Table Of Contents
- 1 Home page
- 2 Registration
- 3. Login
- 4.Create Store
- 5.Seller Dashboard
- 6.Buyer Dashboard
- 7.Buy Now
- 8.Donation
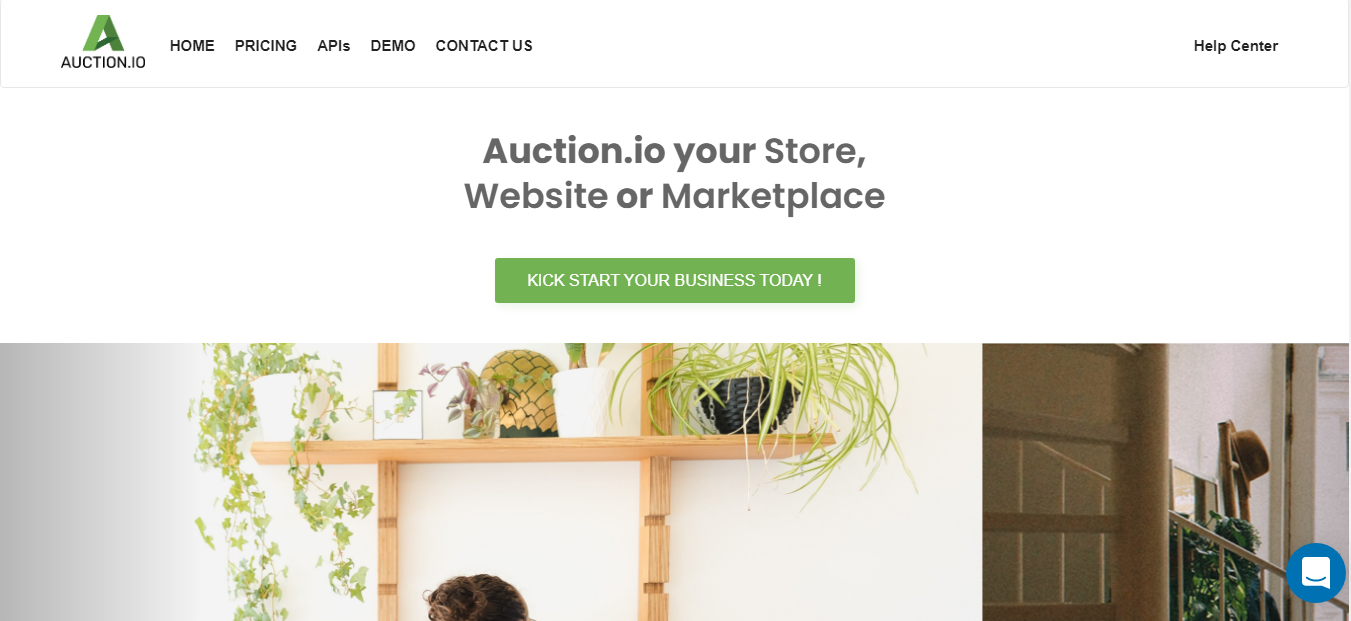
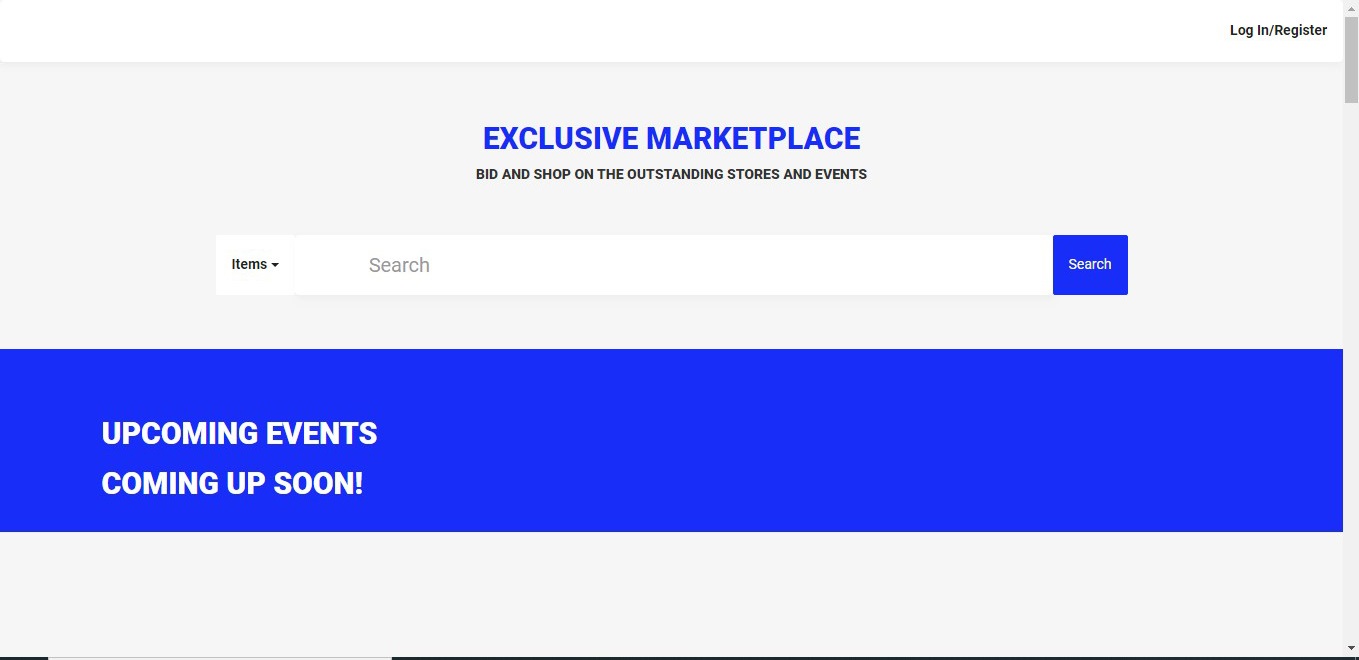
1. Homepage
Home page contains following options,
- Pricing
- Help Center
- Login
- Seller- Registration
- Buyer-
- Training
- Portfolio
- Blog
- Services
- Privacy Policy
1.1 Static Pages


2. Registration
Seller Registration- Sellers can act as both, sellers and buyers, i.e. they can sell as well as buy products. Sellers can directly register and log in to the site.
Buyer Registration- By registering as a buyer, a user can only buy products. A buyer can register only by opening the link shared by a seller.
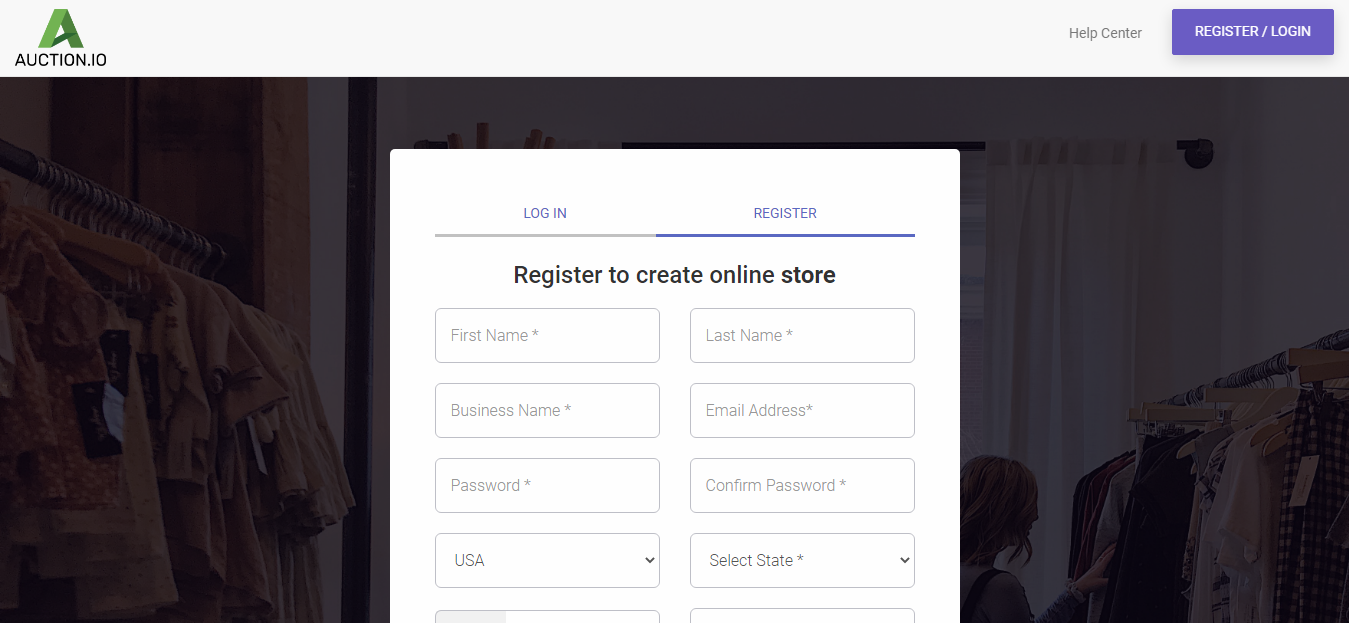
2.1 Seller Registration
Step 1: Click the Register option to navigate to the Select Plan page.
Step 2: Select desired plan and click “Get Started”.

Step 3: Fill in all the details on the Registration page.
- To complete the registration fill all the fields and all fields are mandatory.
Step 4: Click “Register” to receive a mobile verification code
Click “Resend Code ” if you don’t get one in 5 minutes. Enter the code and click on “Confirm Code”.
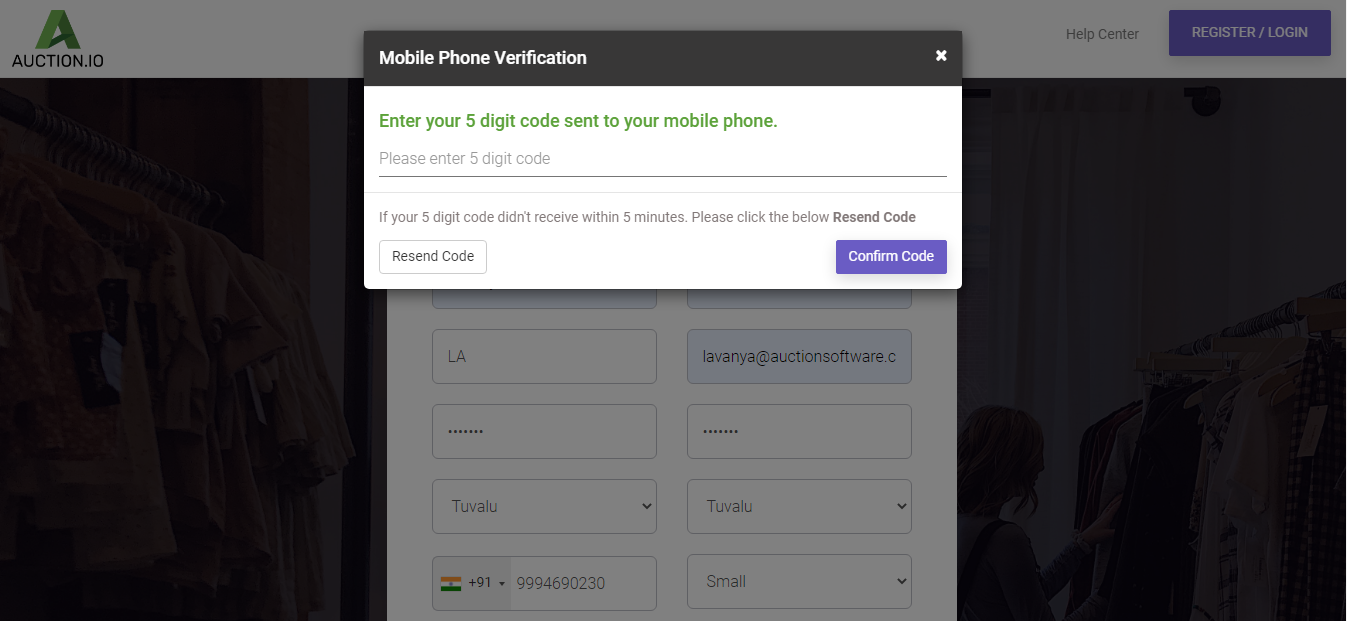
- Please wait 5 mins while we send you the code. If you didn’t get the code, click on “Resend Code”. It will generate another code. Once you receive code, enter the code and click on “Confirm Code”. Your account will be verified and please check the email id that you gave during registration for account activation.

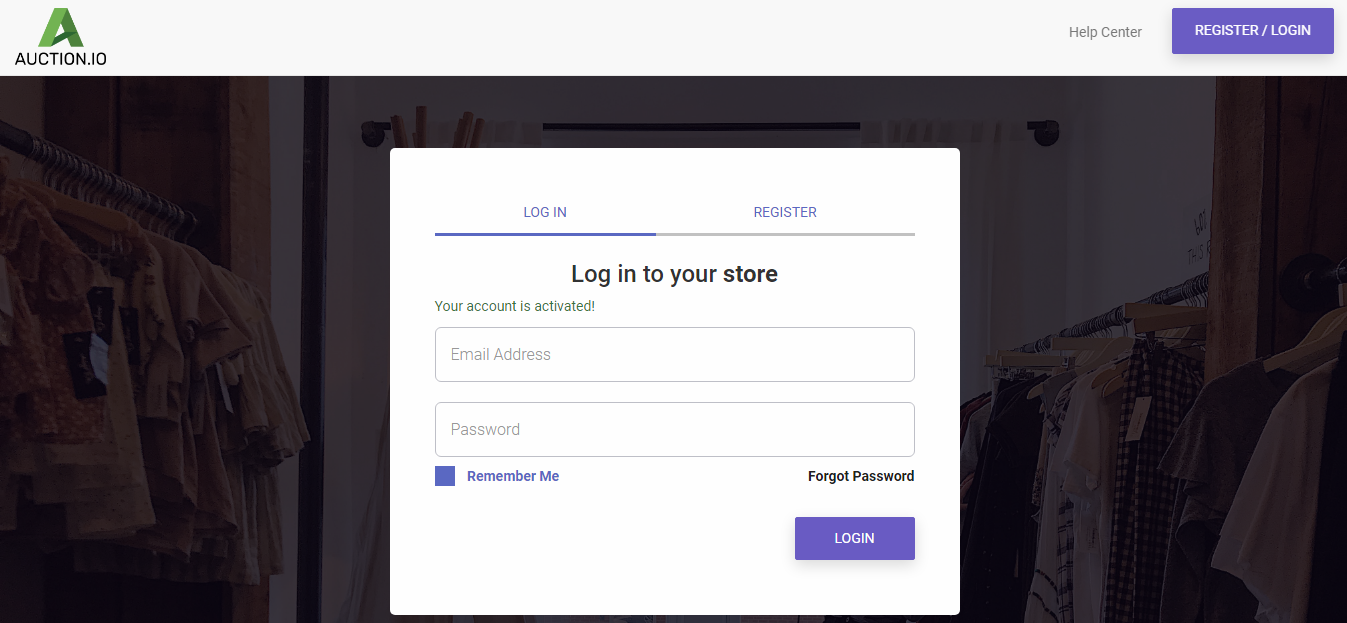
Step 5: Check registered email for account activation. Clicking the activation link will redirect you to the login page.

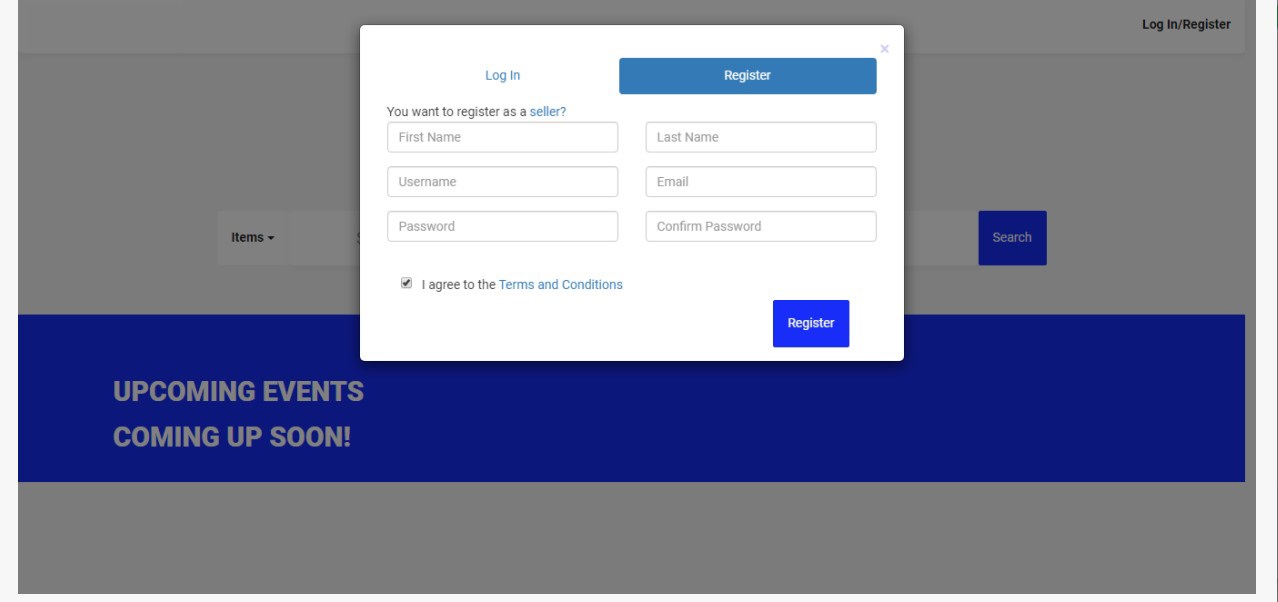
2.2 Buyer Registration
- Buyer registration is enabled via a link shared by a seller. Users can register as either a buyer (can only buy products) or a seller (can sell or buy products).
- Opening the URL the buyer can login or register.
- Here we can register as seller or buyer.
- Seller can both sell and buy product, whereas buyer can only buy products
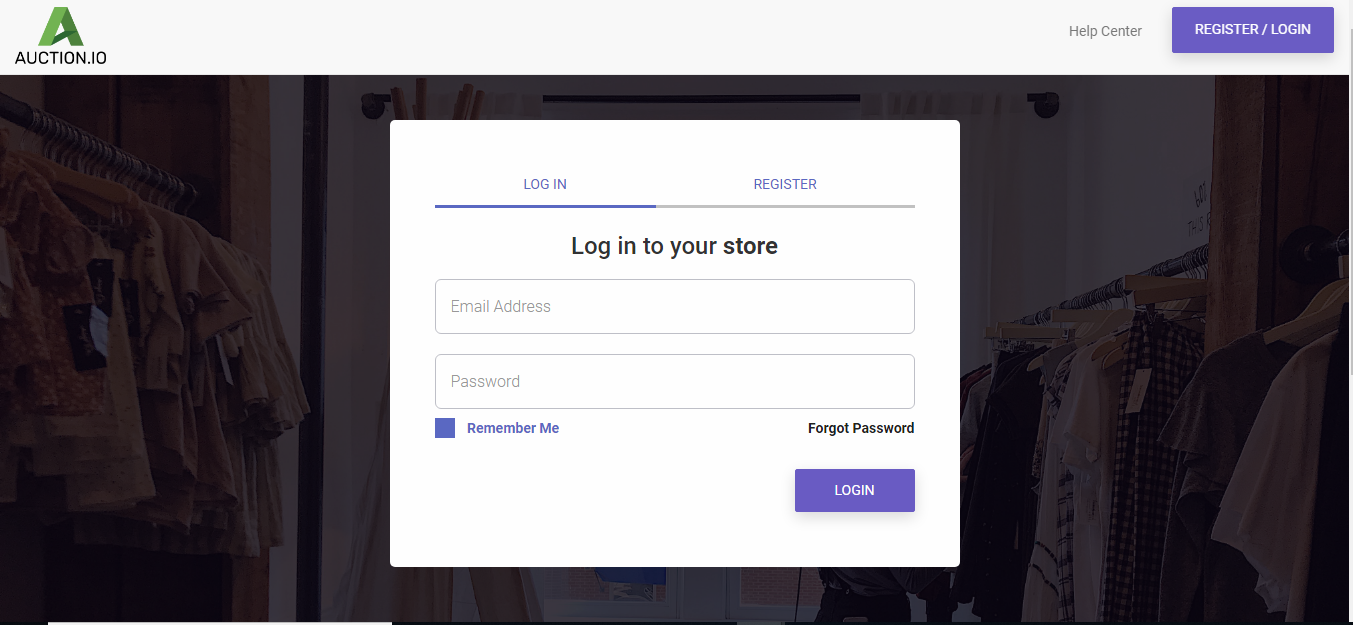
3. Login
- Log in using the registered email and password.

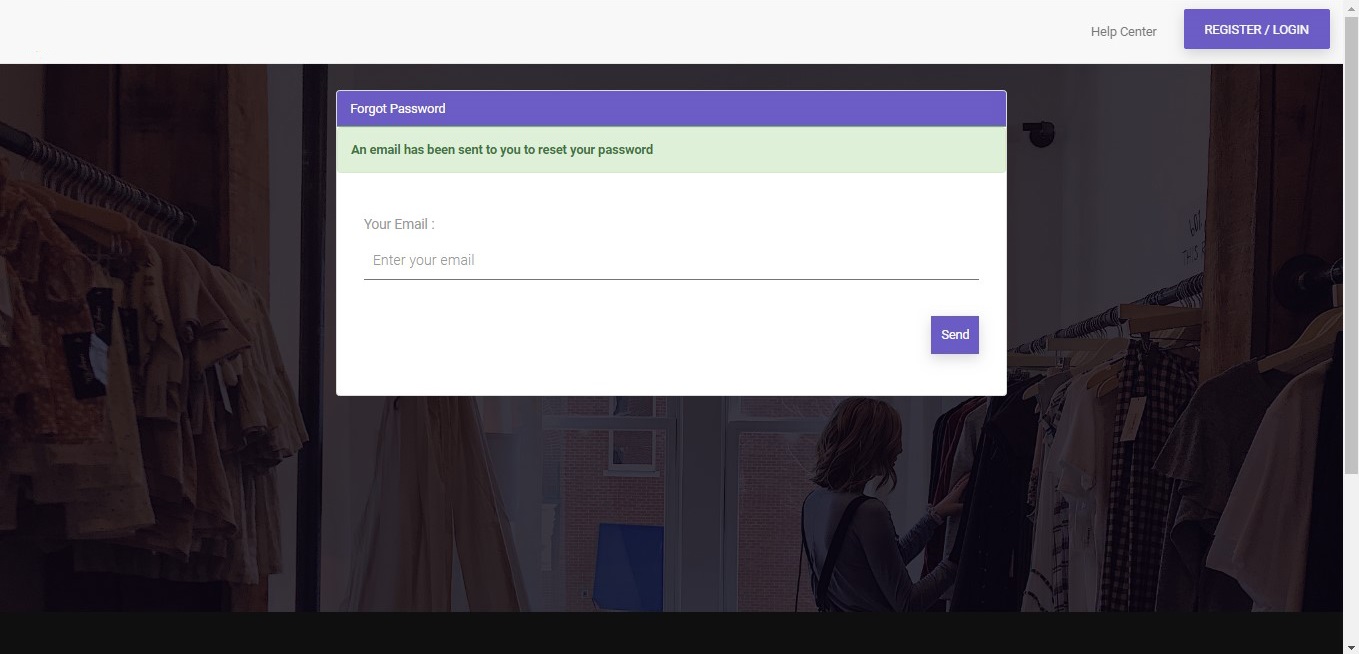
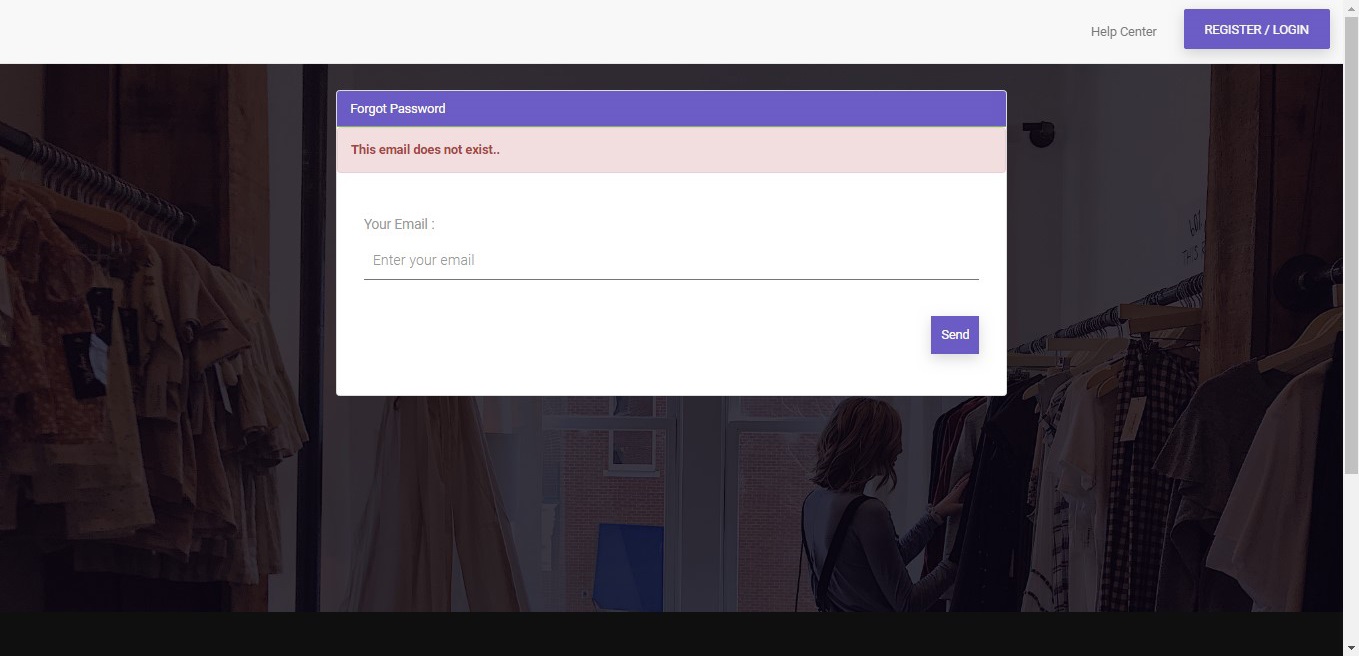
3.1 Forgot Password
- “Forgot Password” can be used to recover forgotten passwords by entering the registered email address.
-
- A password reset email is sent and confirmation is displayed.
- Entering an unregistered email address will give an error.
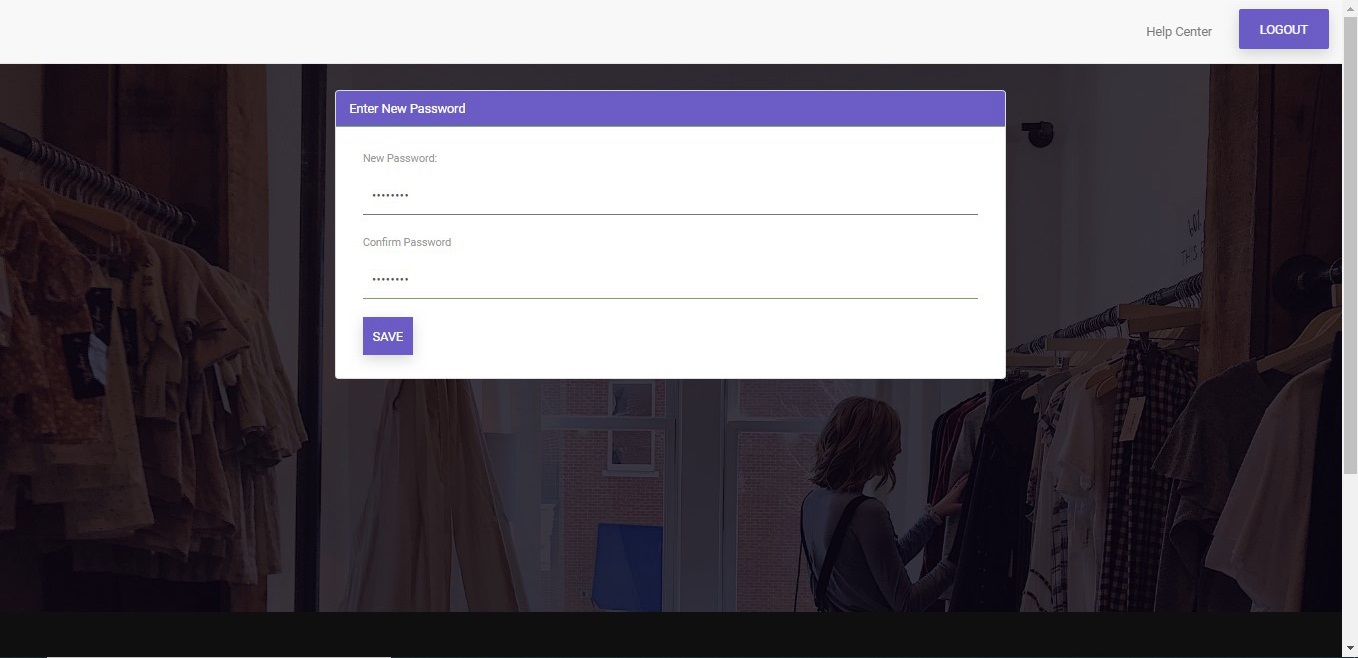
3.2 Reset Password
- The reset password link allows users to enter their new password, confirm the new password and click on “Save”.
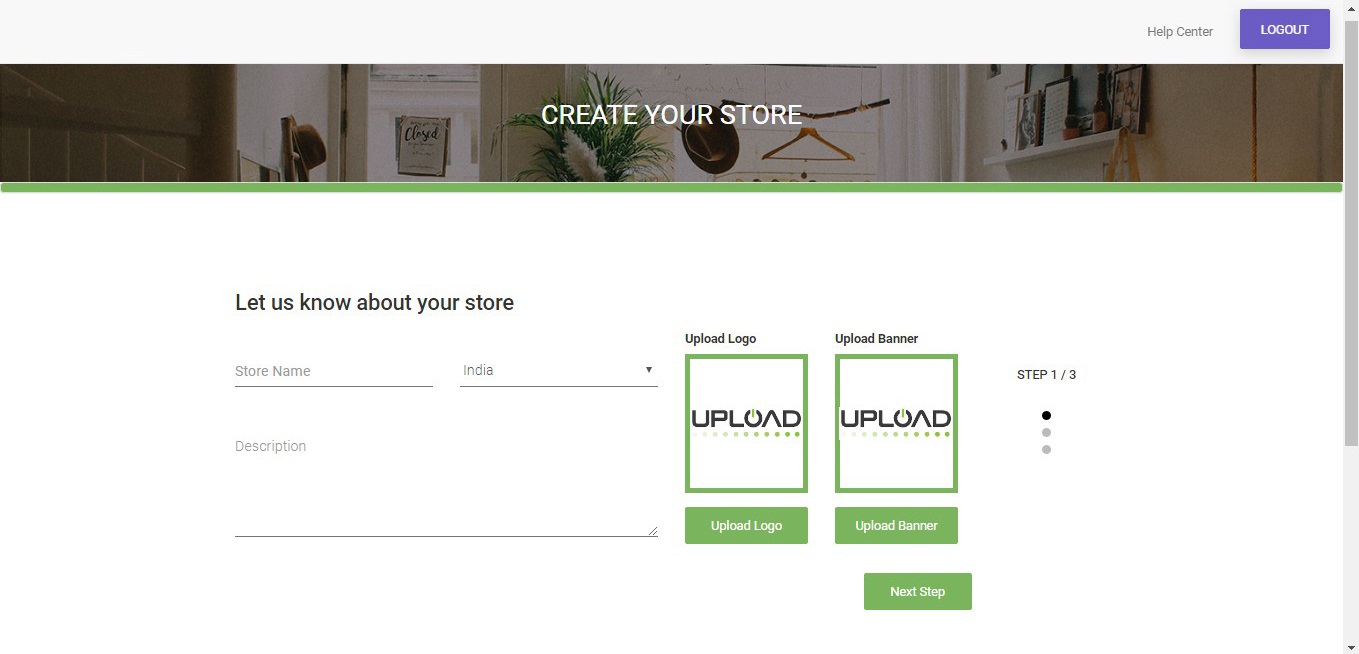
4. Create Store
Step 1:Fill in the following details and click on “Next Step”.
- Store Name
- Country
- Description
- Upload Logo
- Upload store banner
After filling all the fields click “Next step”, it will navigate to Address page.
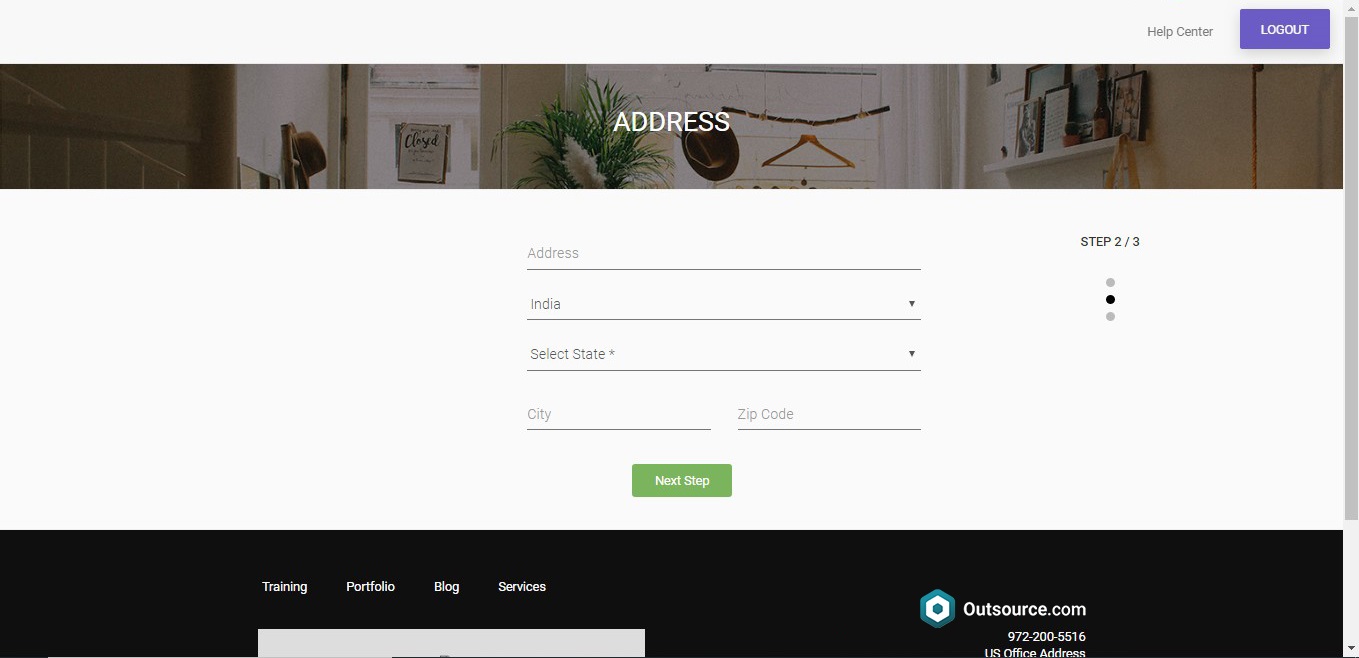
Step 2: Address
- Fill the address fields and click on “Next Step”.
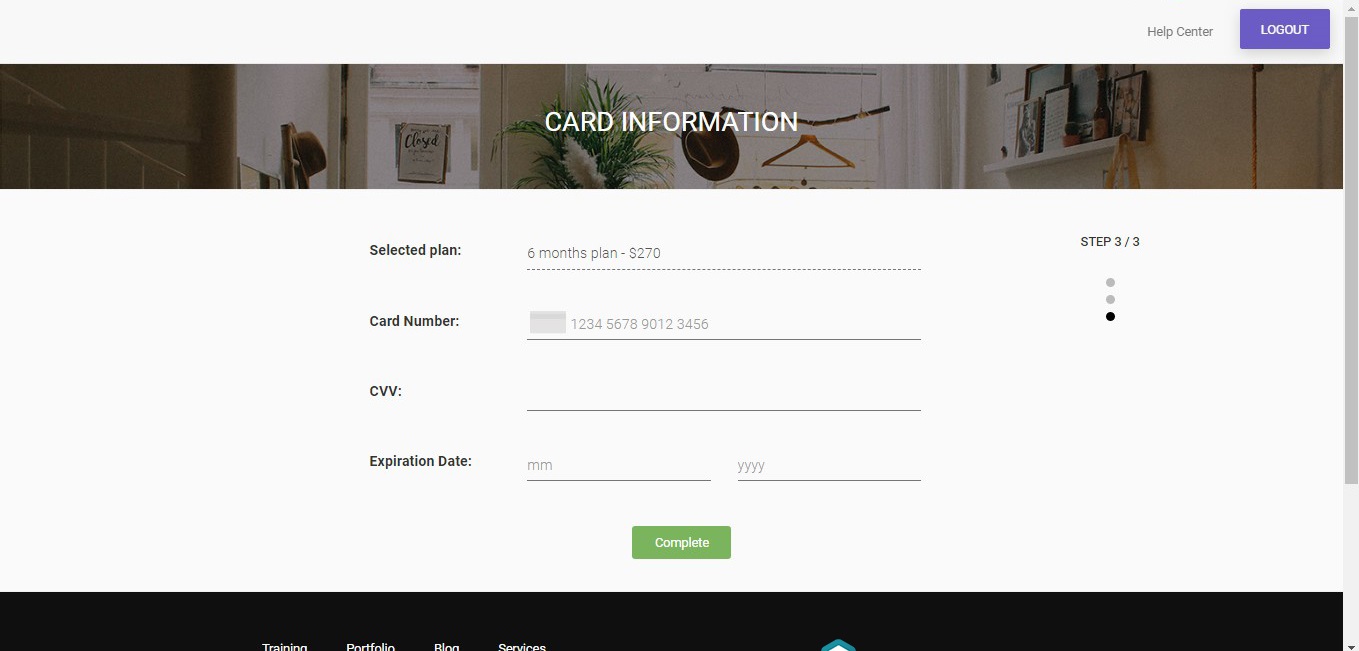
Step 3: Card Information
- This page shows the selected plan and asks for valid card details. Click on complete to create your store.
5. Seller Dashboard
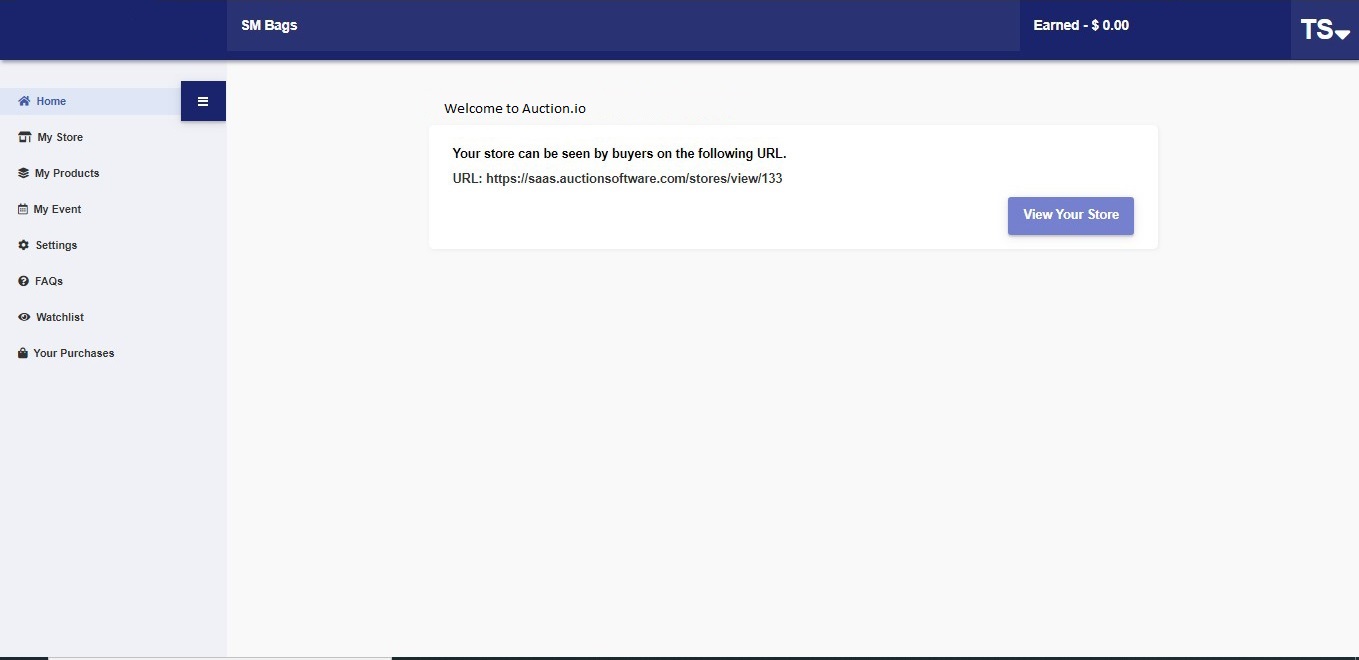
- Once your store is created, you can view it by clicking in the “View Your Store”

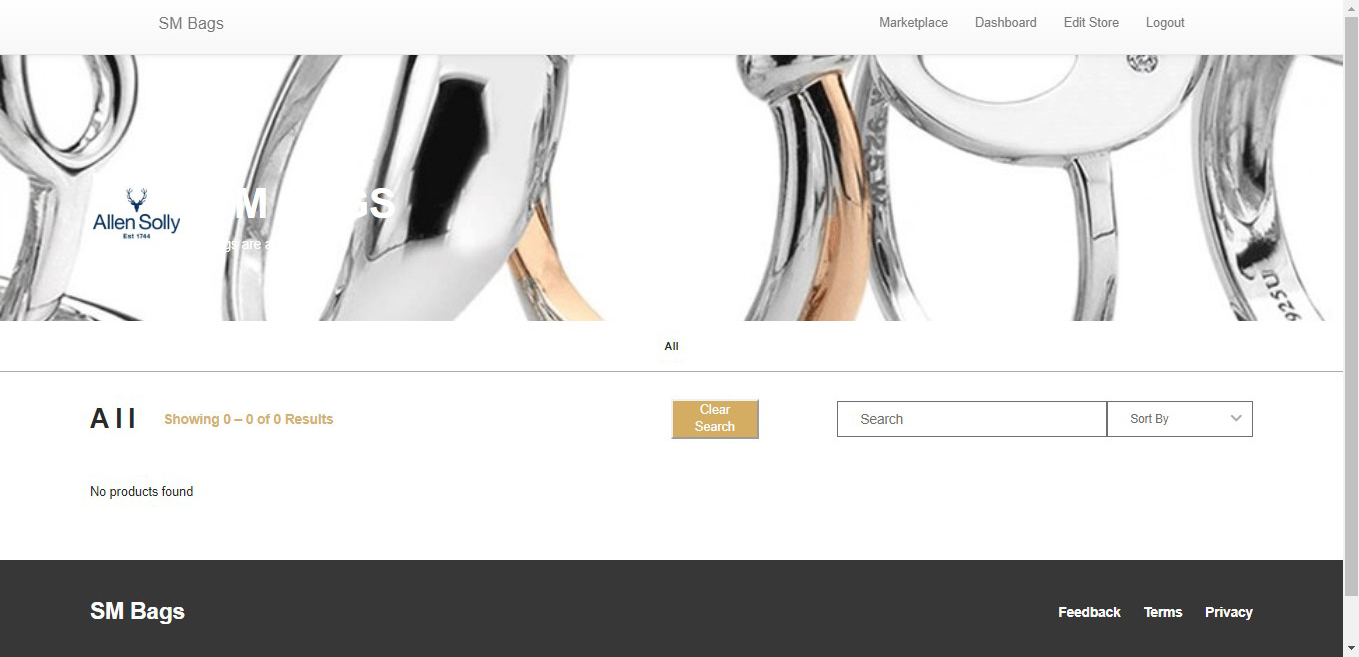
- All your products are displayed here, along with search and sort options are available. This is a sample of how your store looks.
5.1 My Store
Store is a collection of multiple products, where the buyer can purchase and buy products.
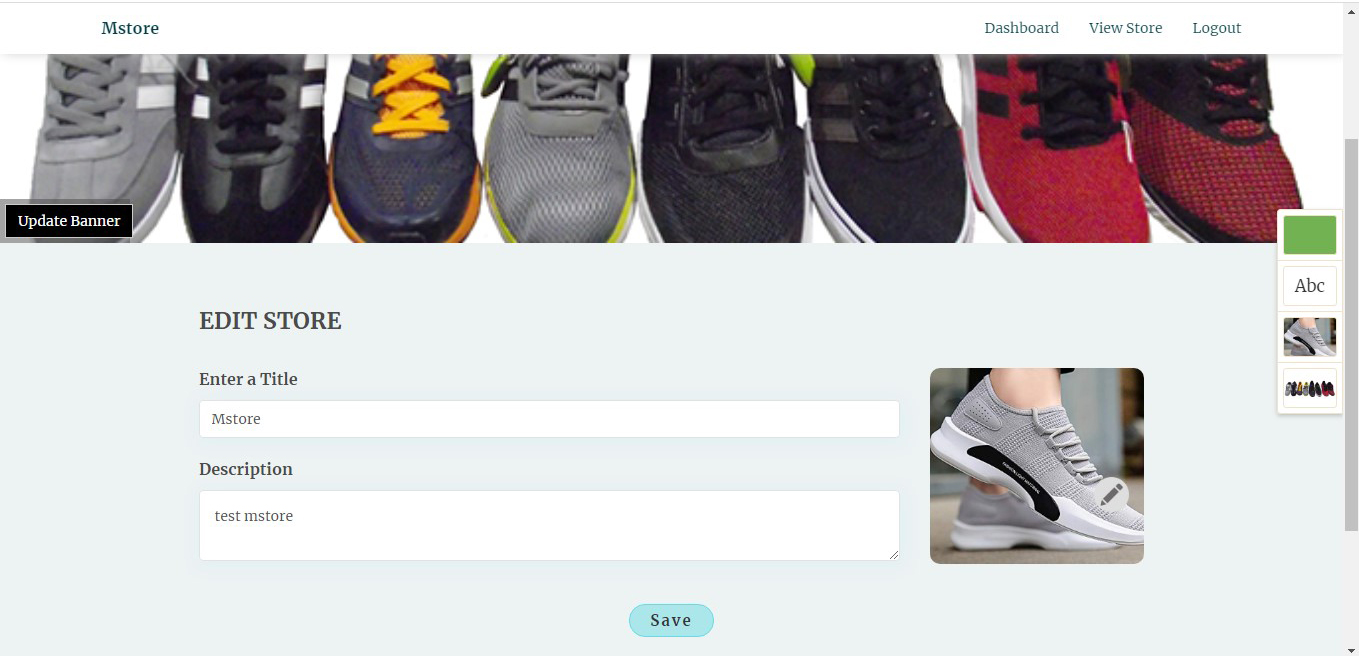
5.1.1 Edit store
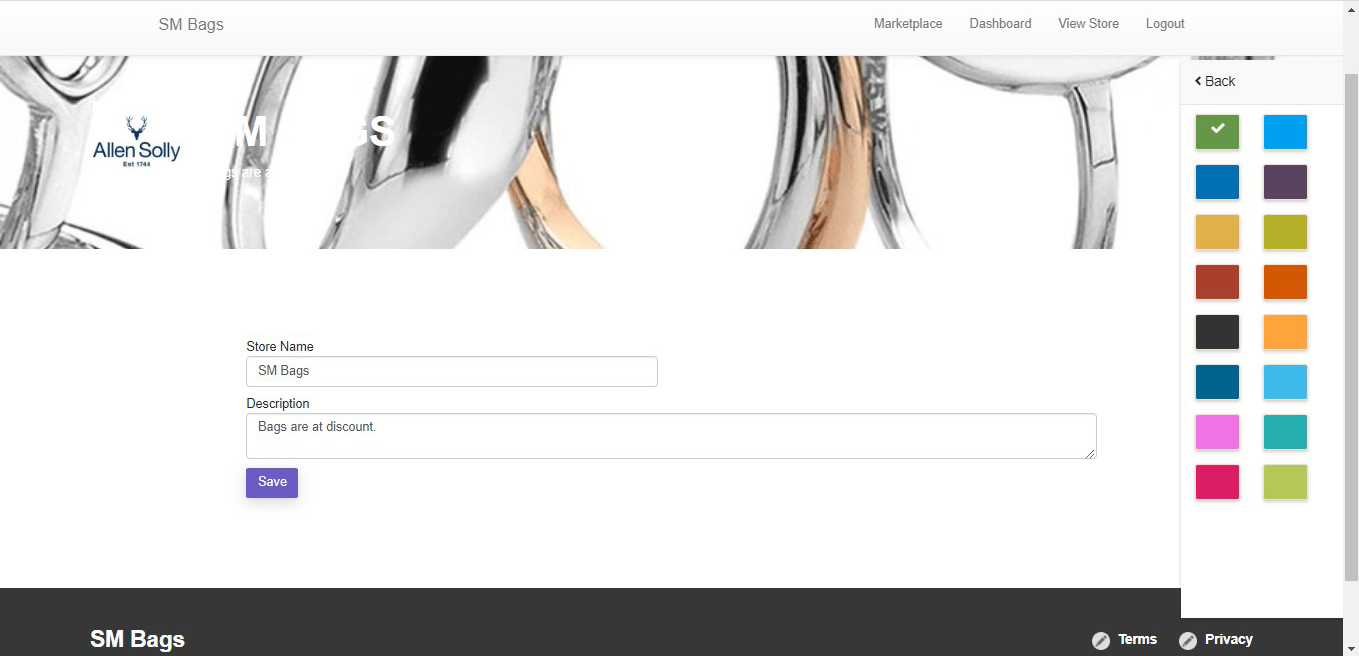
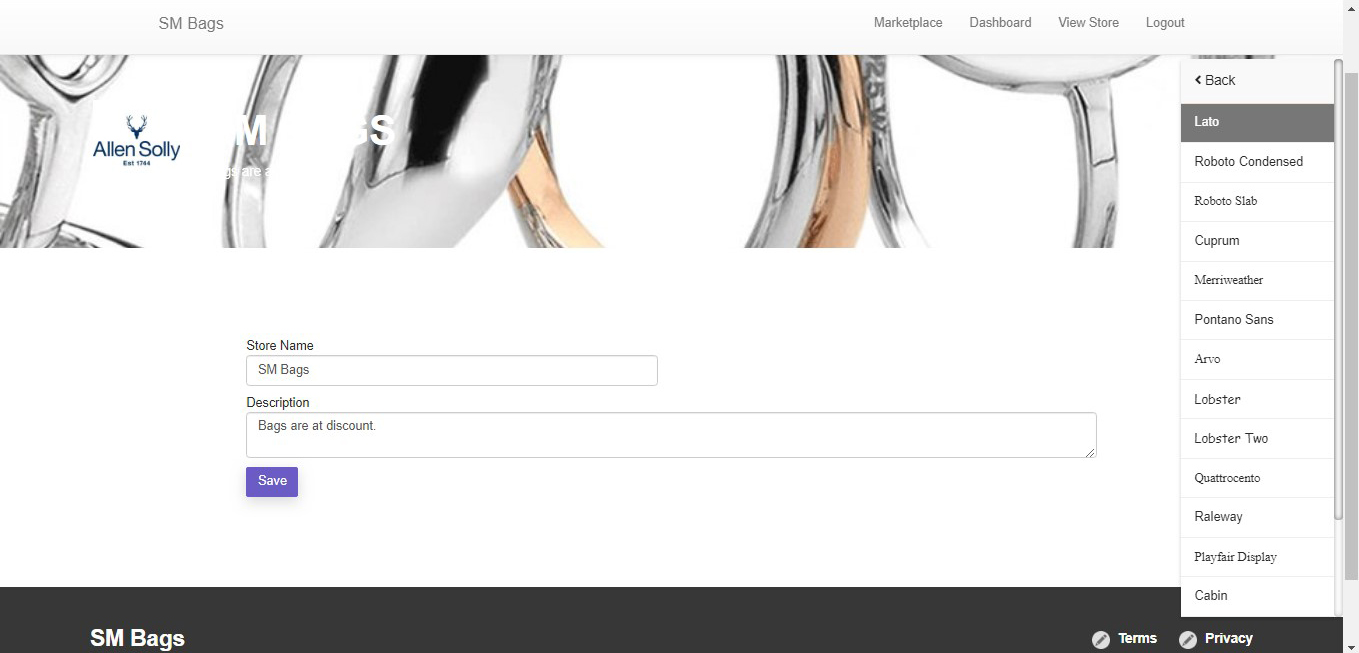
- All details of the store can be updated here - name, description, color, text, logo and banner.
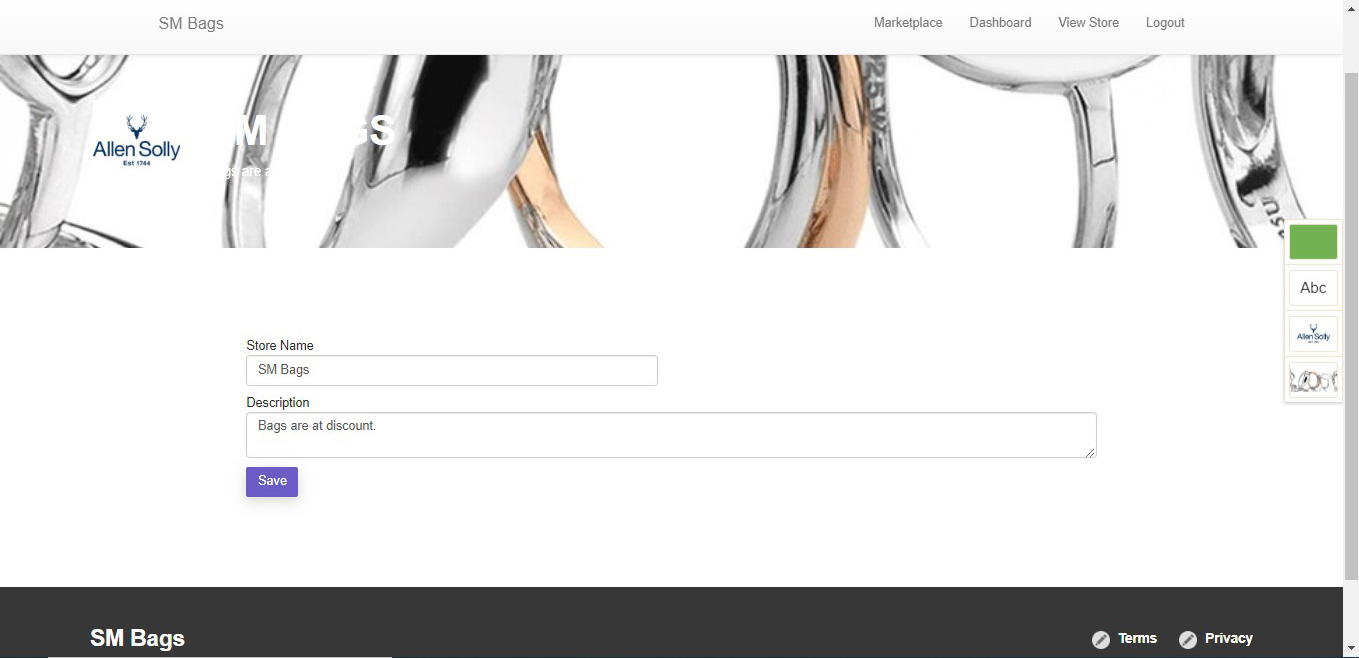
Color - Choose a color from the palette.
Text - Select the desired font from the list.
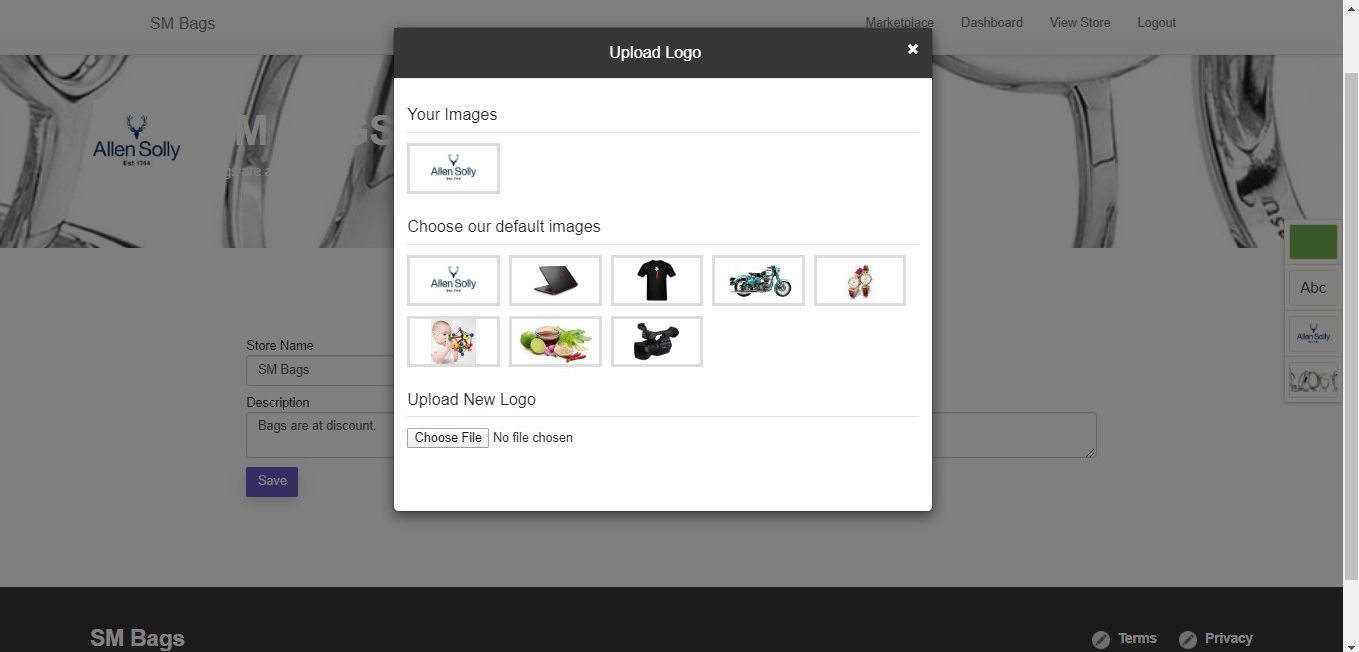
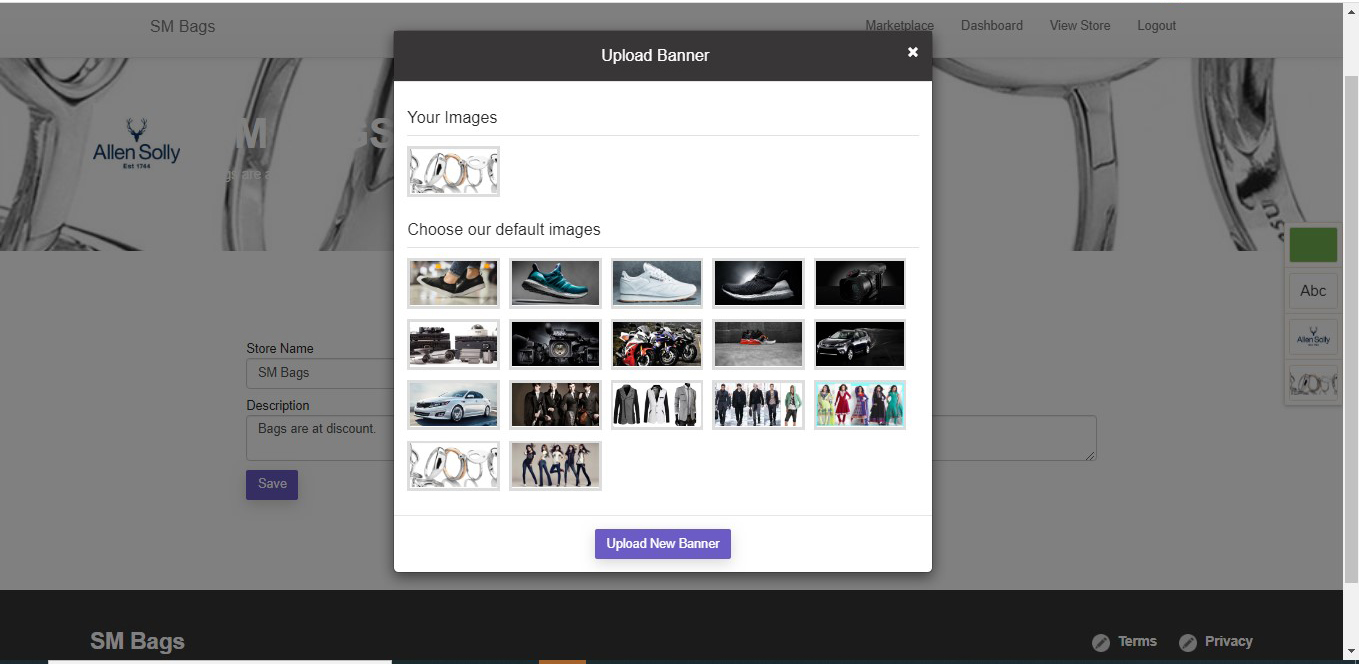
Update Logo- Users can choose one of the default logos or upload their own.
Upload Banner- Users can choose one of the default banners or upload their own.
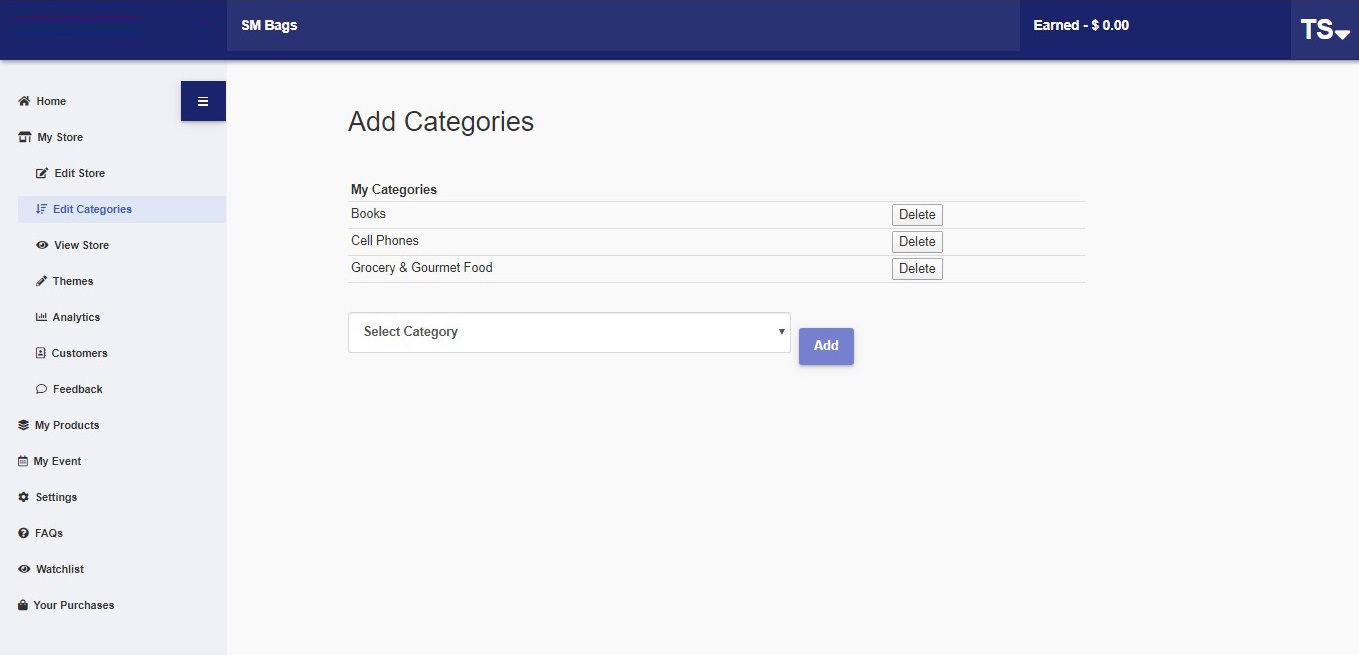
5.1.2 Edit categories
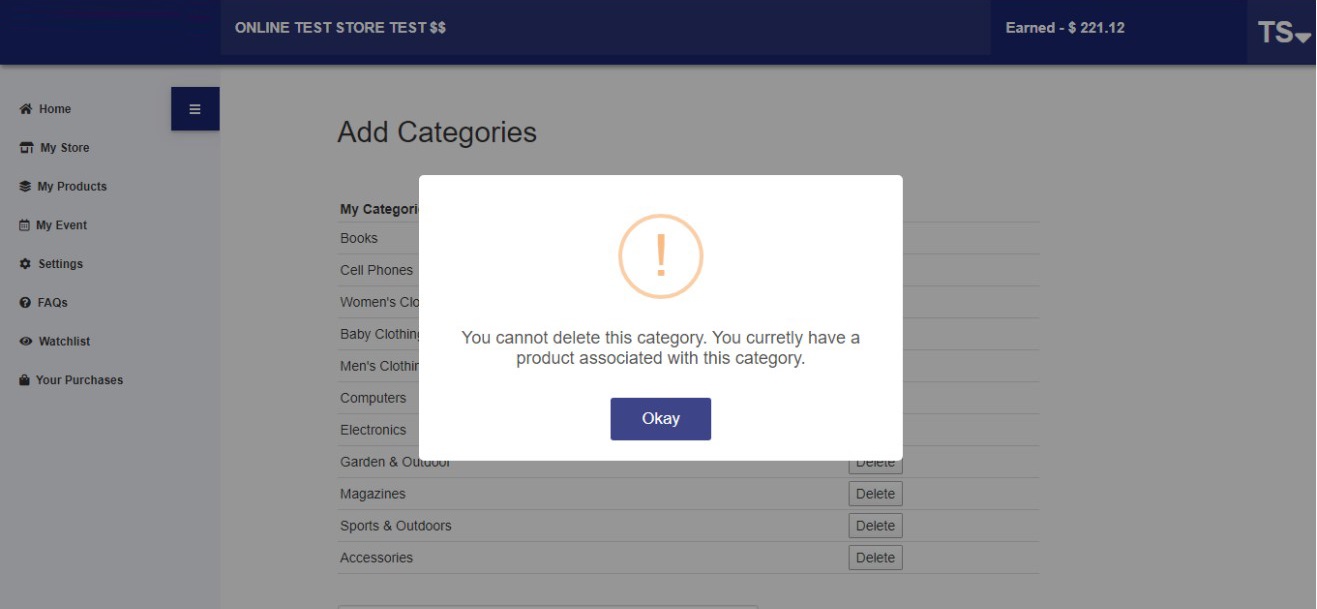
- Here you can easily add and delete categories for products.
However, if products are currently in a category, it cannot be deleted. A warning will pop up.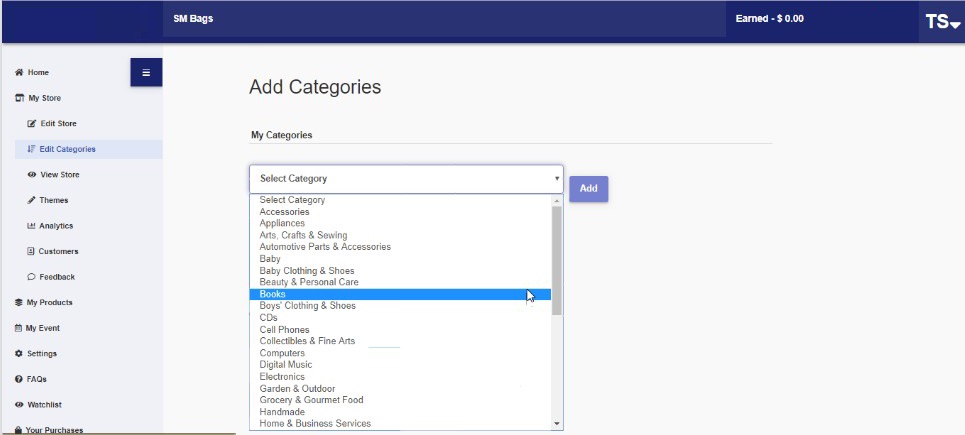
- Clicking on the delete button the particular category will be deleted.
- If we have already posted products in that category we can’t delete that category. Warning popup will be displayed.
-
5.1.3 View store
- All listed products can be seen here with search and sort options from the buyers’ point of view.
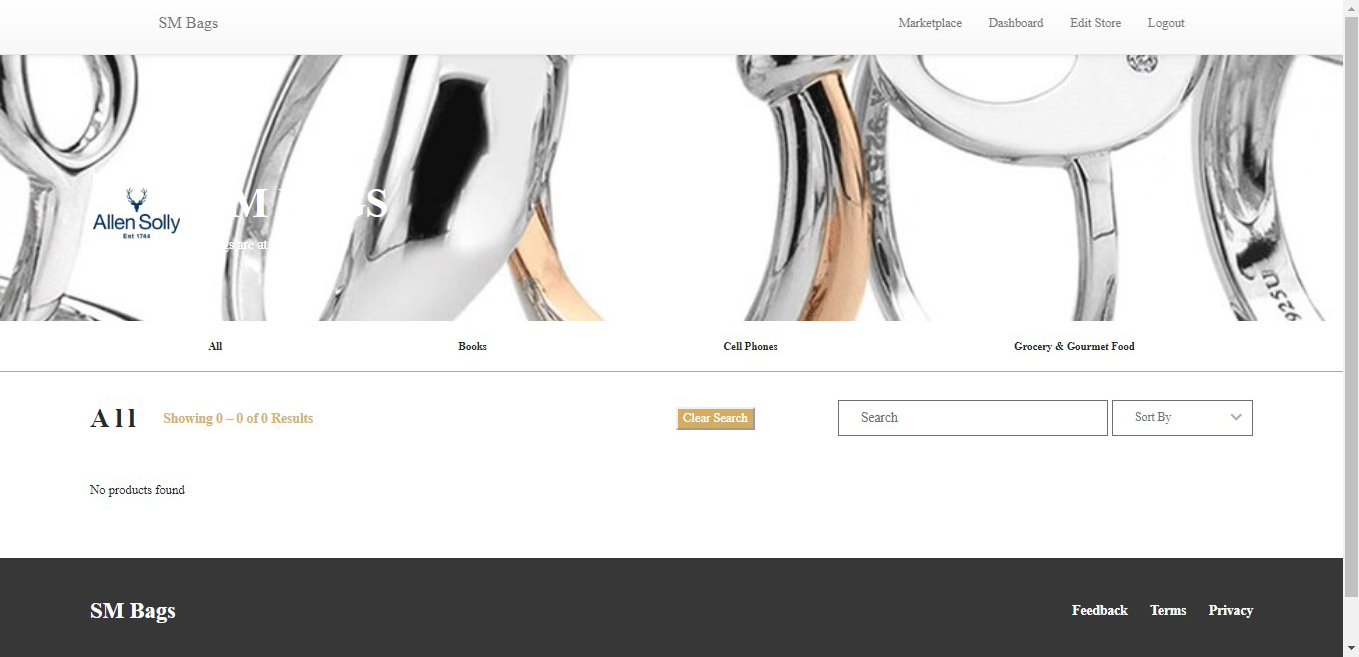
- All listed products can be seen here with search and sort options from the buyers’ point of view.
-
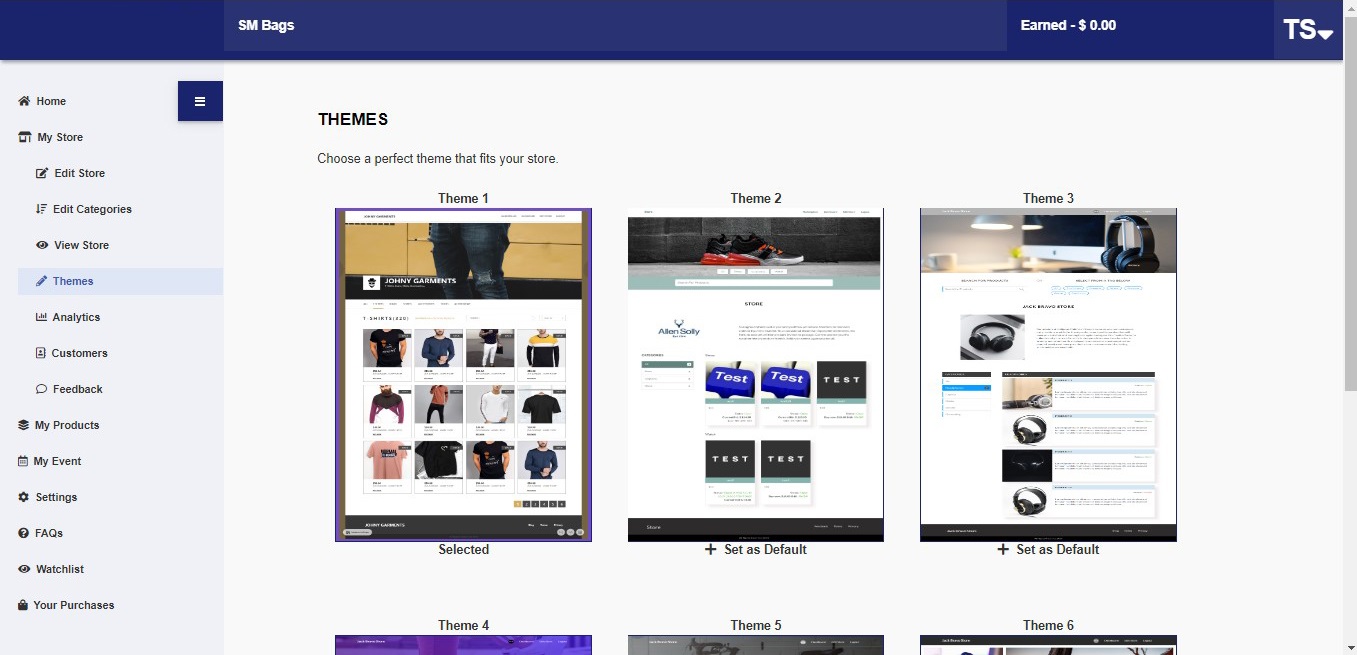
5.1.4 Themes
- Users can select a theme and set it as default for their store. “Set as default”
5.1.5 Analytics
Users can view useful analytics of their shop, including:- Total Sales
- Total Online store visits
- Repeat customers
- Product purchase
- Average cost per customer
- Analytics can be displayed for desired time periods.
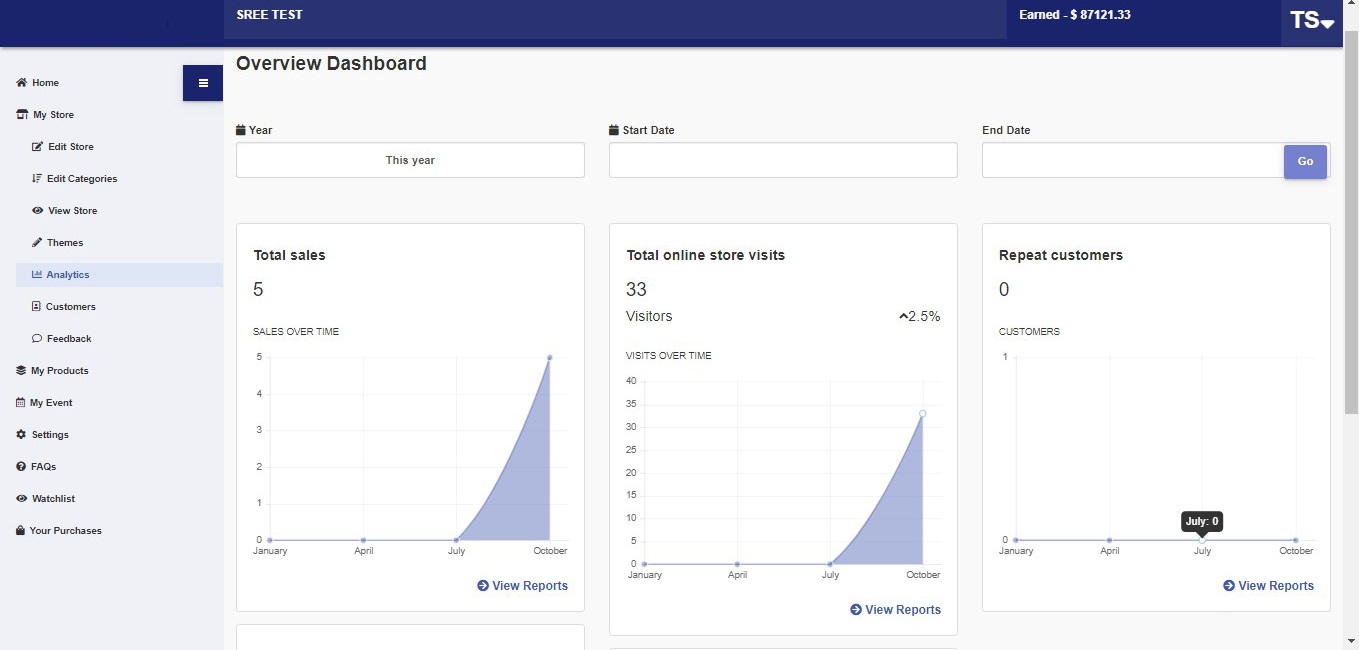
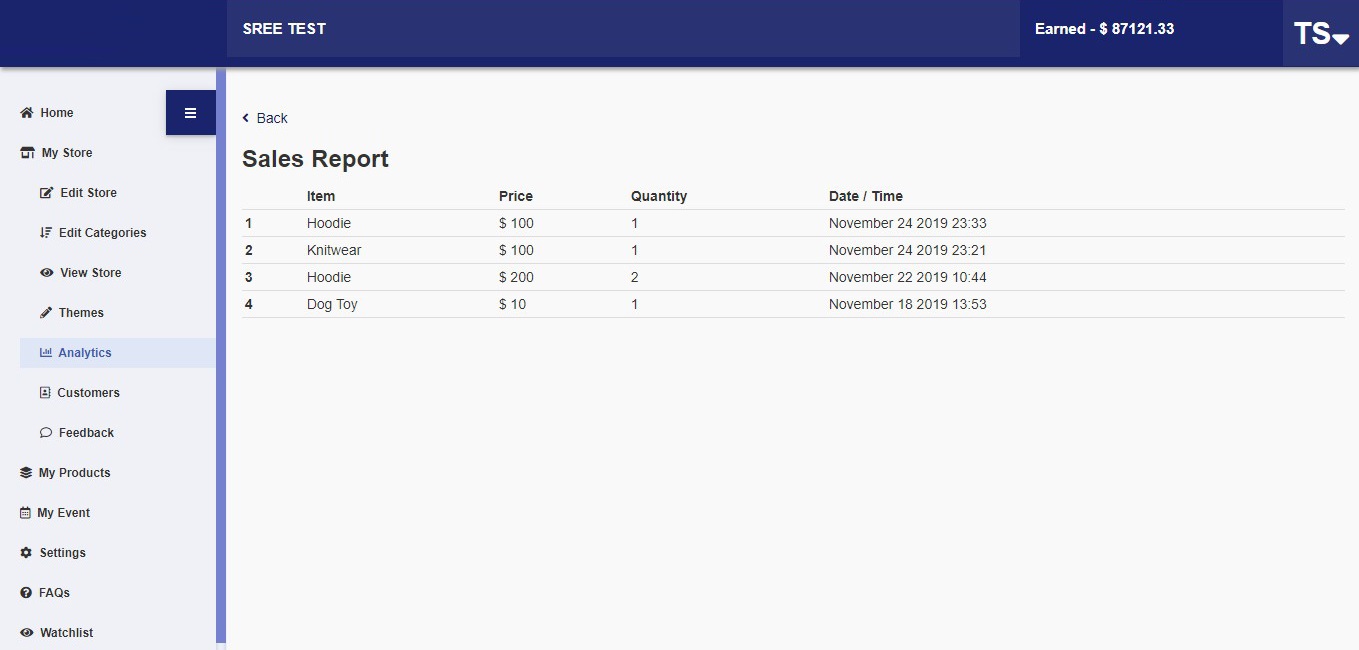
- “View Reports” displays the respective analytical report.
5.1.6 Customers
Here you can analyze past customers and their purchases as well as your customer list.
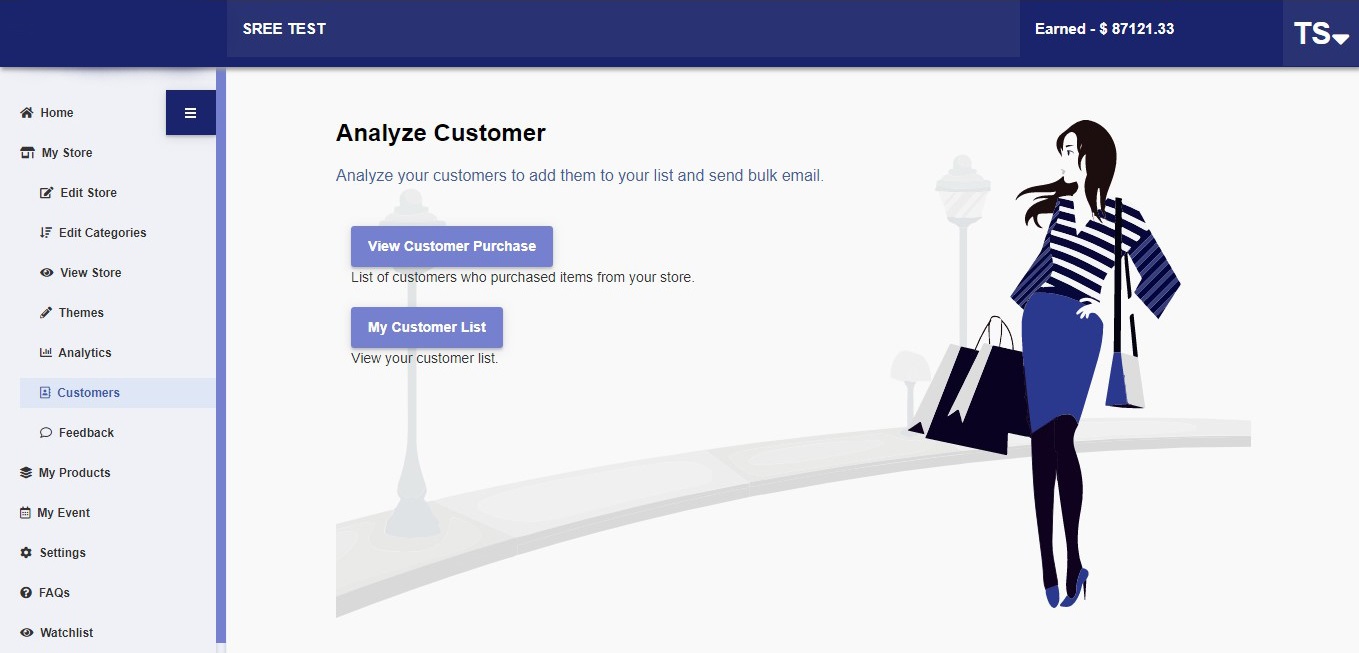
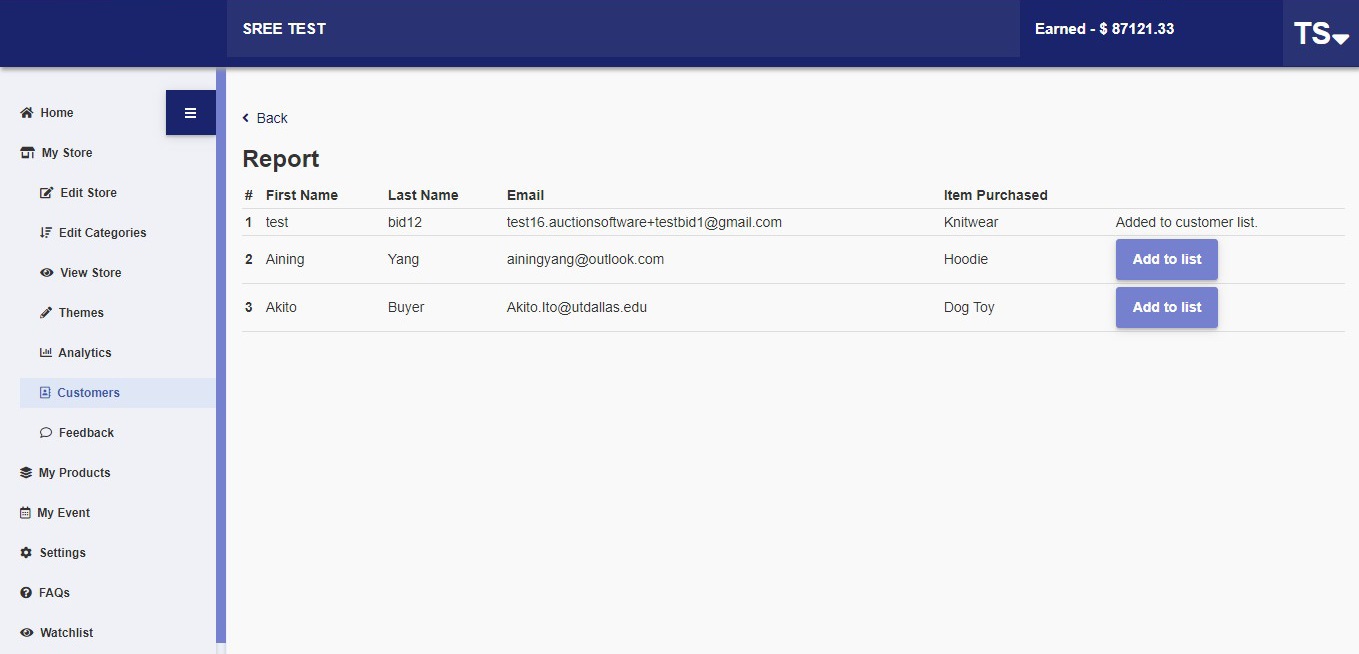
View Customer Purchase
- This displays the list of customers who purchased from the shop, their email addresses and the items they purchased along with an option to add them to your customer list.
- By clicking on “Add to list” we can add that customer to your customer list.
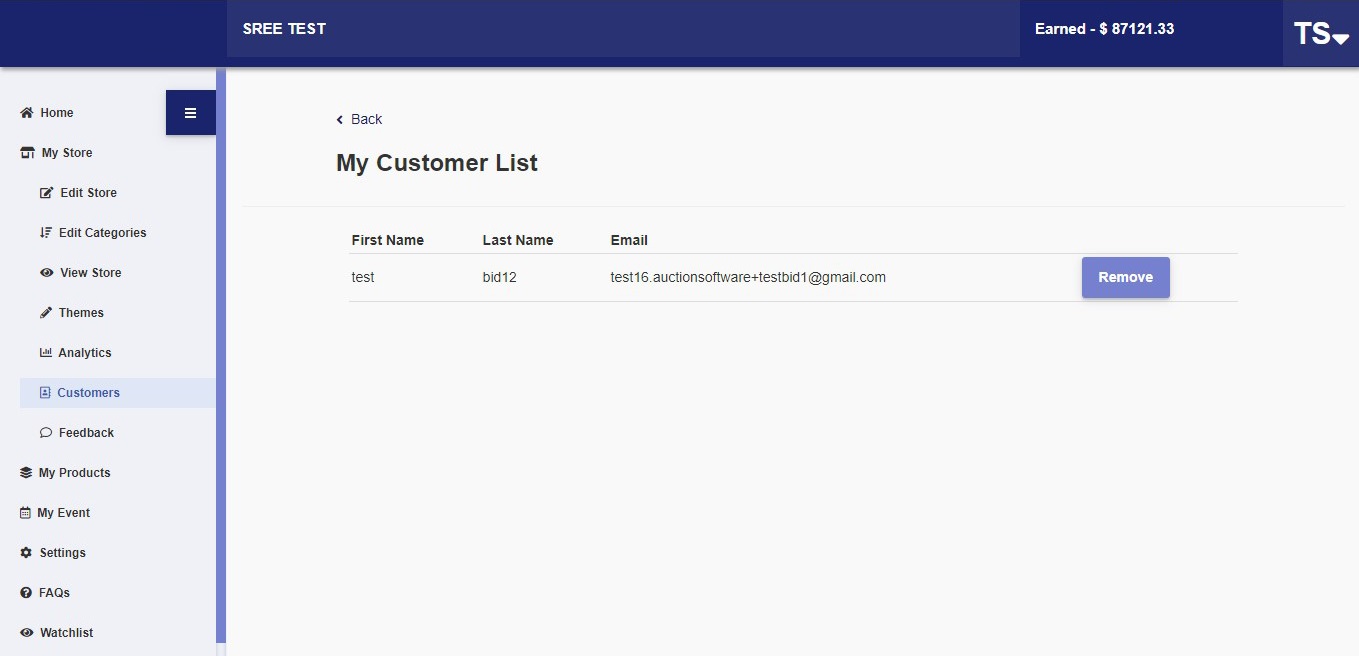
My Customer List
- Customers who are added to the customer list will be displayed here.
5.1.7 Feedback
- This displays the feedback given by customers.
5.2 My Products
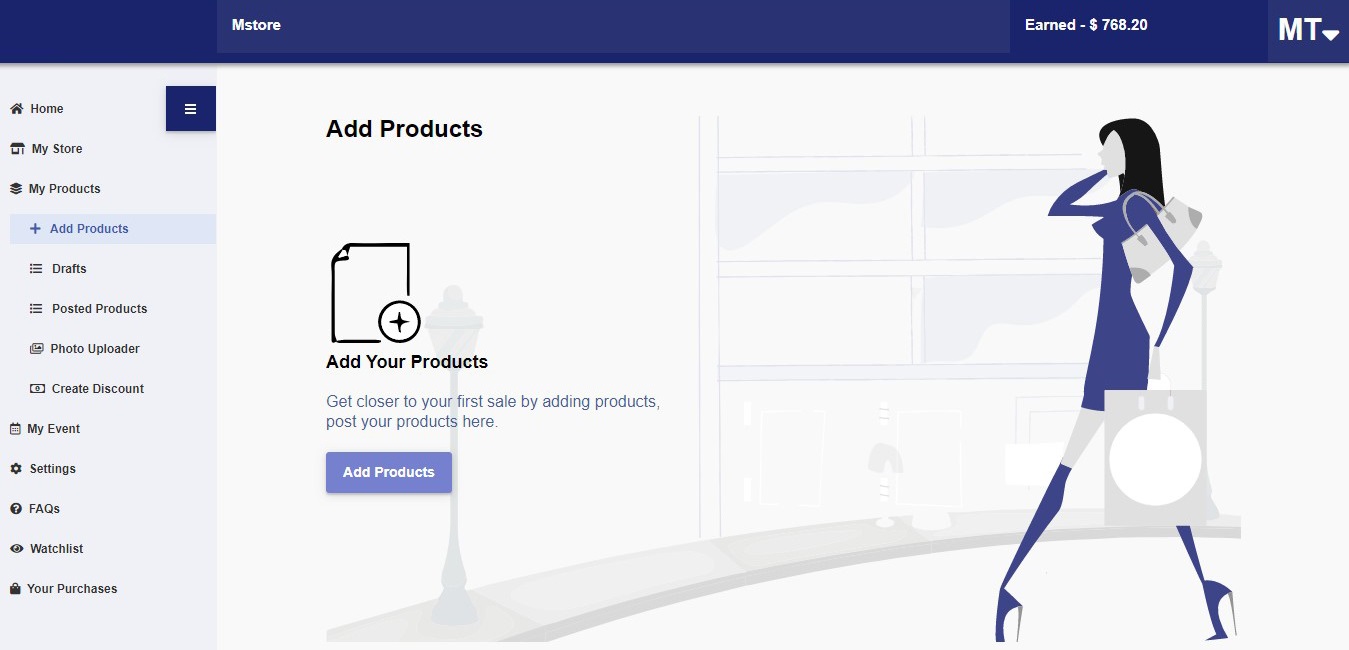
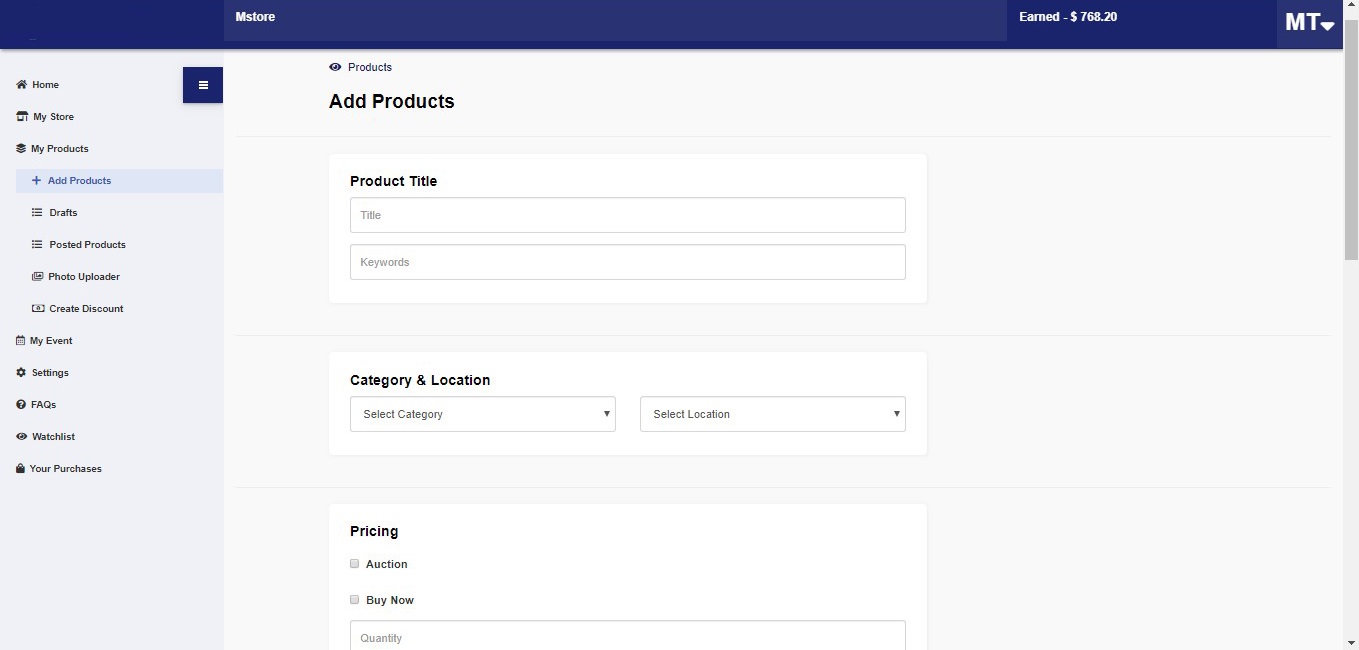
5.2.1 Add Products
- To add product to your store click “Add Products”
- Asks for start price and reserve price is greater than or equal to the start price.
- Buy Now - Asks for retail price and buy now price (etail price is greater than buy now price)
- Post - The product is listed in the shop
- Save as Draft - Product details are saved for later
- Cancel - All details are cleared
Fill in required details such as Product title, Category & Location, Pricing, Description, Shipping, Image and URL.
Pricing has 2 options:
Products are listed and delisted based on start and end dates.
Shipping has 2 options: Free or Fixed Price.
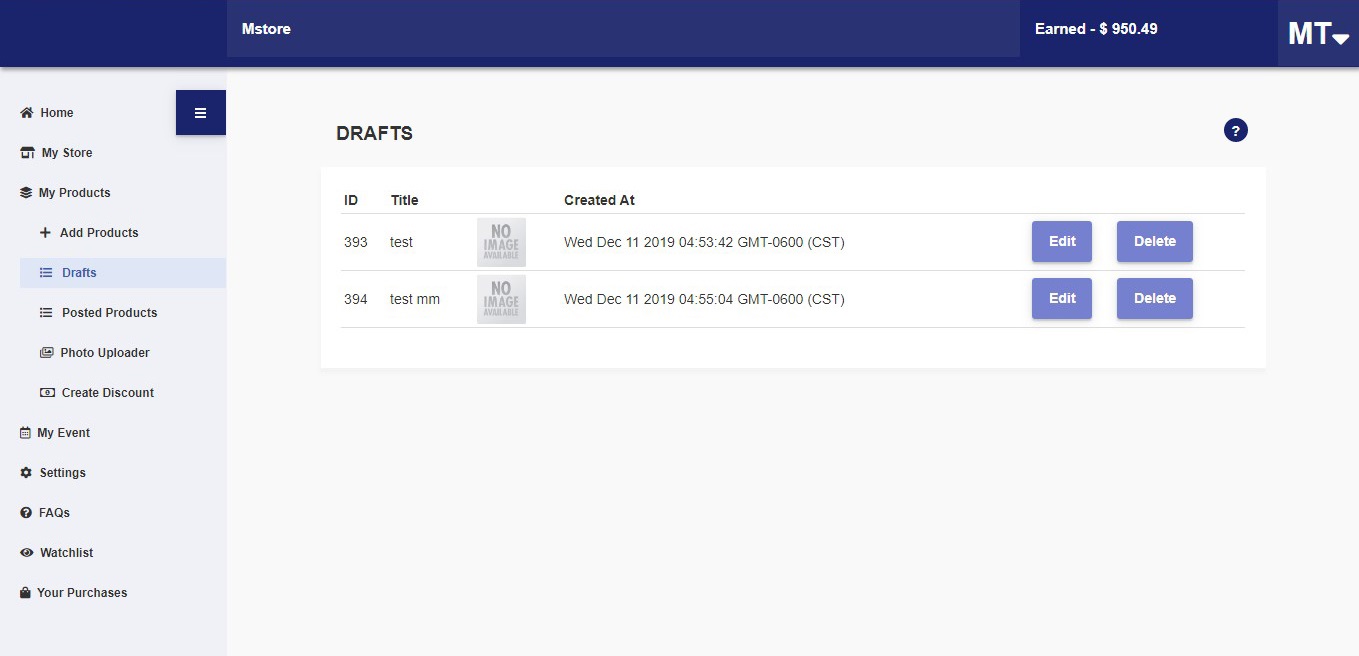
5.2.2 Drafts
- Product details saved as drafts can be edited and listed in the store or deleted.
- By clicking on Edit you can edit and post the product.
- By clicking on Delete you can delete the product from draft.
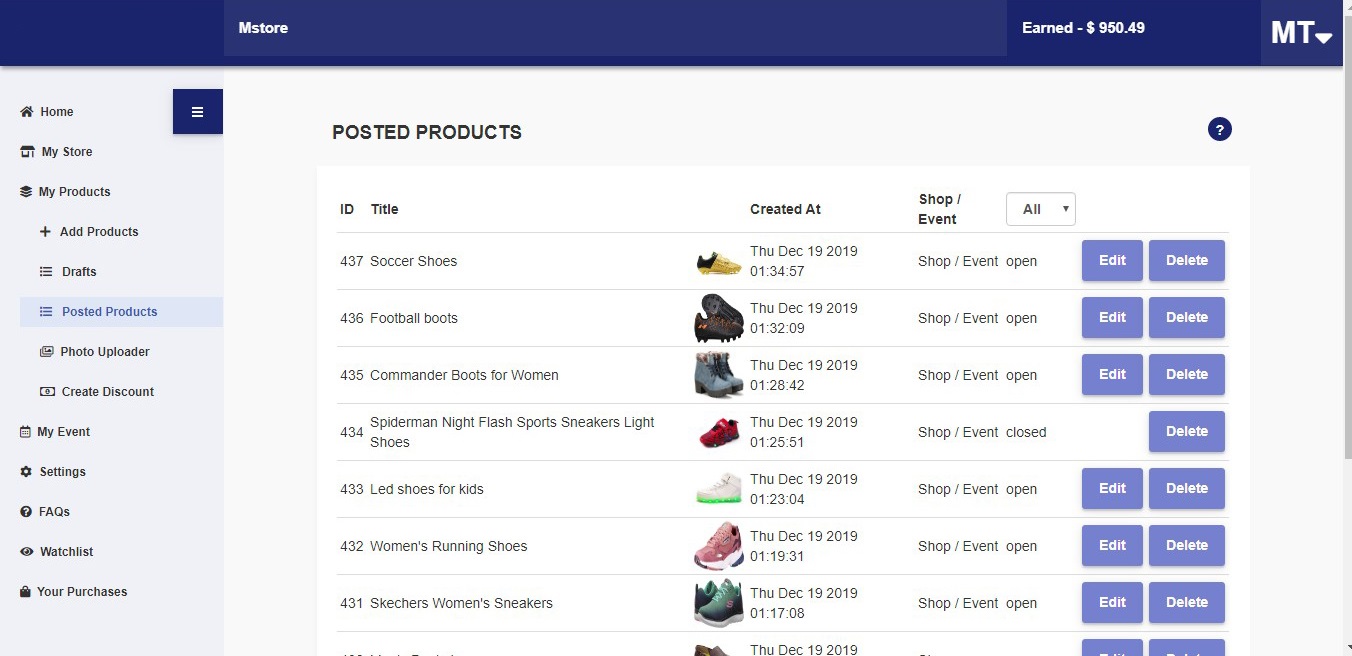
5.2.3 Posted Products
Listed products are shown here, categorized as Open, Sold, Closed or Upcoming.
Product ID, title, image, creation date, shop/event, status, and action are displayed. Users can sort products as All, Open, Sold or Closed.
- You can see all the products posted. It includes Open, Sold, Closed, Upcoming products.
- It displays Product ID, Title, image, Created date, Shop/Event, Status, and Action.
- You can sort products by All, Open, Sold, Closed.
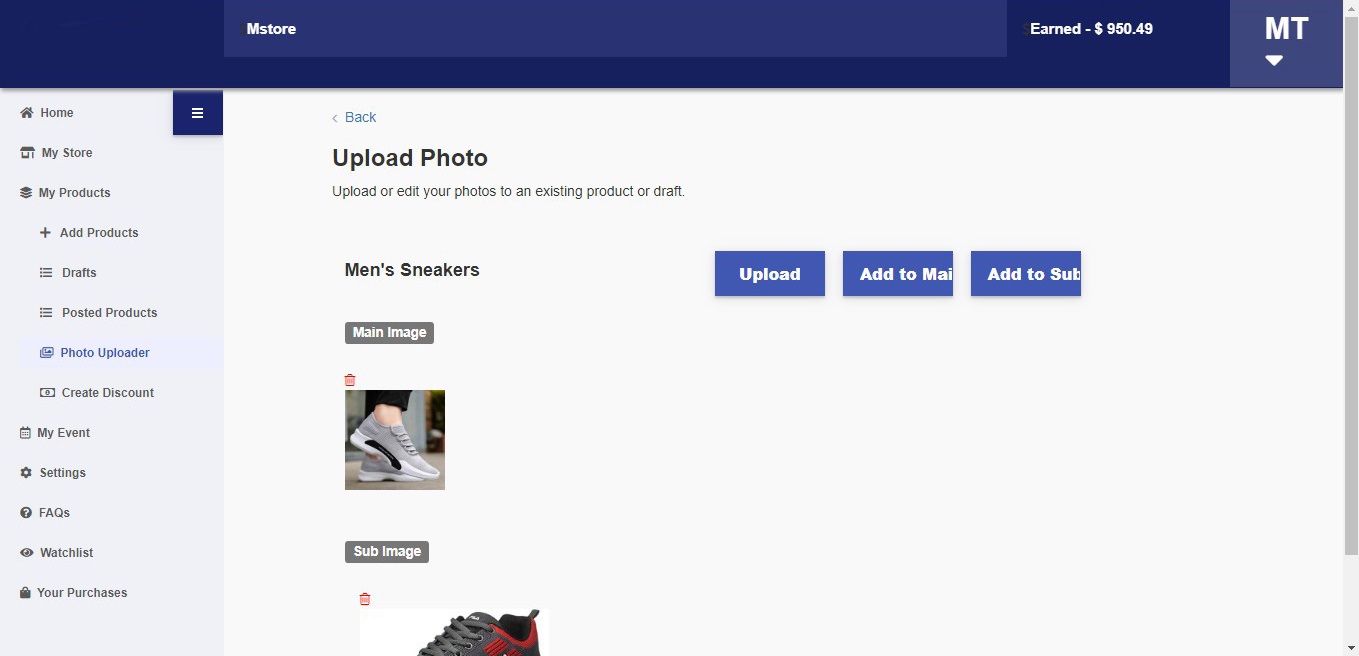
5.2.4 Photo Uploader
- Upload or edit photos for current and new products. Current products can be searched by their ID or name.
- You can search for products by their ID or by name.
- Click on product ID.
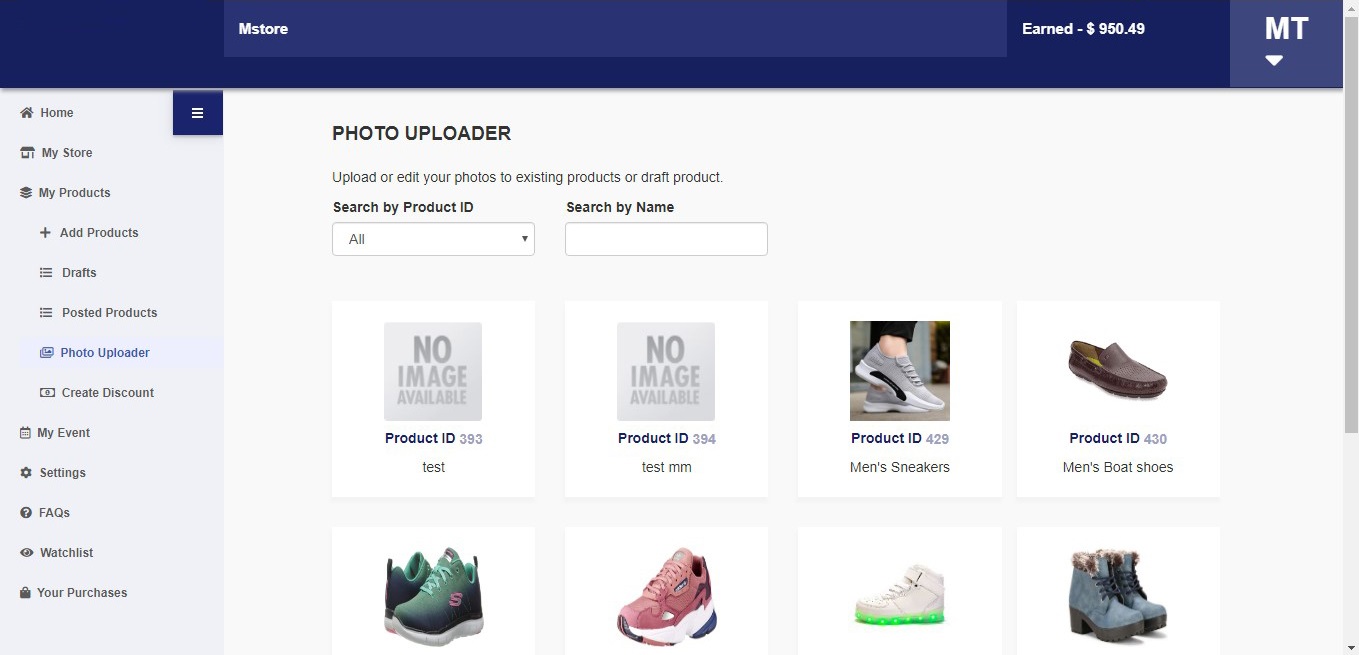
- Click on upload, choose the image from the source and select whether to use it as the main image or a sub image. Delete an image by clicking on the delete icon..
-
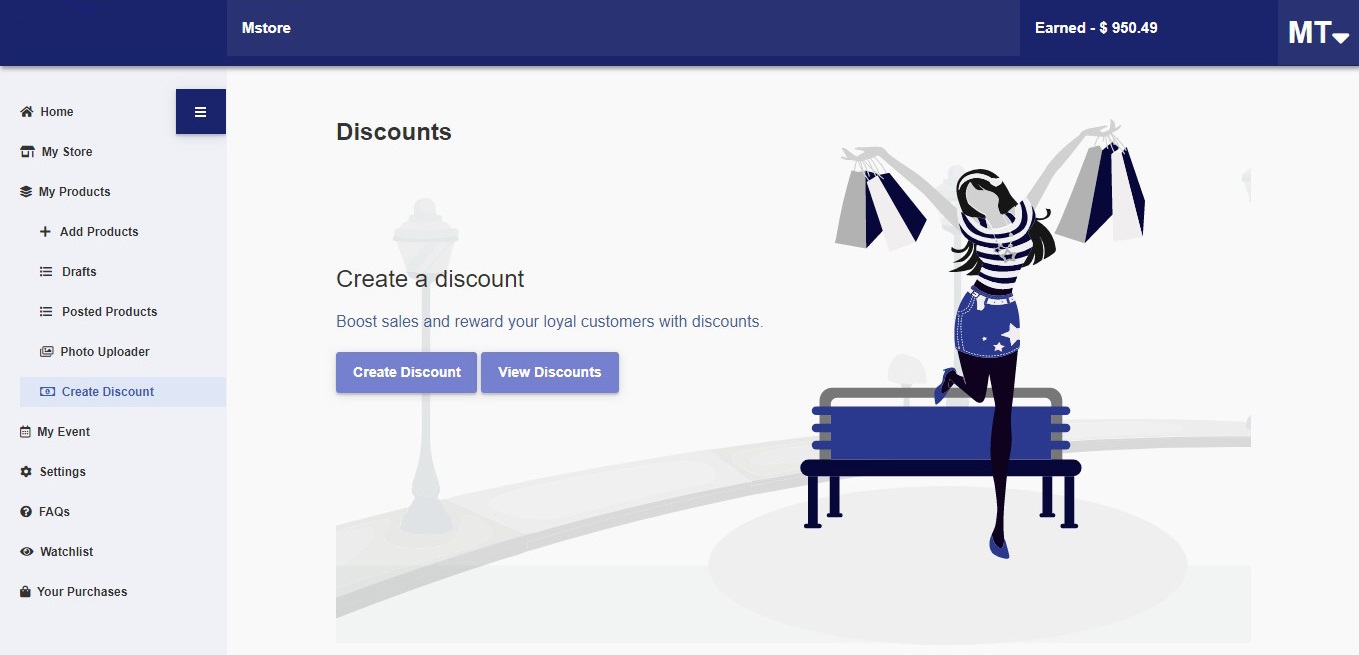
5.2.5 Create Discount
- Discounts can be offered on products using special discount codes.
-
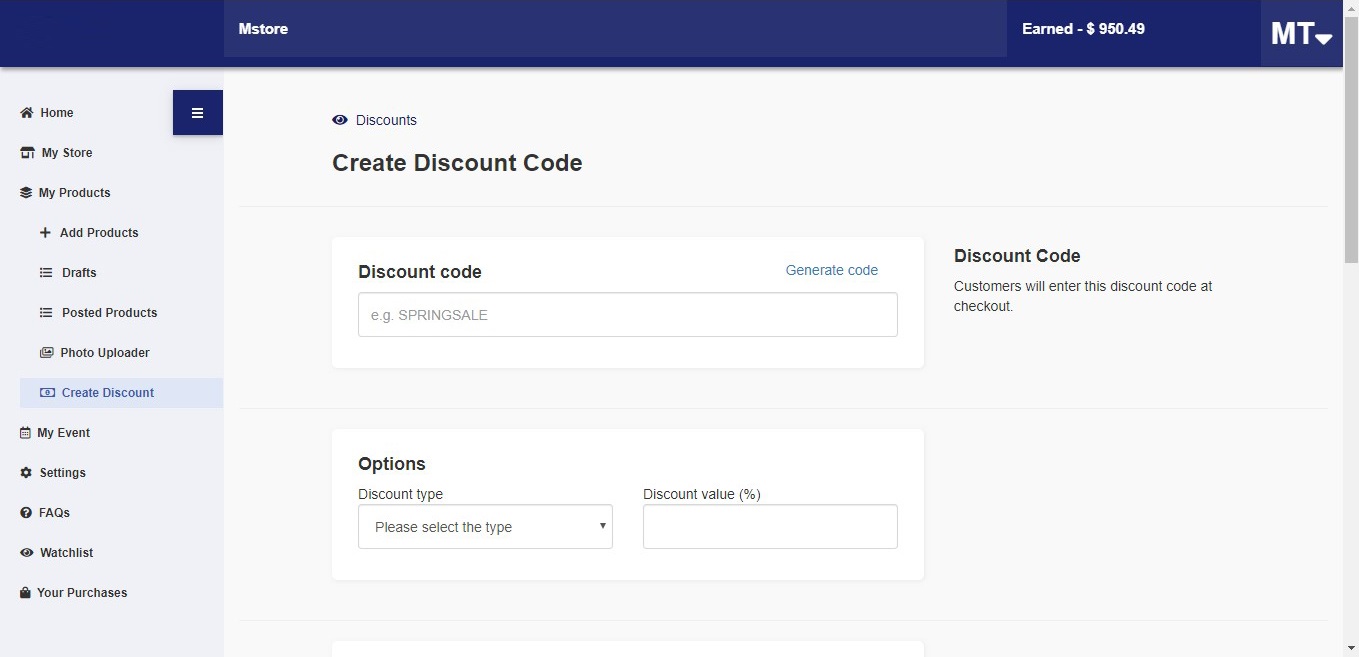
- Step 1: Click on “Create Discount” and fill in the required fields - Discount Code, Options, Applies to, Minimum Requirement, Customer Eligibility, Usage Limits, and Active Dates. Sellers can create custom codes or use the “Generate Code” link to generate a random code.
- Step 2: Select Discount type - Percentage, Fixed Amount or Free shipping. If Percentage, then enter the discount value in percentage
- Step 3: Choose whether the discount should apply to an entire product category or only specific products.
- Step 4: Choose Minimum requirements for discount to be applicable - either a minimum purchase amount or quantity.
- Step 5: Choose Customer Eligibility - whether the discount is available to all customers or only to specific customers.
- Step 6: Select Usage Limits - Set the limit for the number of times the discount code can be used by a customer.
- Step 7: Set Active Dates - Set the dates for when the discount should start and end.
- Usage limits- Set limit for how many times the discount be sued in total.
- Active dates- Set start date and end date when the discount should start and end.
-
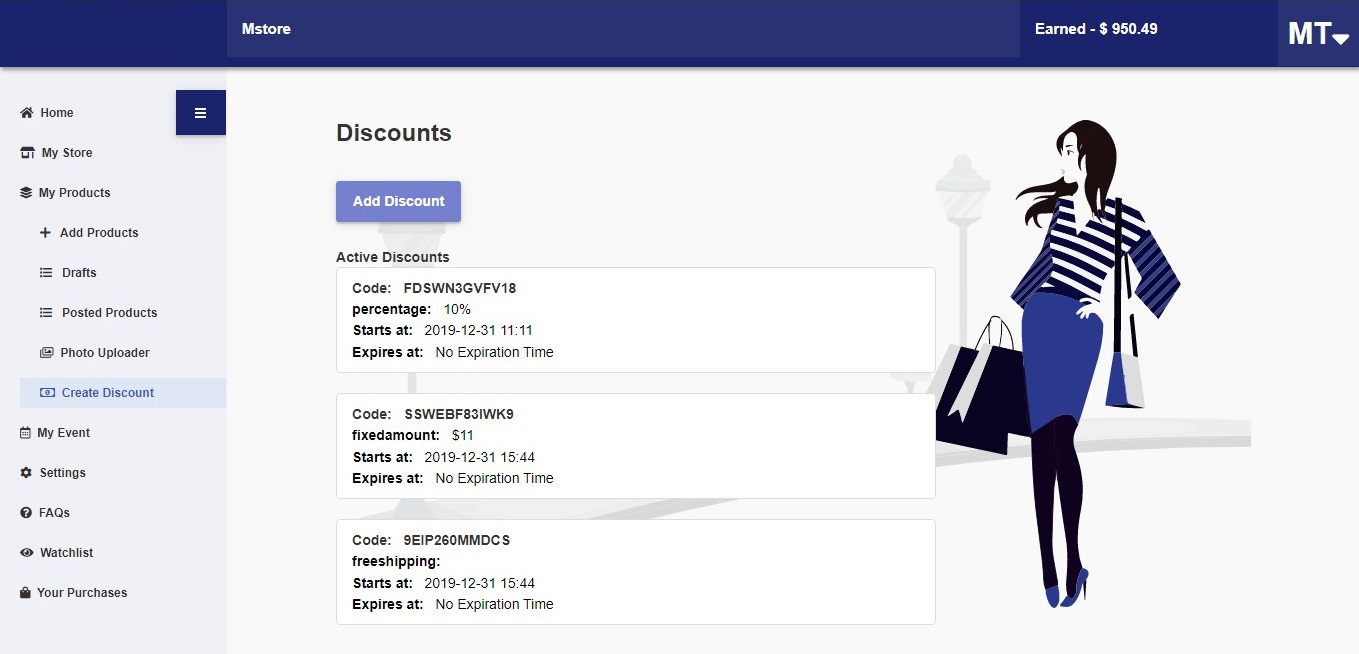
View Discounts - Shows created discount codes with the option to add more.
5.3 My Event
Event is similar to a store and can be shared with buyers. It is a collection of multiple products where the buyer can purchase and buy products.
5.3.1 Create Event
- Creating an event similar to creating a store. Click on “Create Event” and fill in the following details:
- Event Title
- Event Description
- Start date and end date
- Upload Logo
- Upload store banner
-
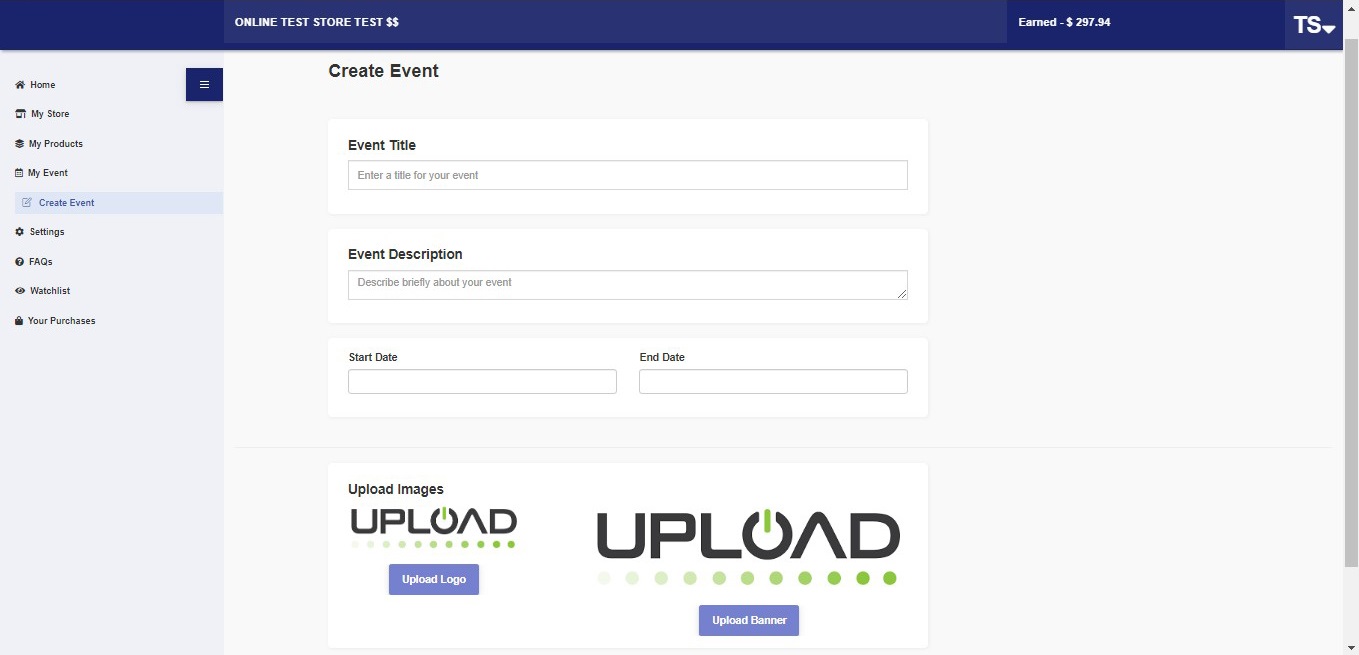
- After filling all the fields, click on “Save” to create the event.
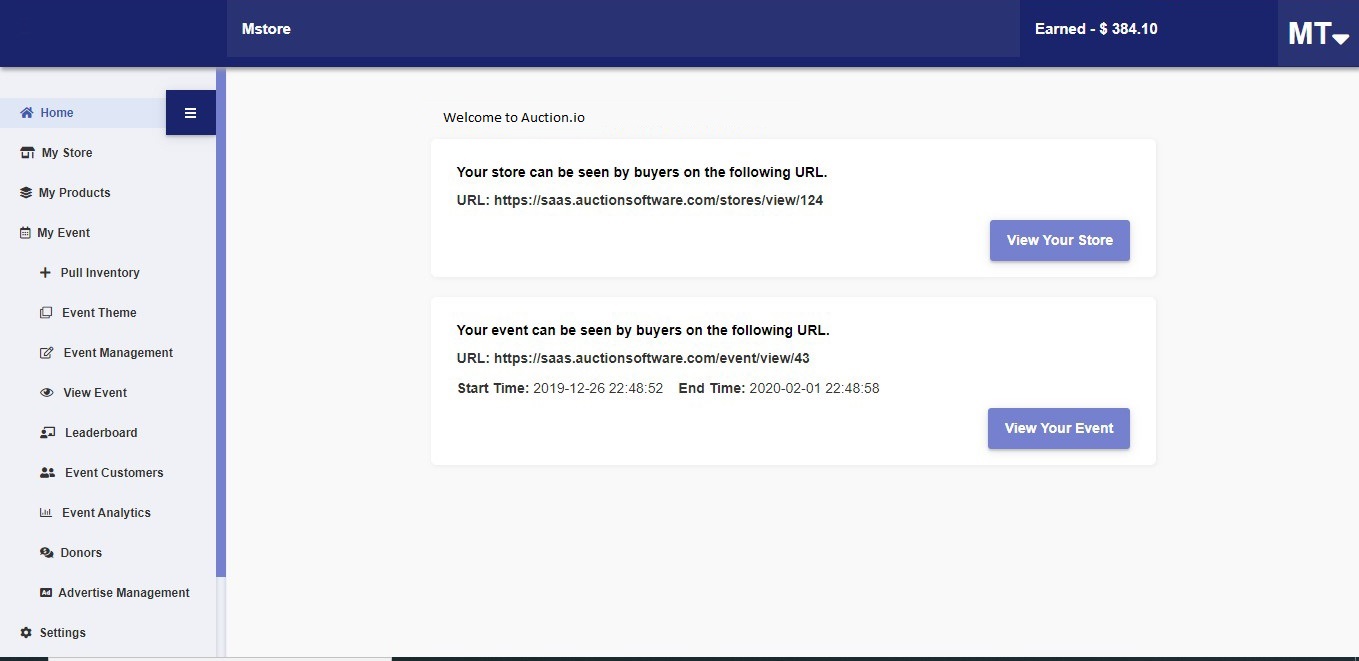
After creating an event
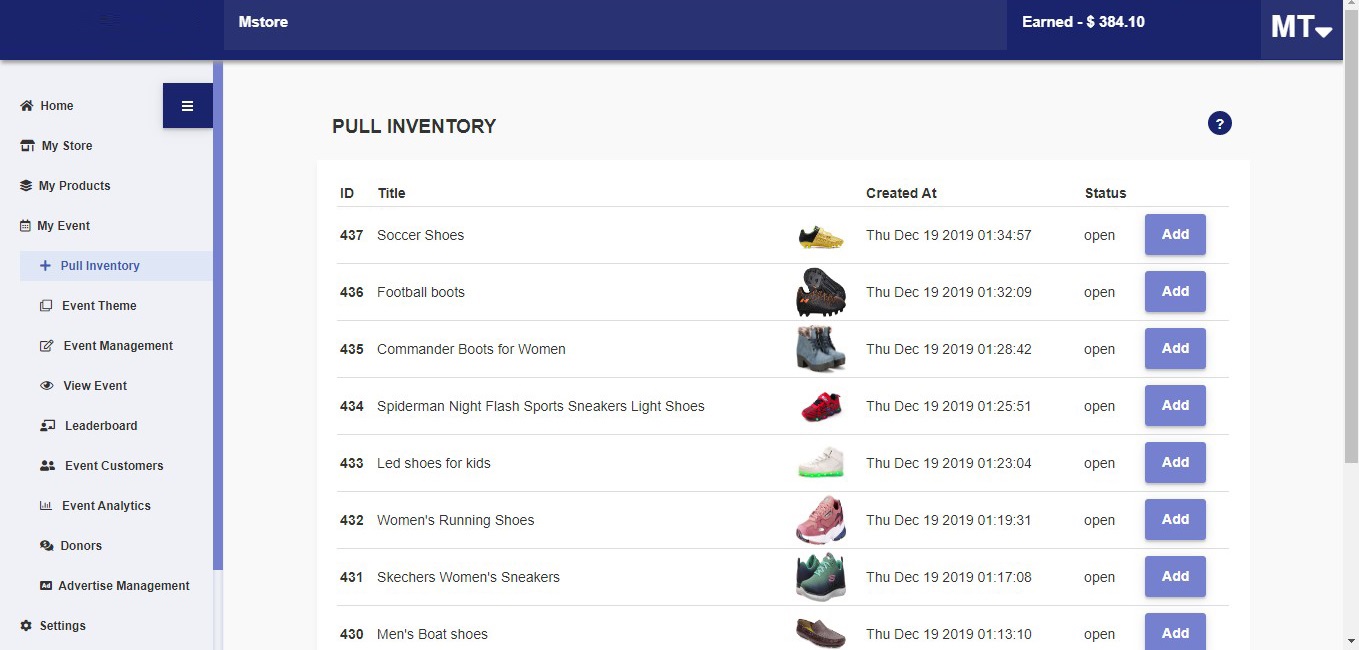
5.3.2 Pull Inventory
- This option allows sellers to pull products from the inventory to events. Pulled products are displayed in both, events and stores. Click on “Add” to add products to the events.
-
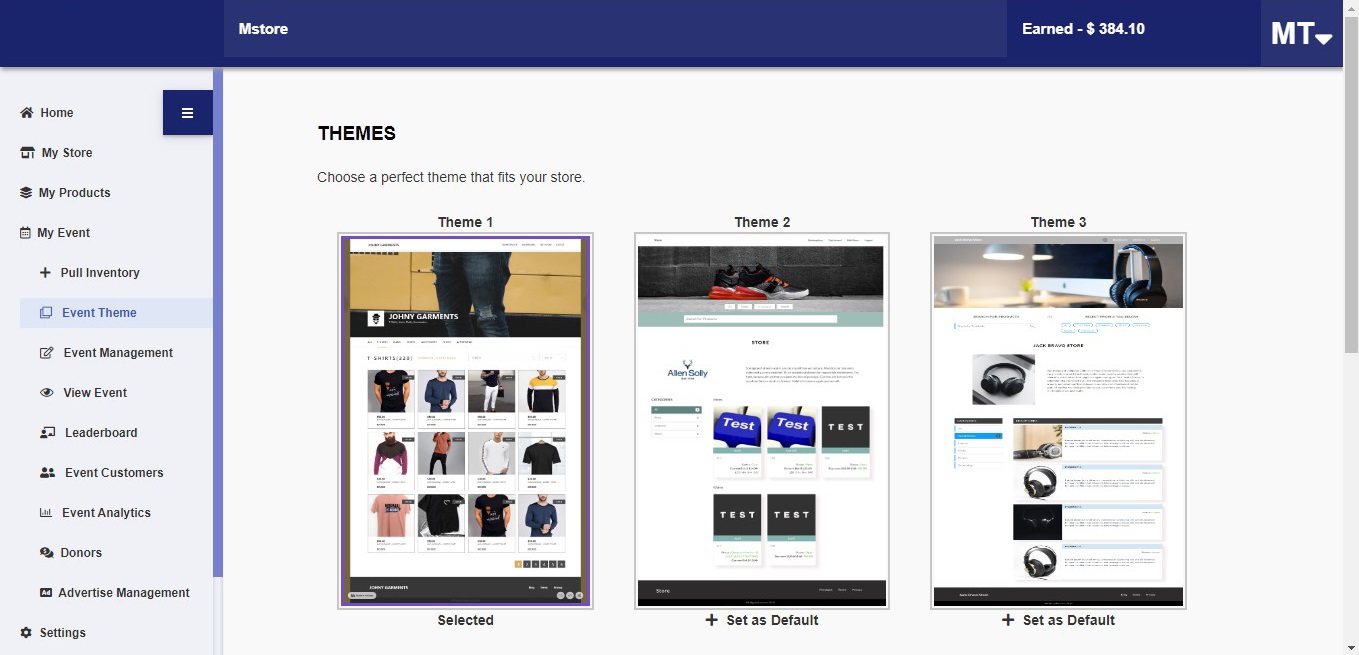
5.3.3 Event Theme
- Select an event theme and click on “Set as default”.
-
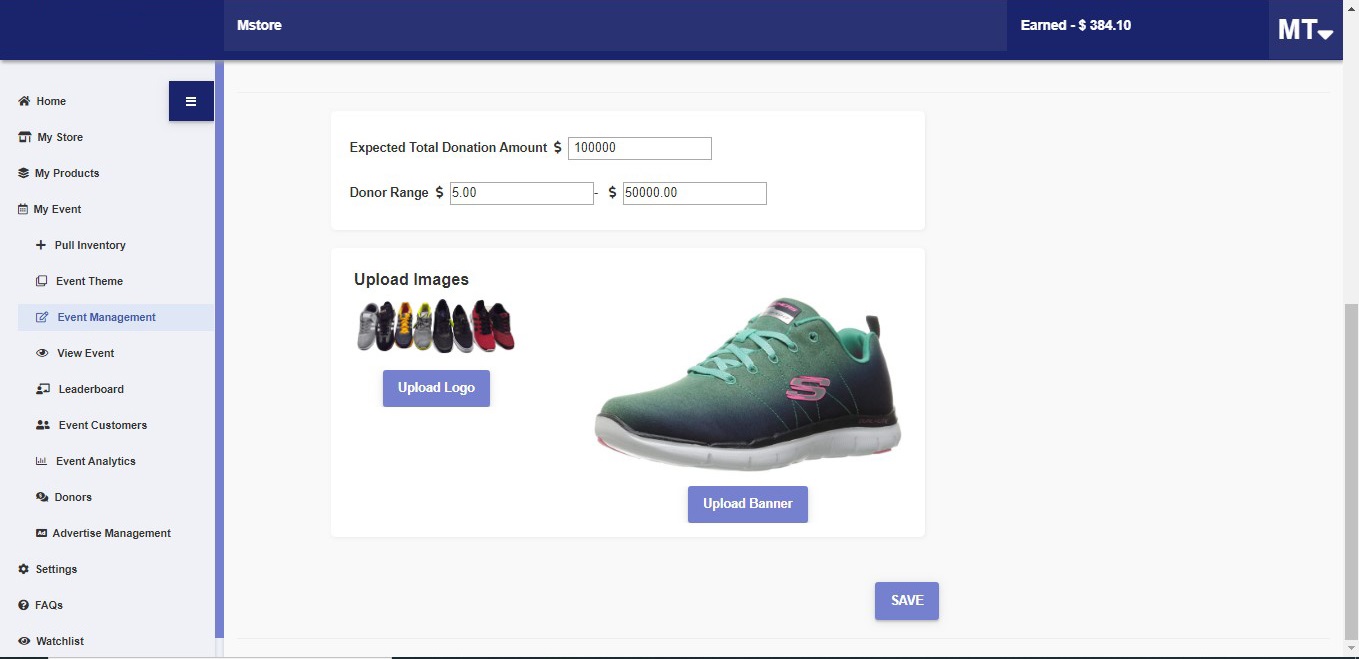
5.3.4 Event Management
- Sellers can edit the Title and Description, add Location, change Expected Total Donation Amount and Donor Range, and also change the logo and banner.
-
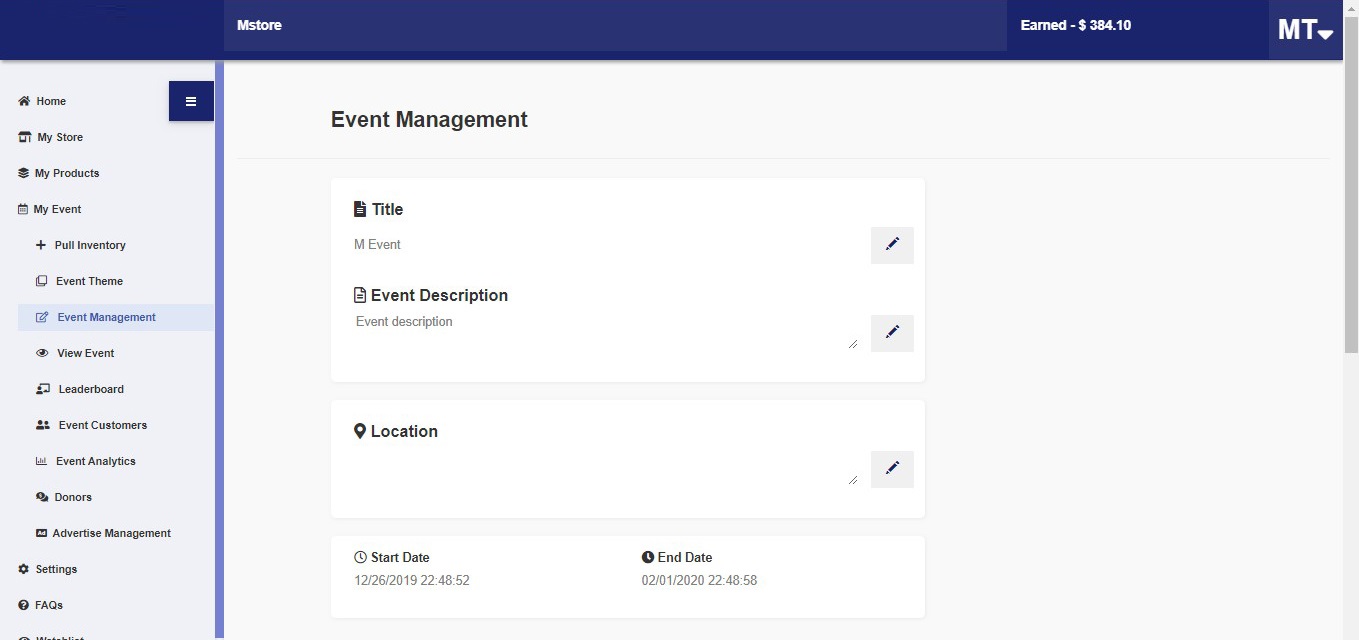
-
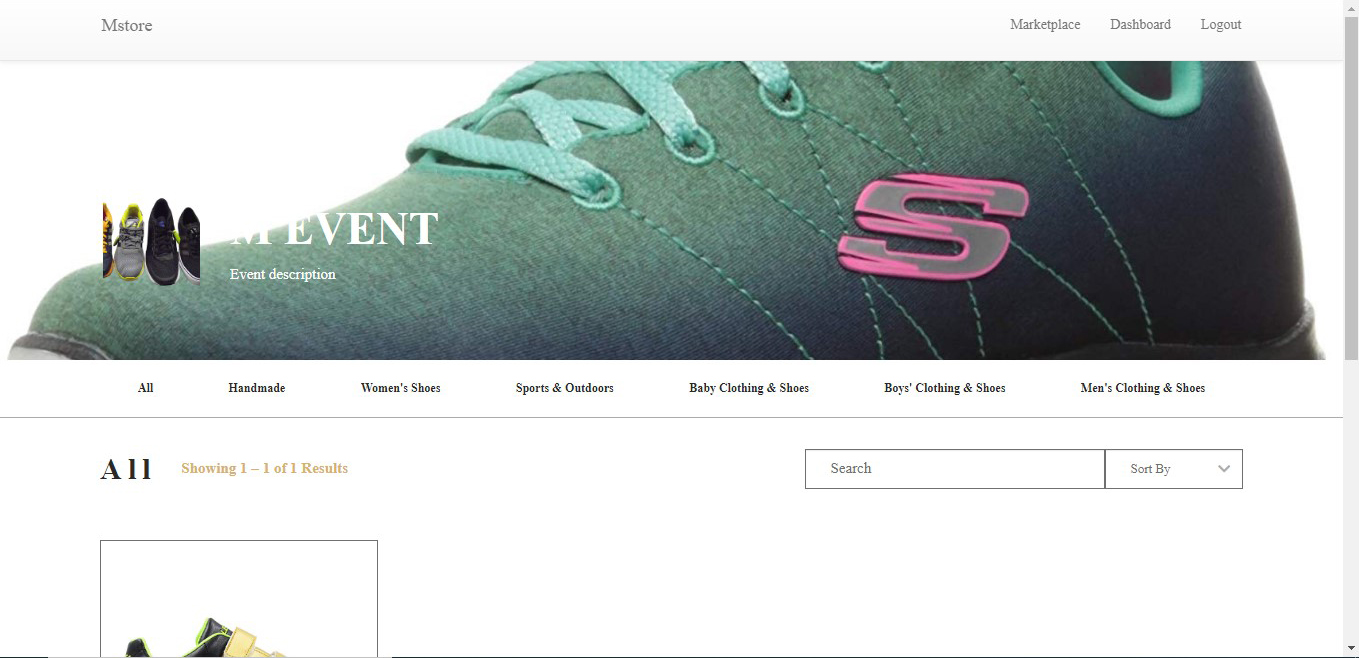
5.3.5 View Event
- All products pulled from inventory are visible here along with Search and Sort options. This is a sample of how an event is viewed by buyers.
-
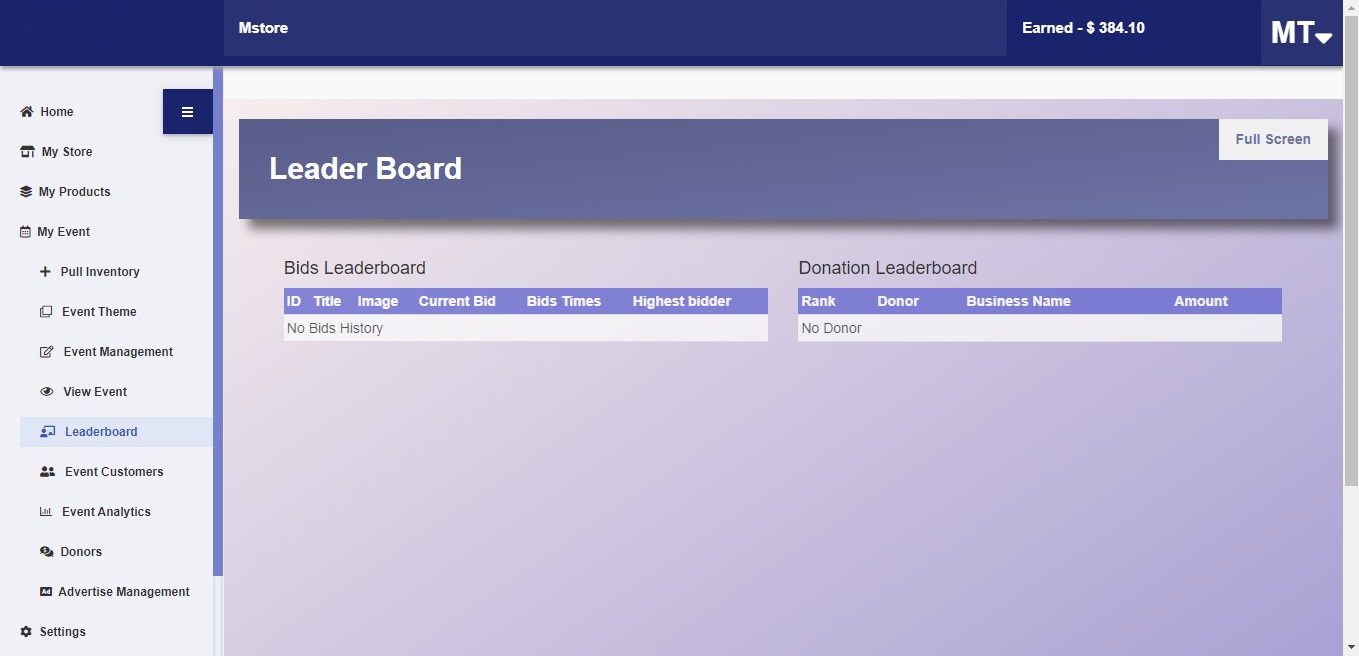
5.3.6 Leaderboard
- Leaderboard displays the event overview - percentage completed, $ raised, number of donors and $ goal.
-
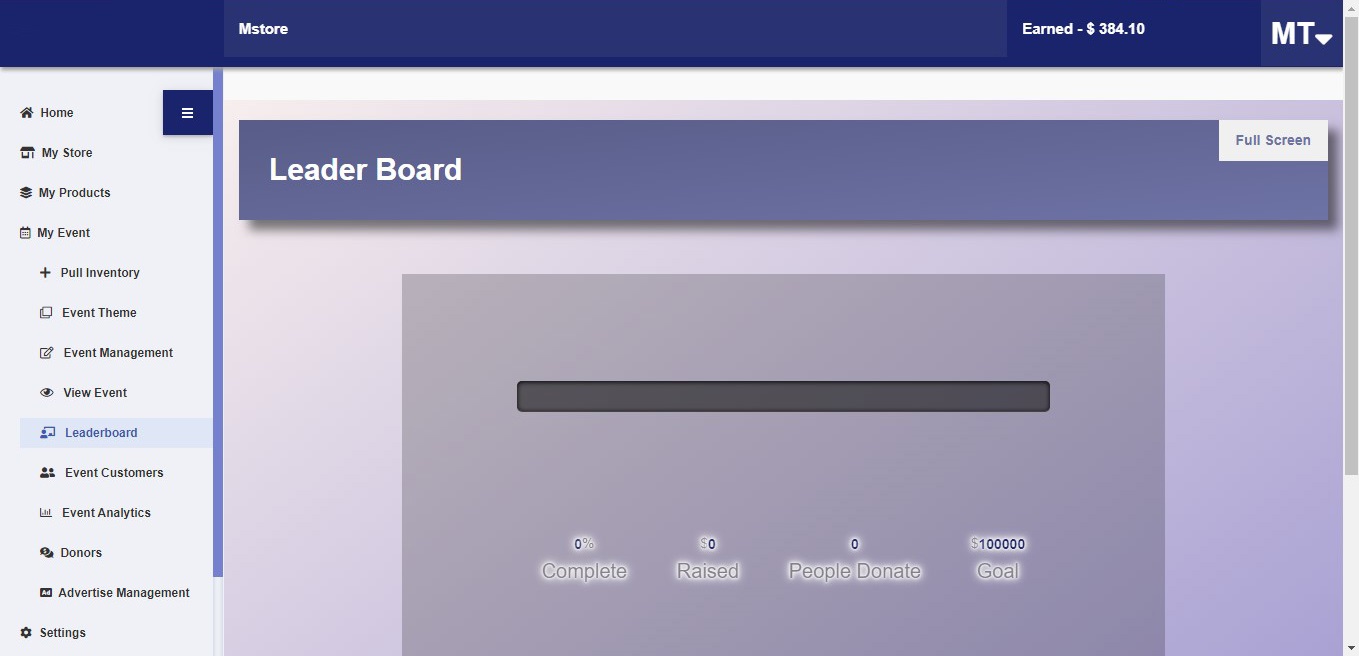 There are 2 leaderboards:
- 1.Purchases Leaderboard - Displays the history of the purchases received
- 2. Donation Leaderboard - Displays donor details and amount of donation.
-
5.3.7 Event Customers
- Customers who have participated in the event are listed here. There are 3 options:
-
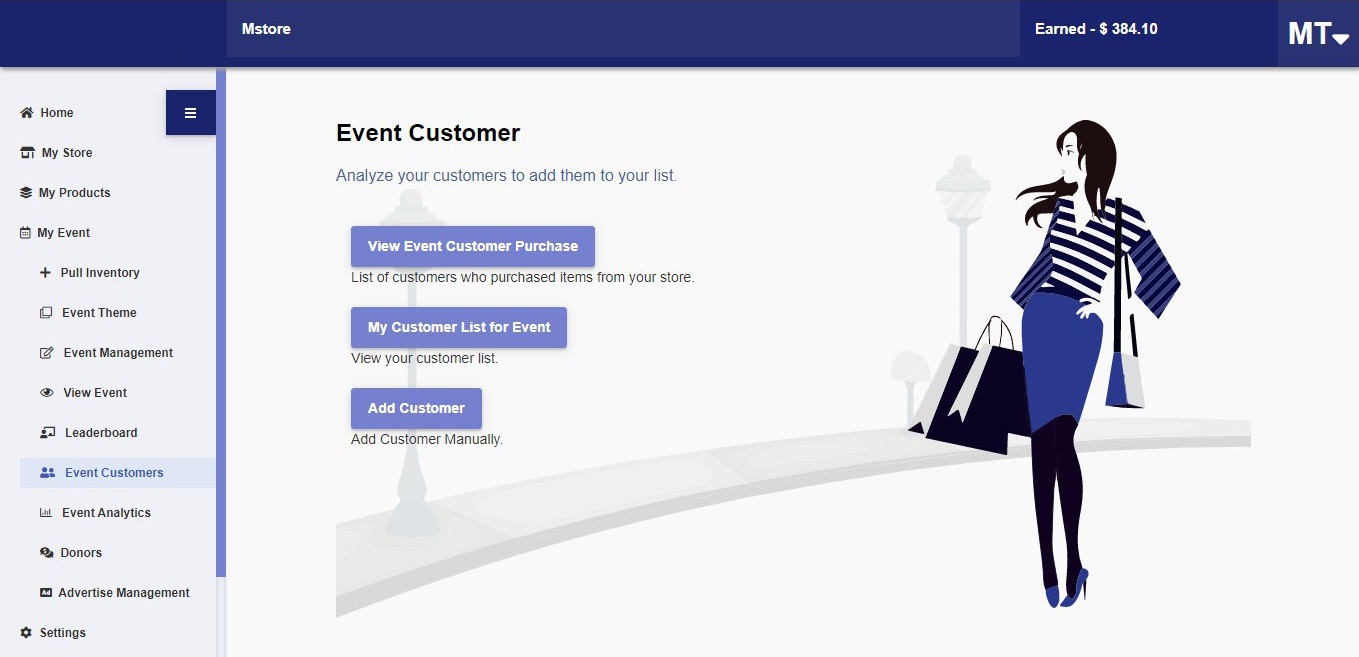
View Event Customer Purchase
- displays the list of customers who have purchased items from the event. Customers can be added to the Customer List.
My Customer list for events
- Customers who have purchased during the event or those who were added to Customer List are displayed here. Individual customers can be removed from the list.
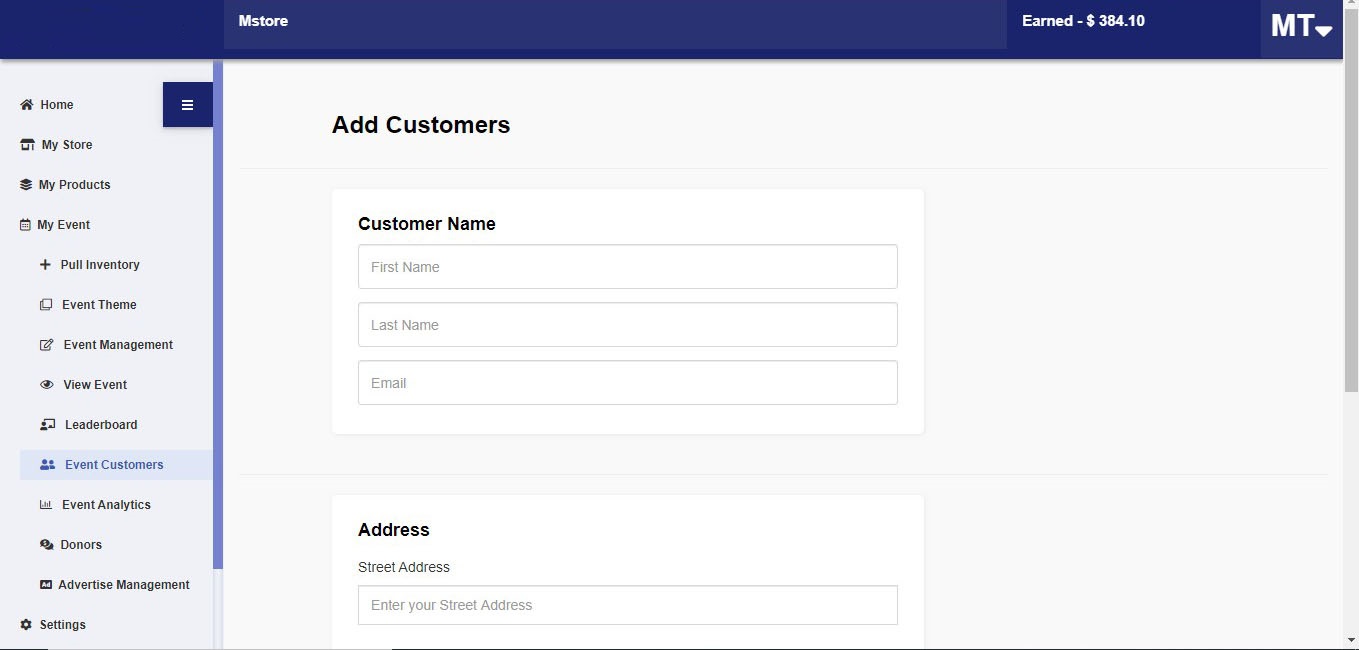
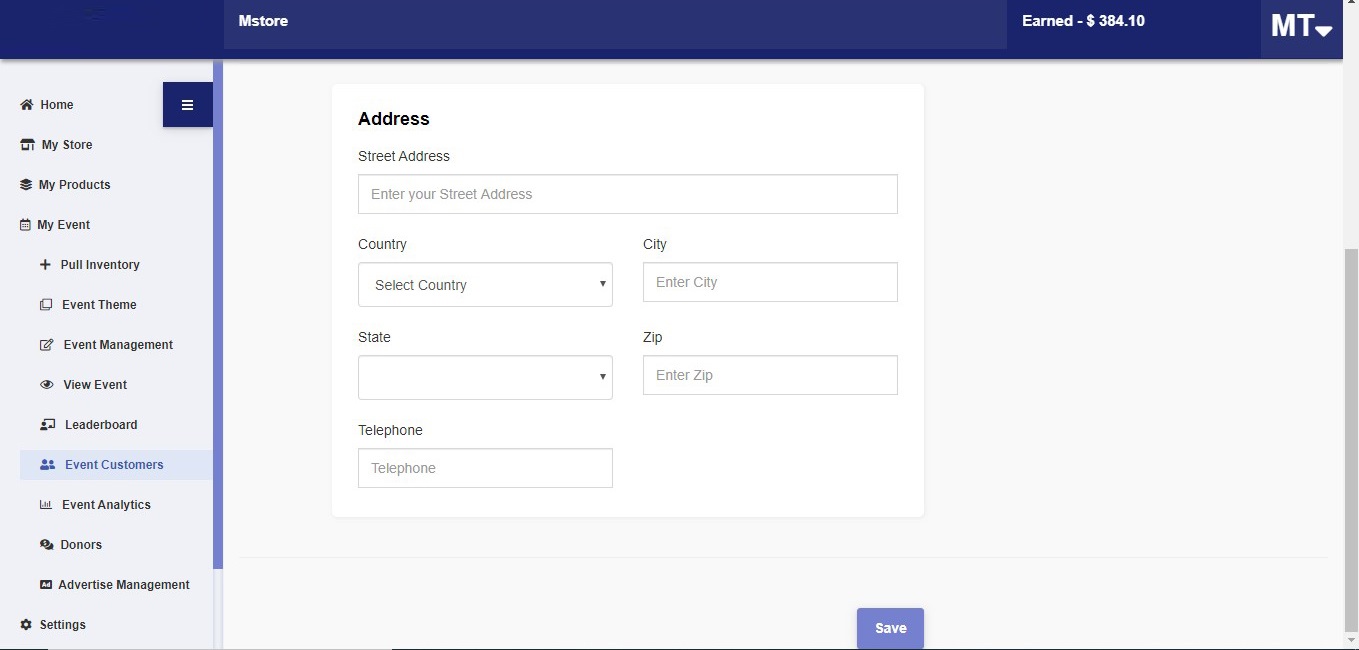
Add Customers
- When a customer is manually added to an event, a mail is sent to them with a link to directly login to the event. These customers can be viewed in My Customer List for Events.
-
-
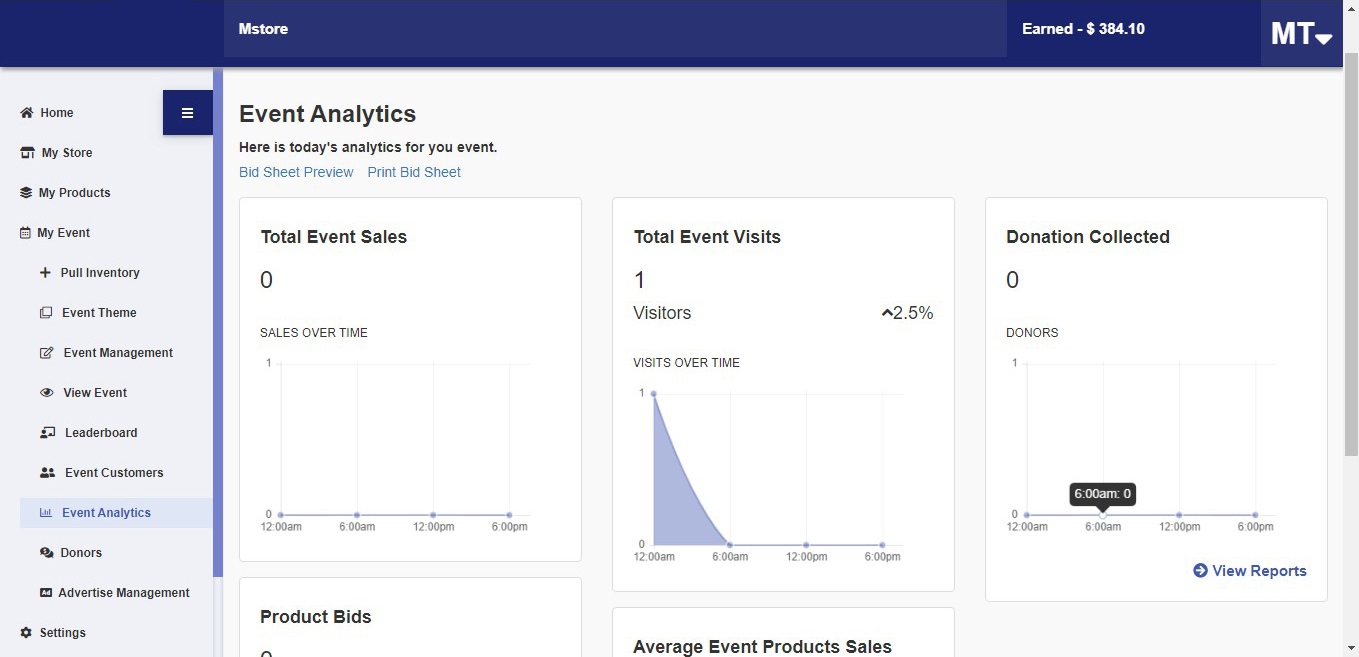
5.3.8 Event Analytics
Displays the following graphs and reports:
- Total Event Sales
- Total Event Visits
- Donations Collected
- Product Purchase
- Average Event Products Sales
”View Reports” option will display the following reports:
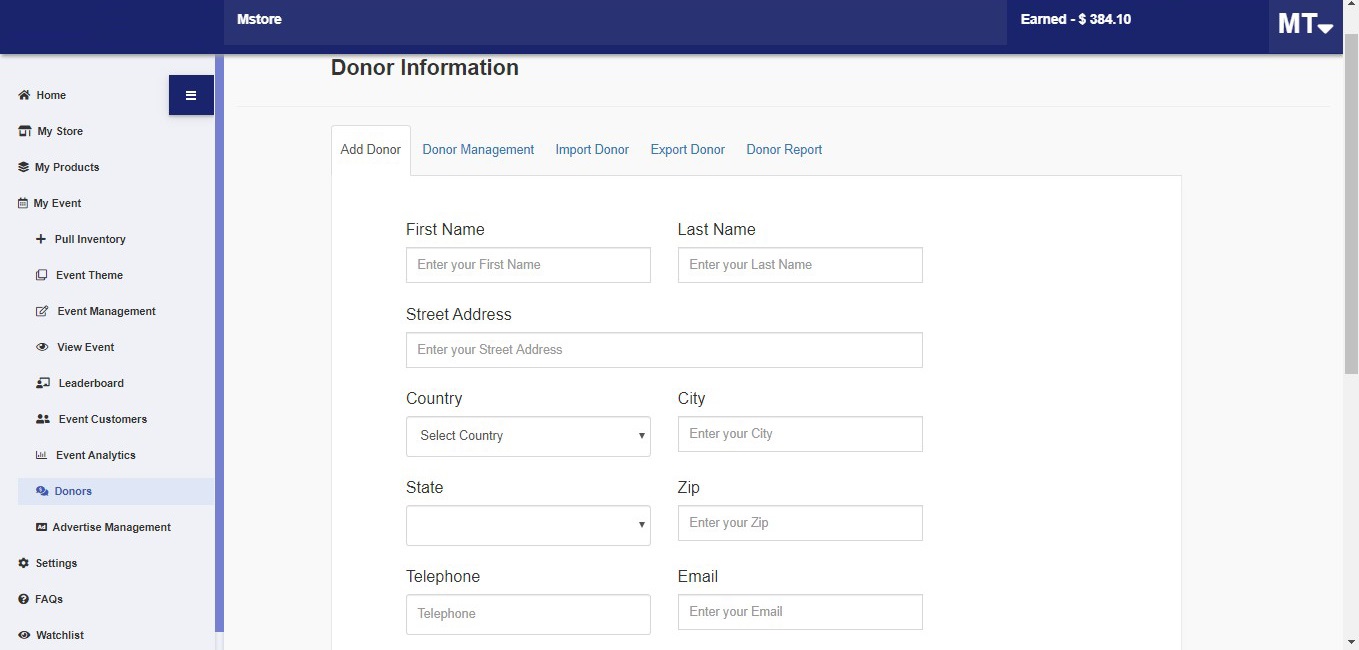
5.3.9 Donors
Here we can Add Donor, Manage Donor, Import Donor, Export Donor and generate Donor Report.
Add Donor
We can add donors by filling the requisite details.
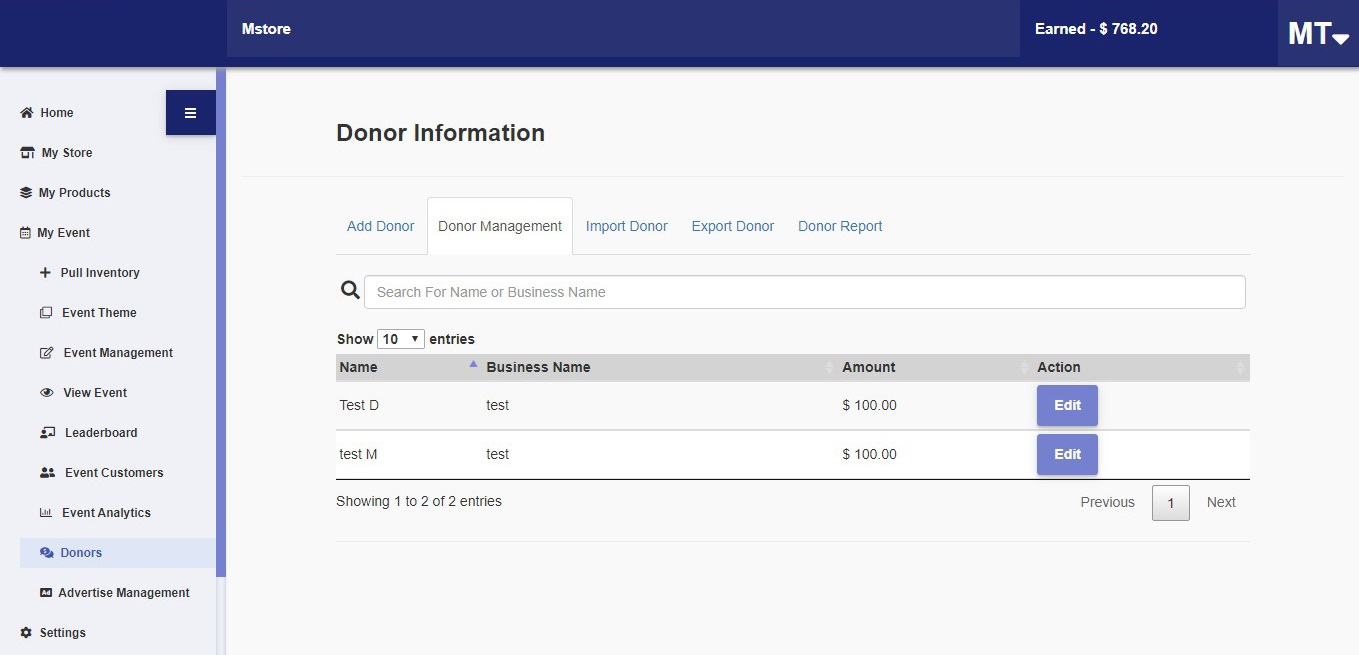
Donor Management
Displays all donors and gives options to edit details.
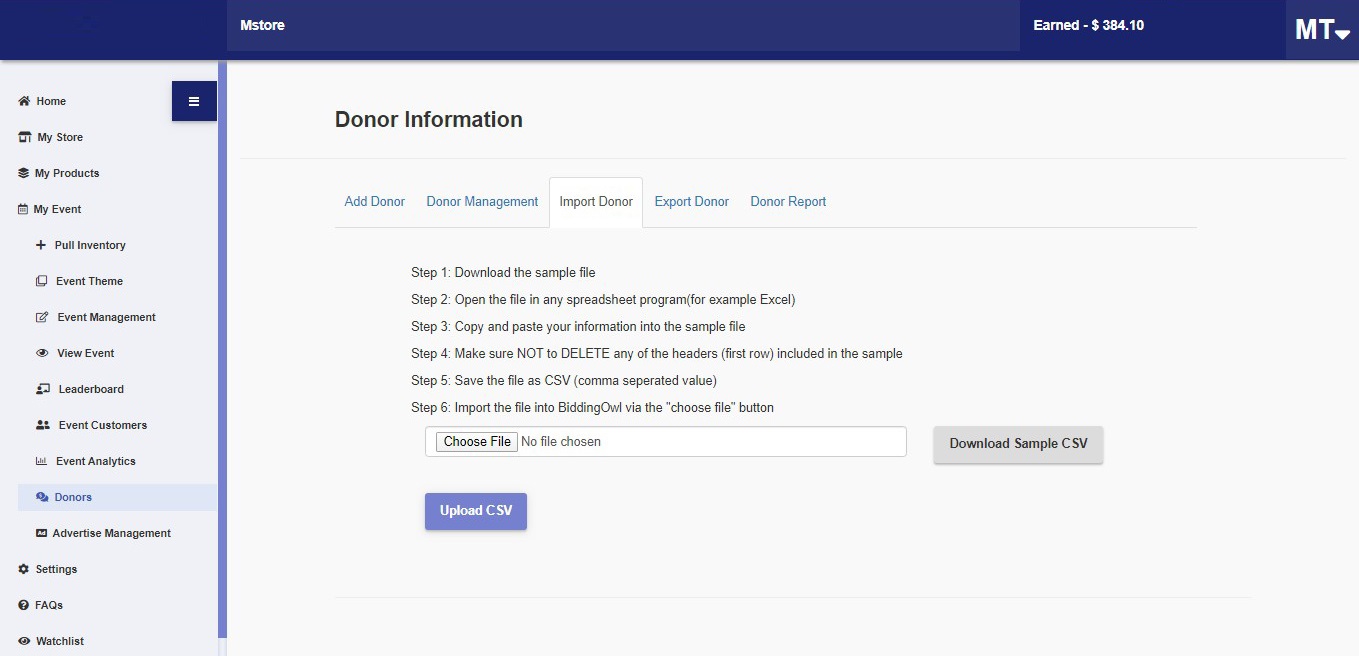
Import Donor
Sellers can import the donor lists from external sources:
Step 1: Download the sample CSV file
Step 2: Open the file using any spreadsheet program (e.g. Excel or Numbers)
Step 3: Copy and paste your information in the sample file
Step 4: Make sure NOT to delete any of the headers (first row) included in the sample
Step 5: Save the file as a CSV (comma separated value)
Step 6: Import the file into Purchase via the "choose file" button
Step 7: Click “Upload CSV”
Export Donor
Selecting “Export” will download a CSV file with details of the donors

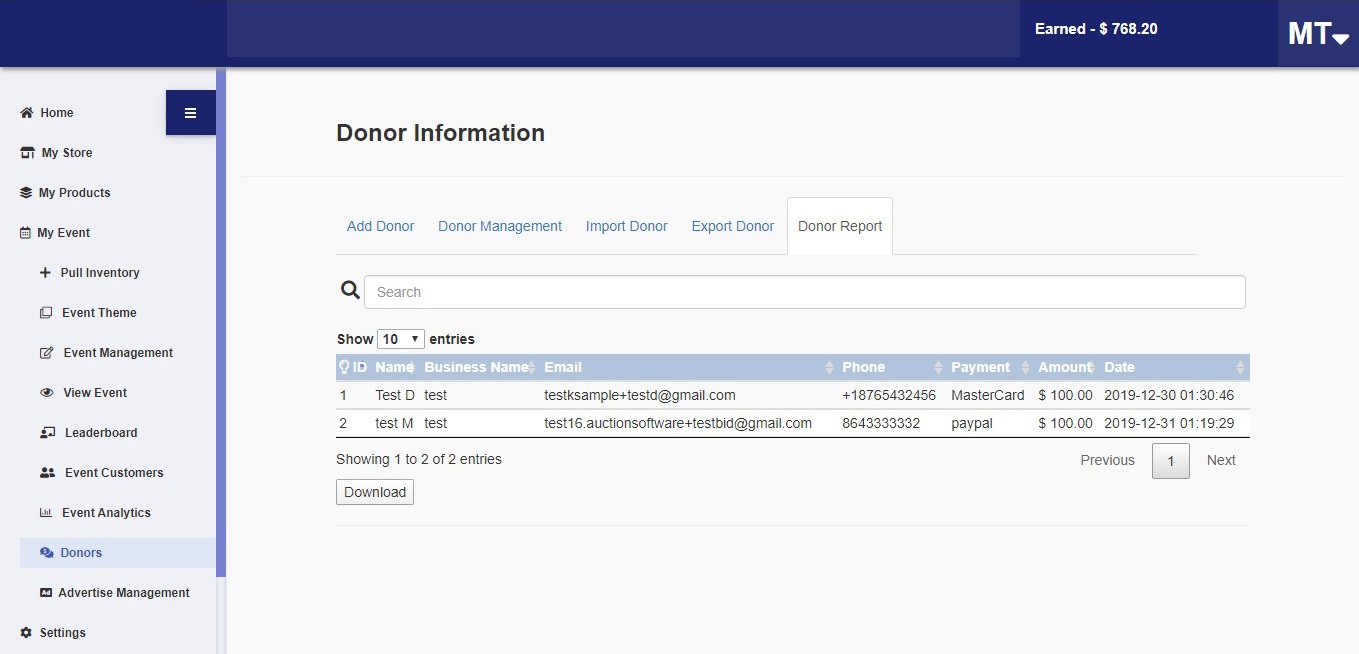
Donor Report
Displays a downloadable list of donor details with a search option.
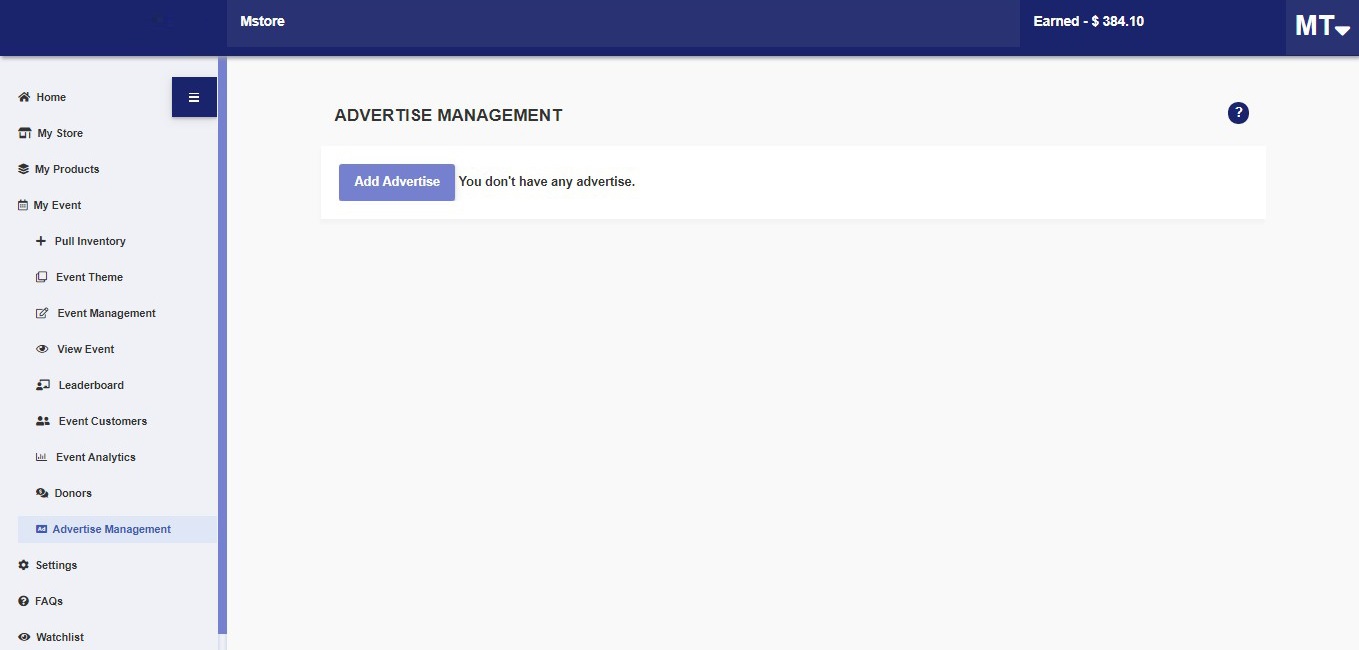
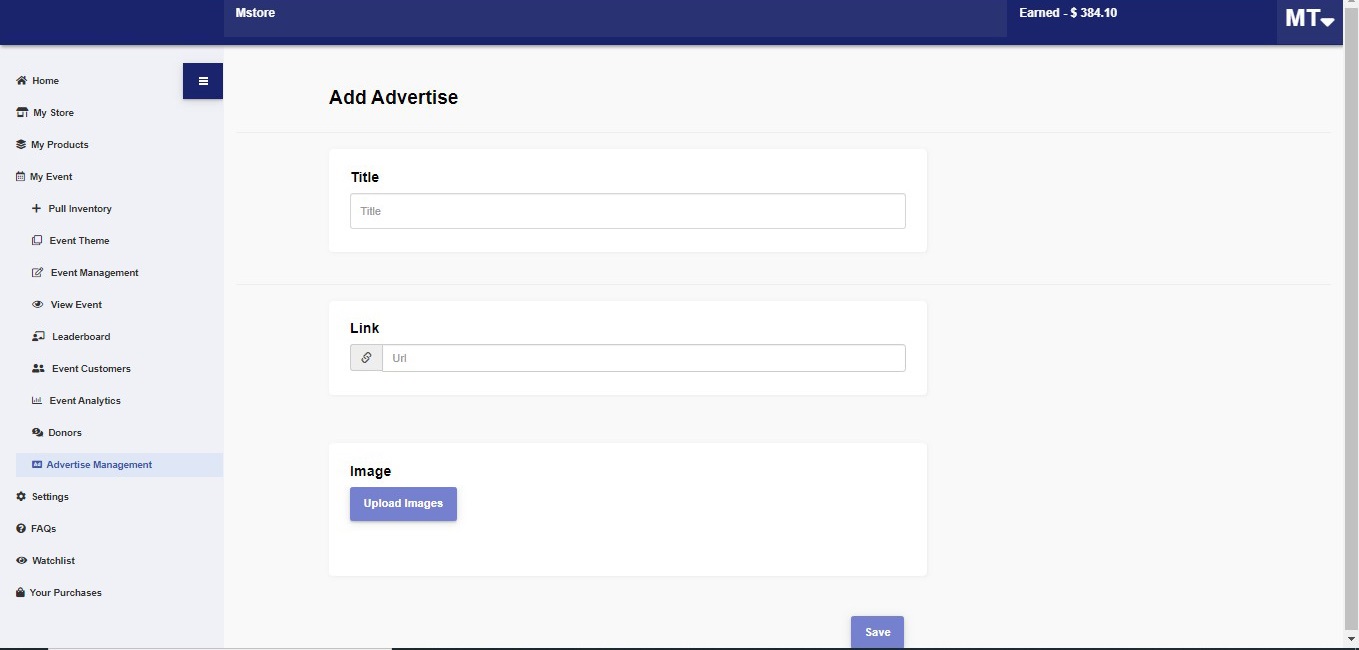
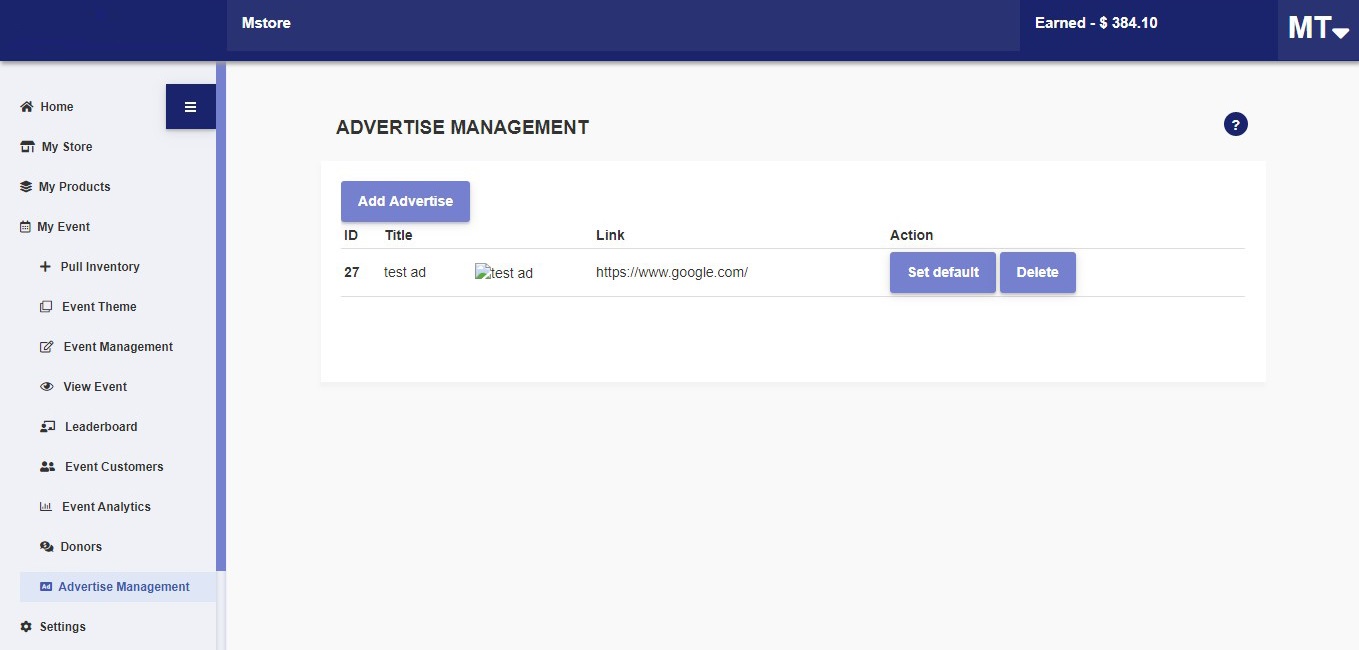
5.3.10 Advertise Management
- Sellers can create advertisements by clicking on “Add Advertise”
- Fill in details - Title, Link and Image.
- Advertisements can be “Set as Default” and if deleted, they are not displayed in events anymore.
5.4 Settings
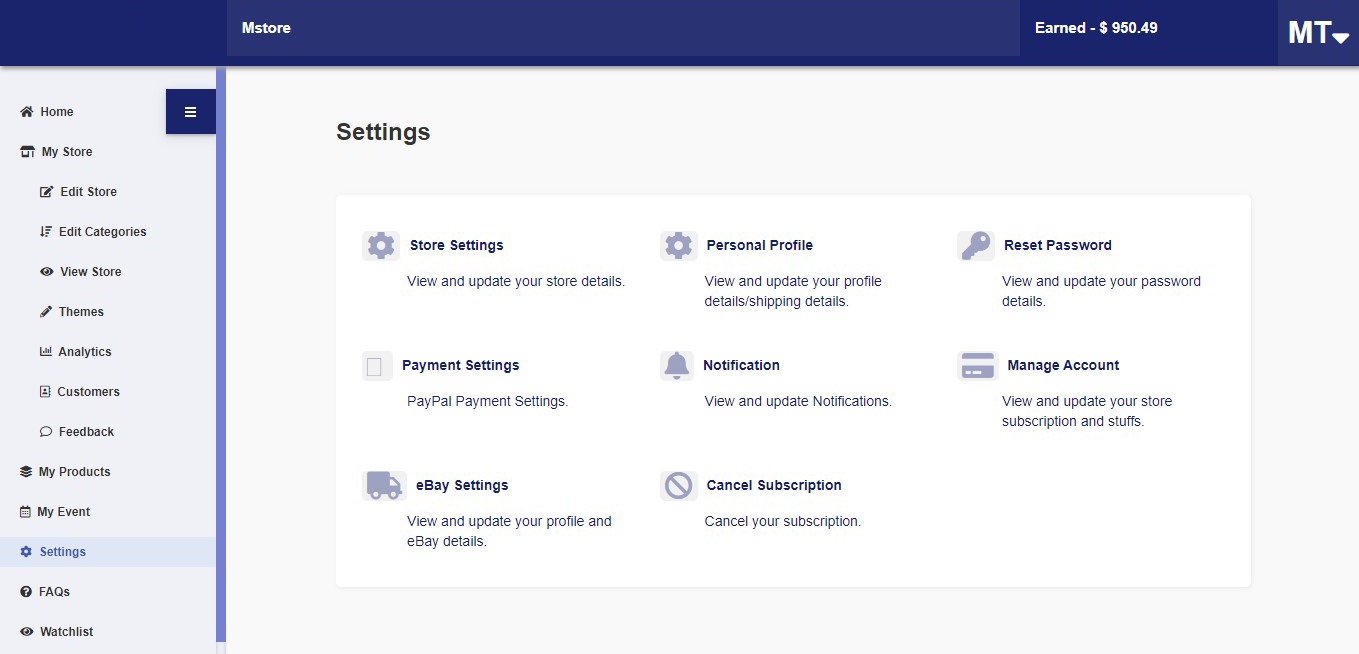
5.4.1 Store settings
- All store settings can be edited here - color, text, logo and banner. See 5.1.1 Edit Store above
- Color change- we can change color as per our need by choosing the color in the list.
- Text change- we can change the text styles a per our needs by selecting the style in the list displayed.
- Update logo- we can change the logo whenever needed by choosing the default logos listed or upload new logo.
- Upload Banner- we can change the banner whenever needed by choosing the default banners listed or upload new banner.
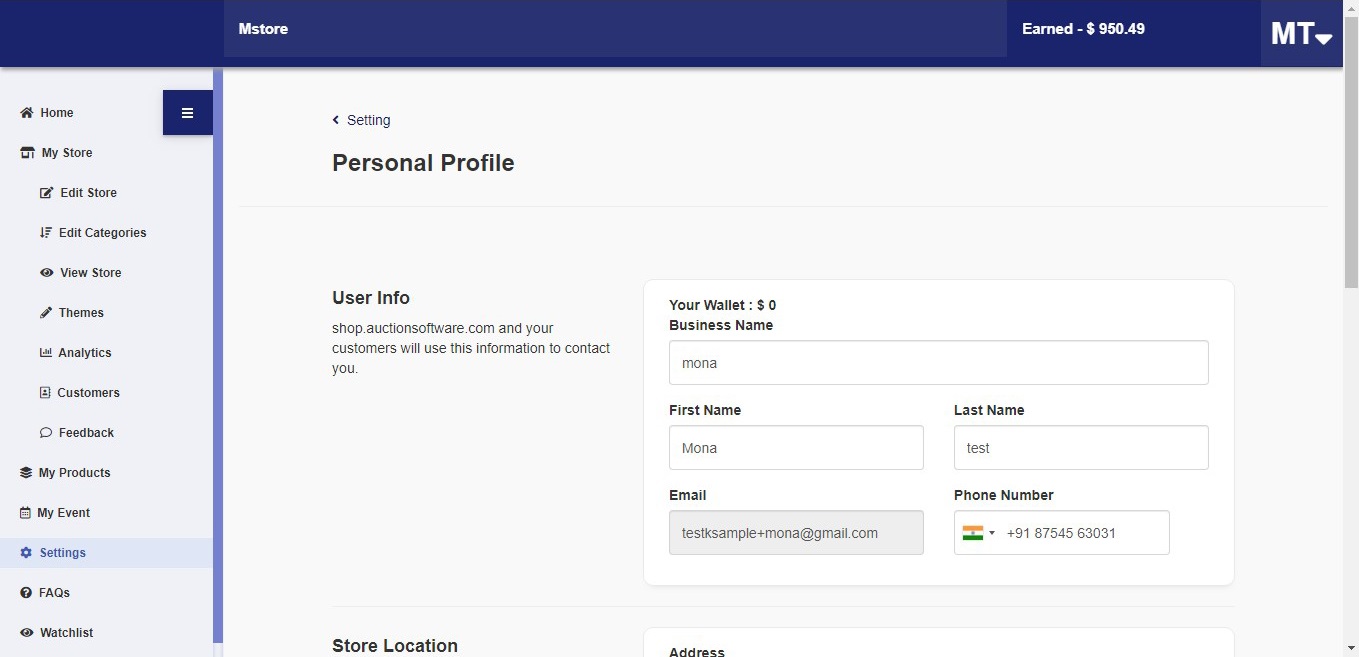
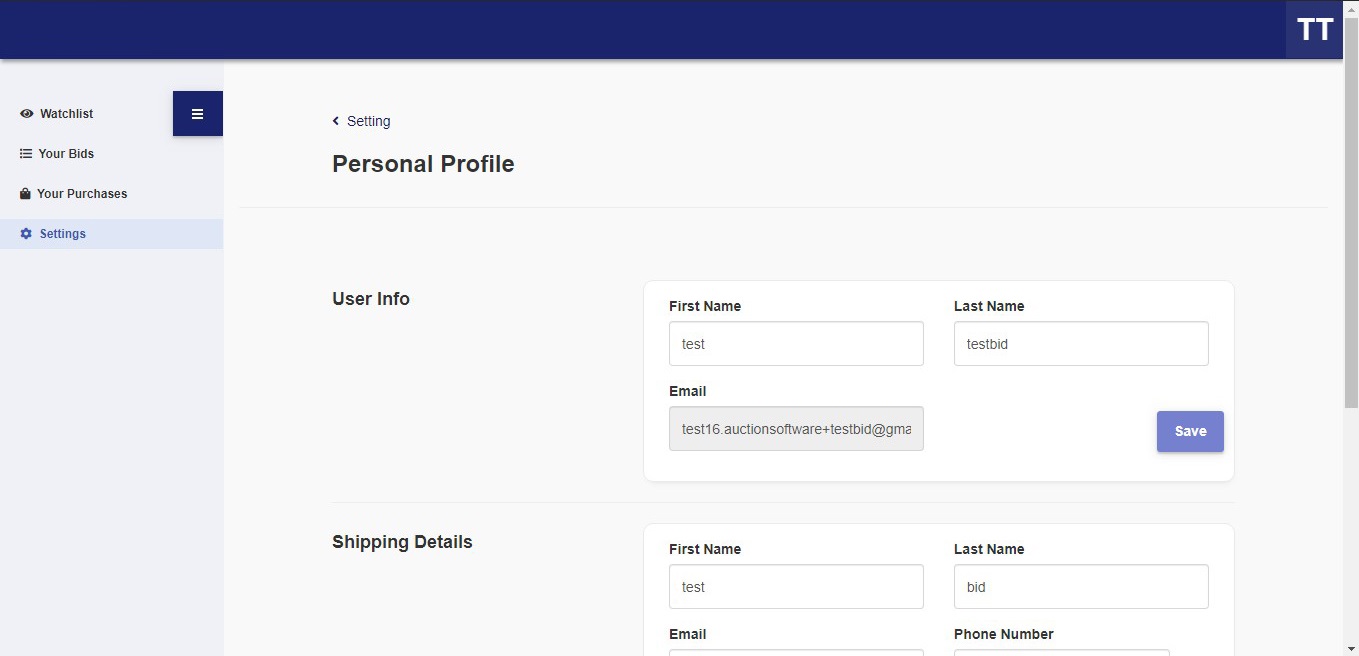
5.4.2 Personal Profile
- This displays user information, store location, and shipping details which can be edited and saved.
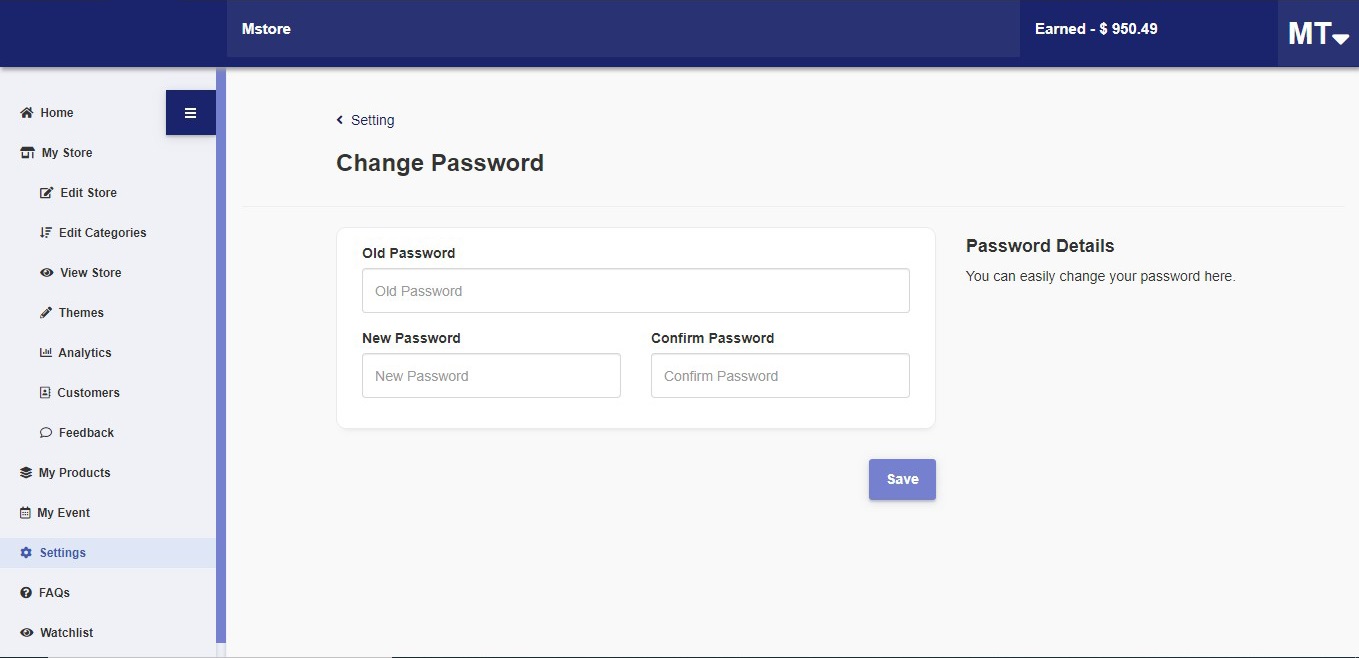
5.4.3 Reset Password
- Users can reset their password here.
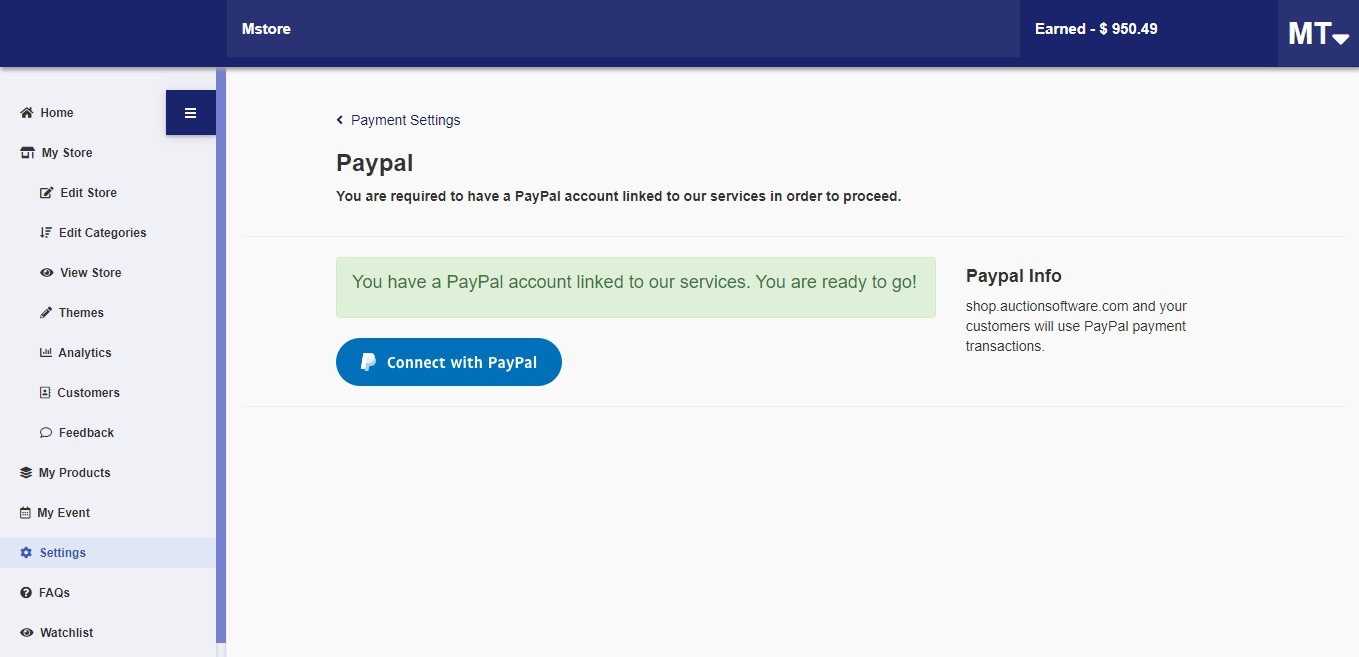
5.4.4 Payment Settings
- PayPpal accounts can be added and edited here.
5.4.5 Notification
- Displays notification options with checkboxes Buyer, Owner, Email and SMS. Products can also be added using the “Add Products” option.
-
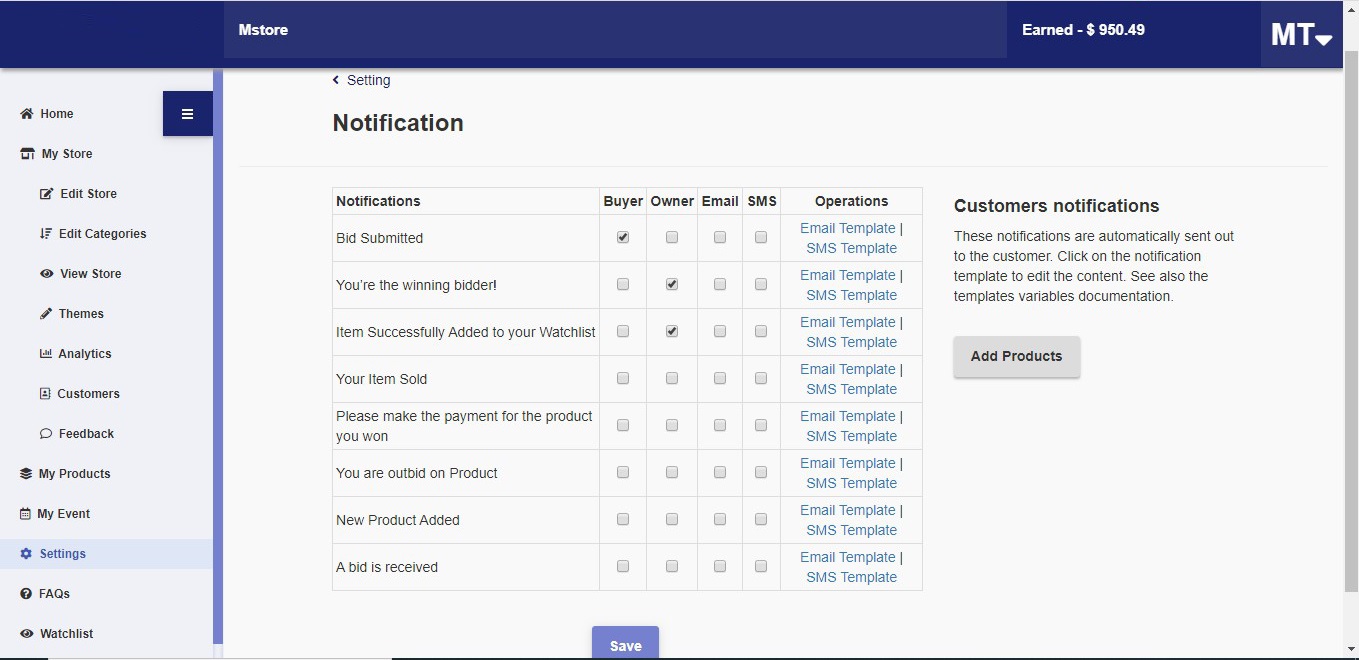
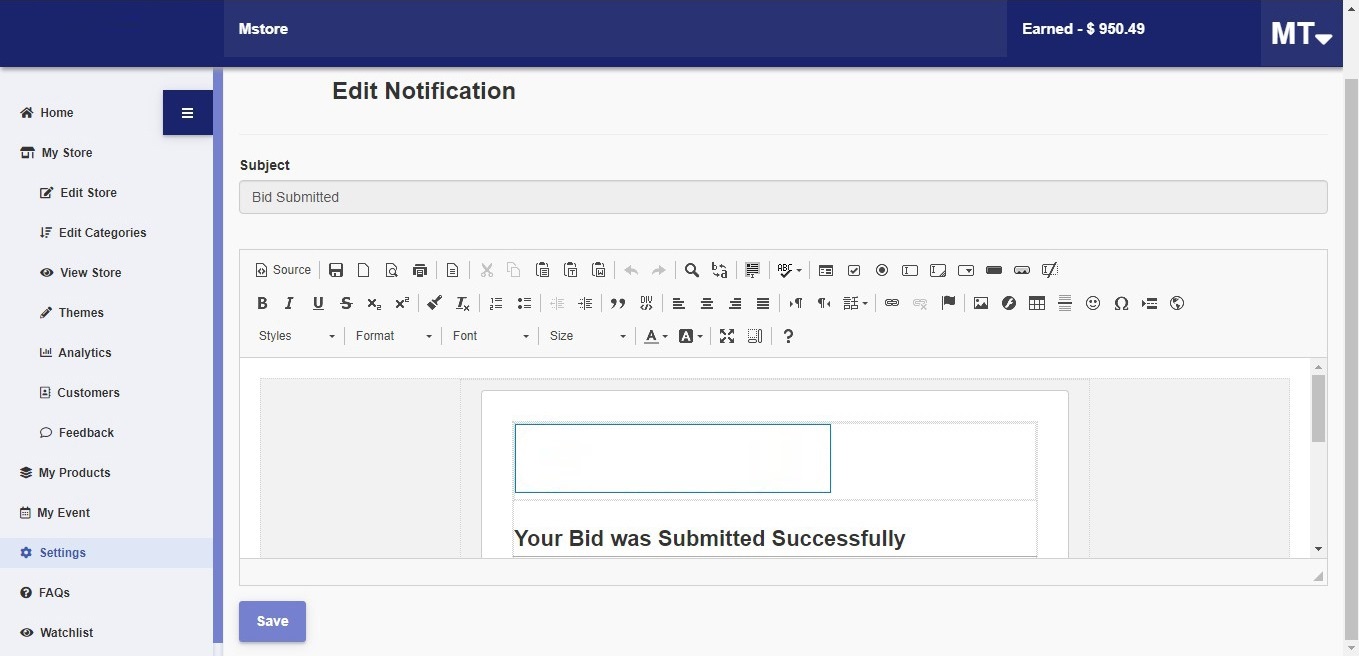
- To edit notification templates, click “Email Template” or “SMS Template”.
5.4.6 Manage Account
- Account Overview- Displays membership details and account status.
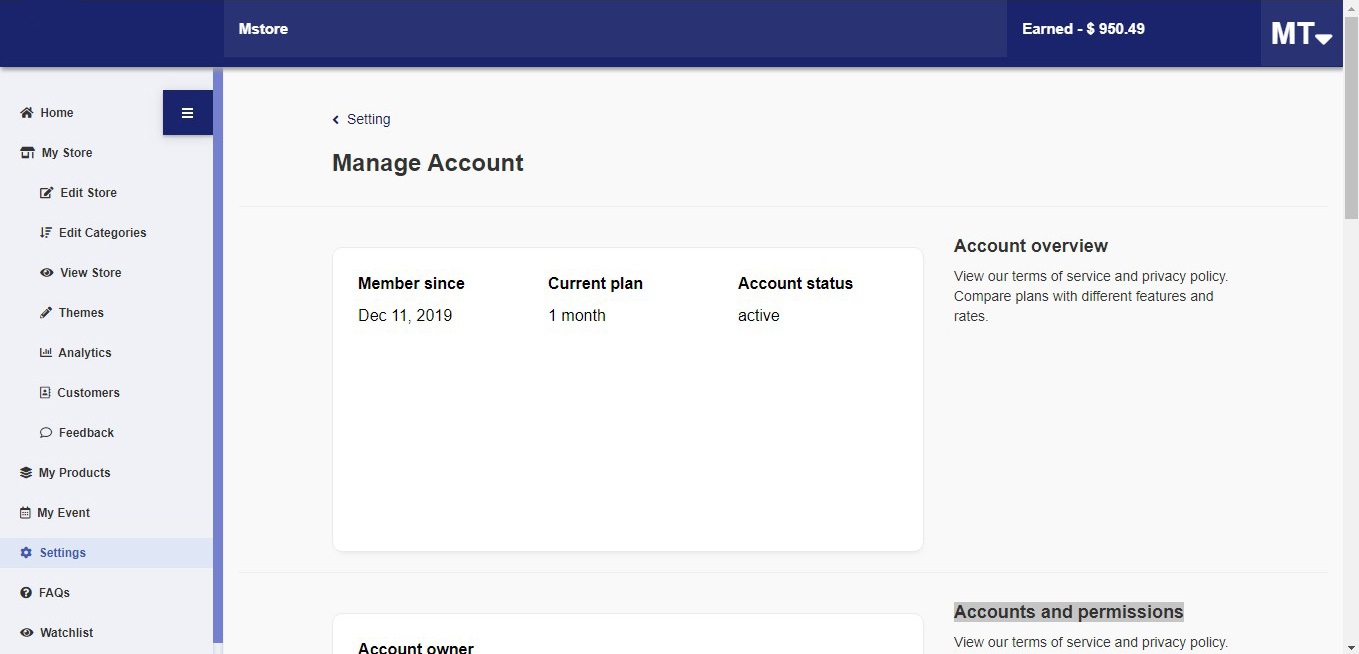
- Accounts and permissions- Displays account owner details and last login.
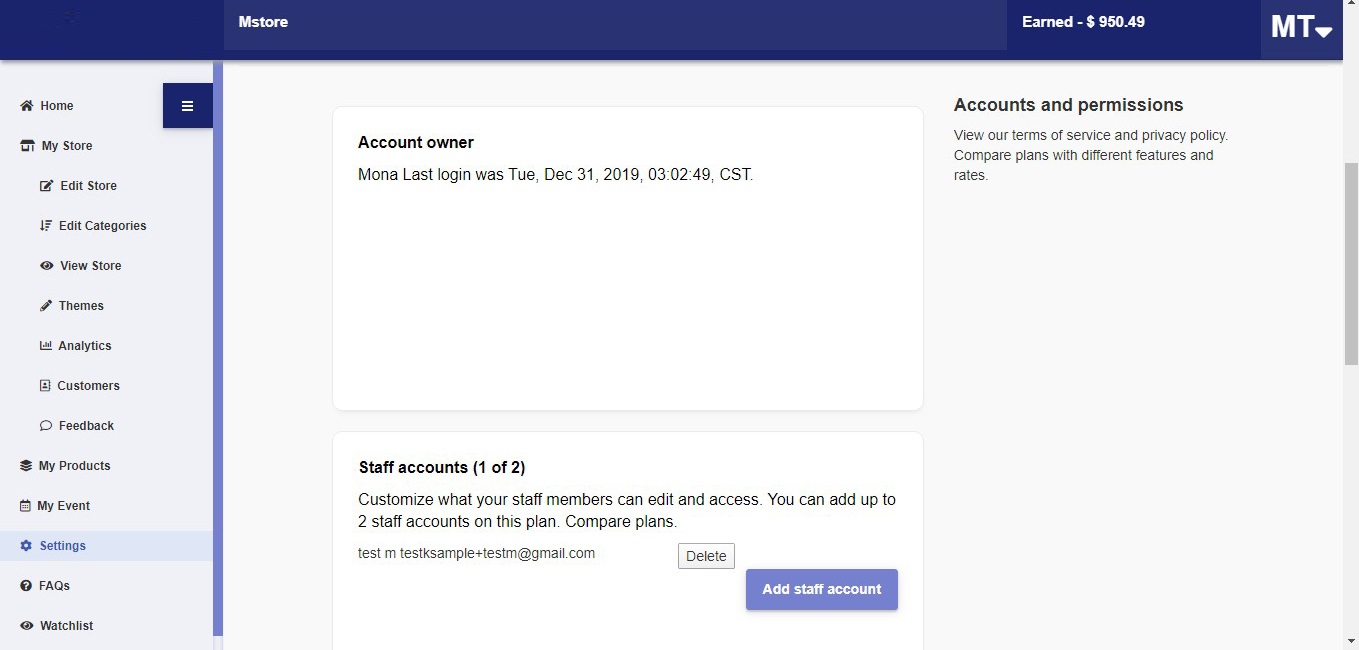
- Staff accounts
- Upto 2 staff member accounts can be created to act as Owner/sub-Owner for the store.
- Step 1: Click on “Add Staff Account” - Fill in details like name, email address and permissions and click on “Send Invite”.
- Step 2: A confirmation will popup. Click on “Confirm” to send an invite to that staff. They will be notified via email with instructions to log in.
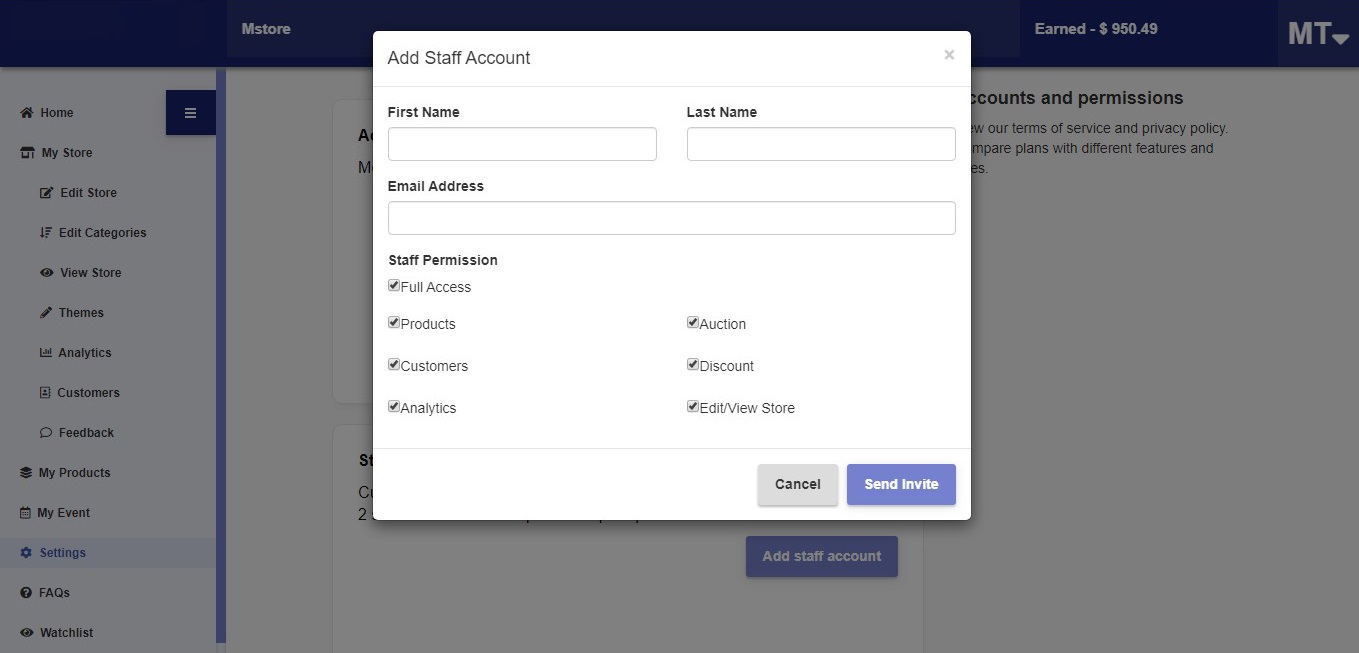
- The staff can only access areas of the site that the owner has given permission for. All access privileges can be removed by deleting the staff account.
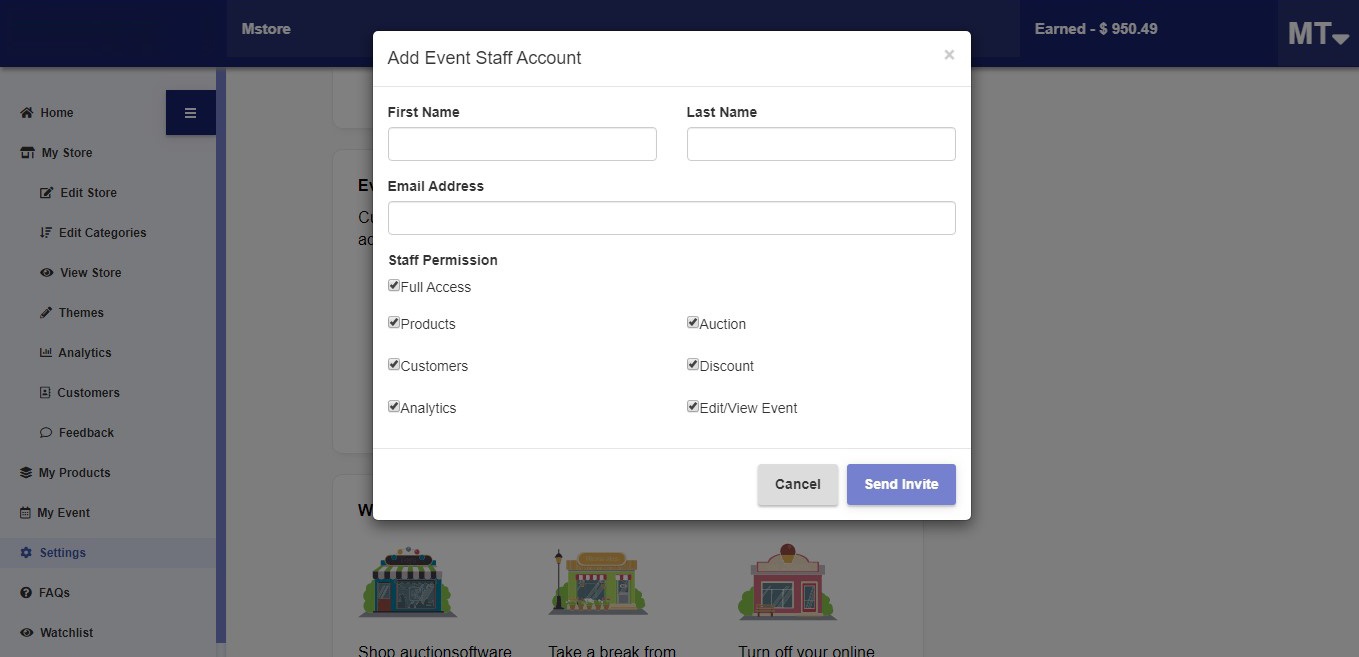
- Event Staff accounts
- Upto 2 staff member accounts can be created to manage an event with limited or full access.
- Step 1: Click on the Add Event Staff. Fill in details like name, email address and permissions and click on “Send Invite”.
- Step 2: A confirmation will popup. Click on confirm to send an invite to that staff. They will be notified via email with instructions to log in.
- The staff can only access event areas that the owner has given permission for. All access privileges can be removed by deleting the staff account.
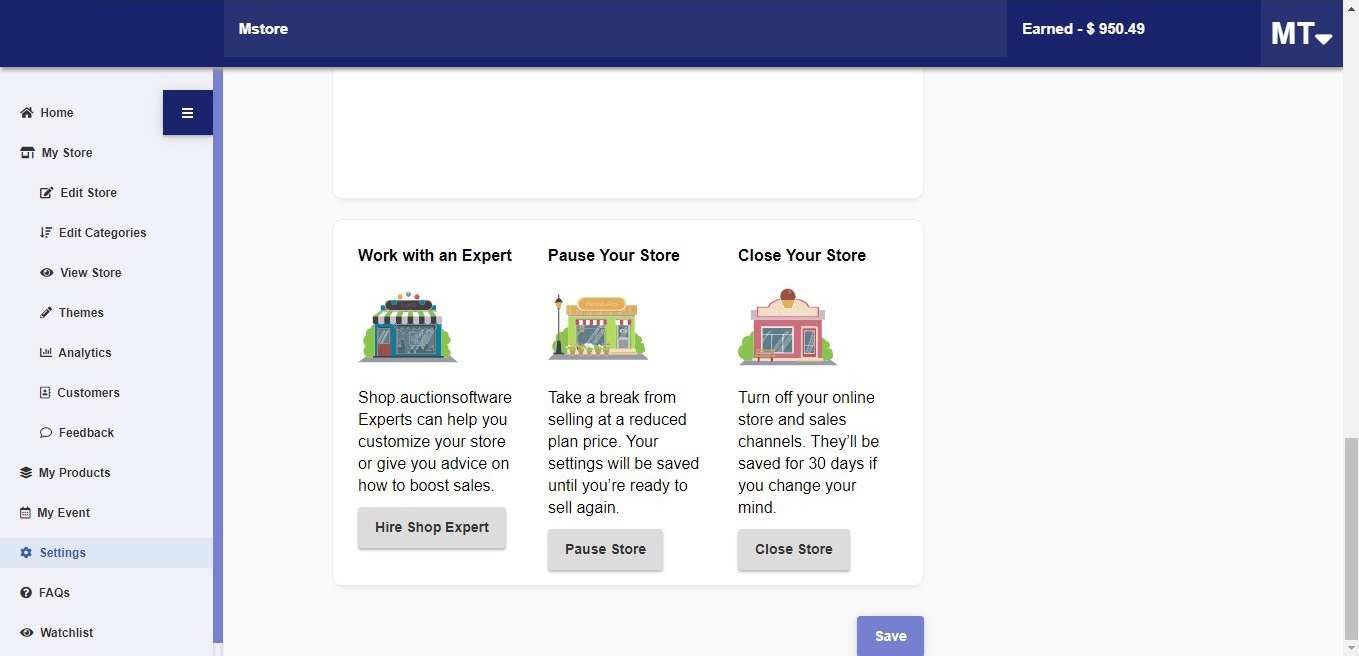
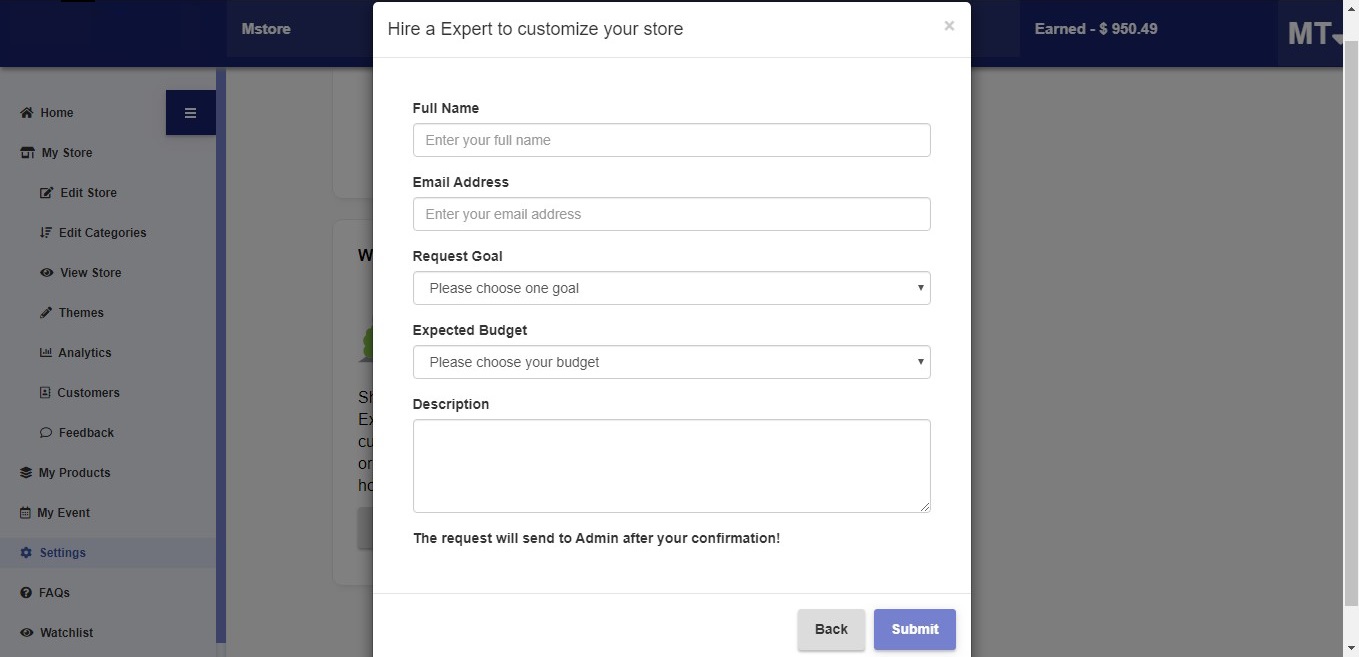
- Work with an Expert
- Experts can help customize your store or advise on how to boost sales. Click on “Hire Shop Expert”, fill in your details in the pop-up that appears, and click “Submit”. An expert will get back to you soon with ideas.
- Experts can help customize your store or advise on how to boost sales. Click on “Hire Shop Expert”, fill in your details in the pop-up that appears, and click “Submit”. An expert will get back to you soon with ideas.
- Pause Your store
- Sellers can take a break from selling without closing their stores completely by clicking on “Pause Store”. Customers will be able to view the products but not buy them. After pausing the store, the button will change to “Restart Store”. Clicking on it will restart your store with the same settings as before.
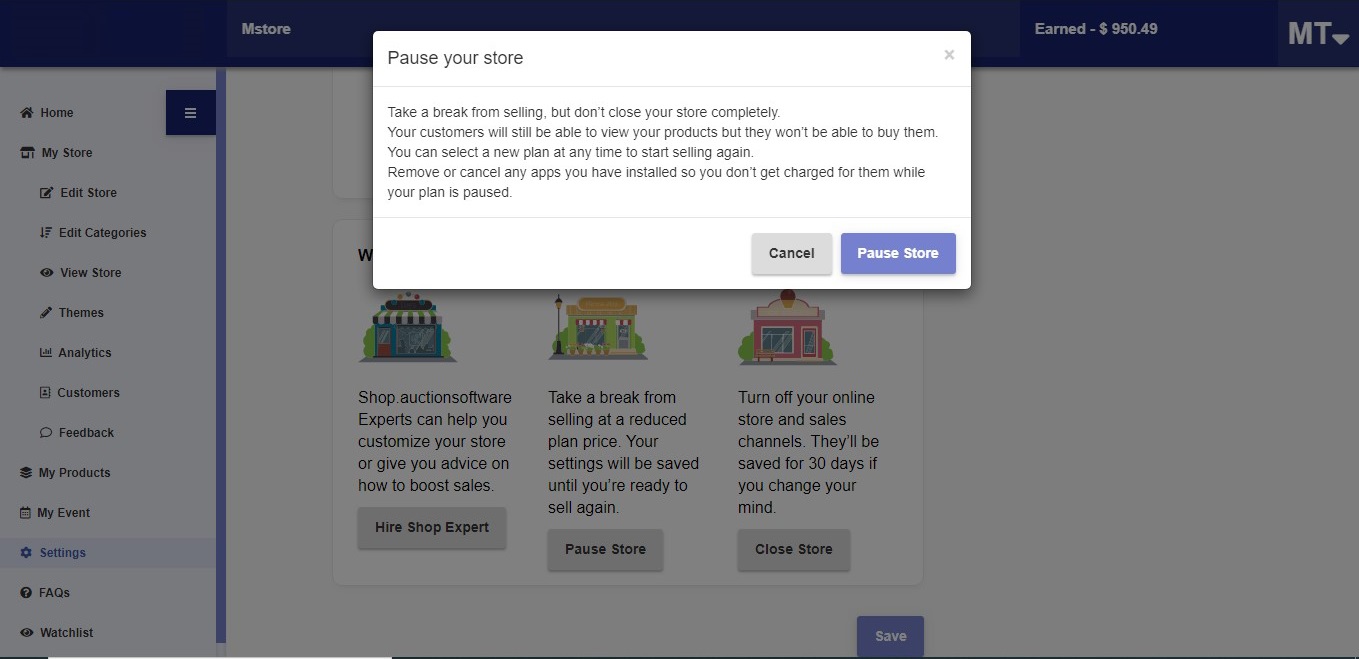
- Sellers can take a break from selling without closing their stores completely by clicking on “Pause Store”. Customers will be able to view the products but not buy them. After pausing the store, the button will change to “Restart Store”. Clicking on it will restart your store with the same settings as before.
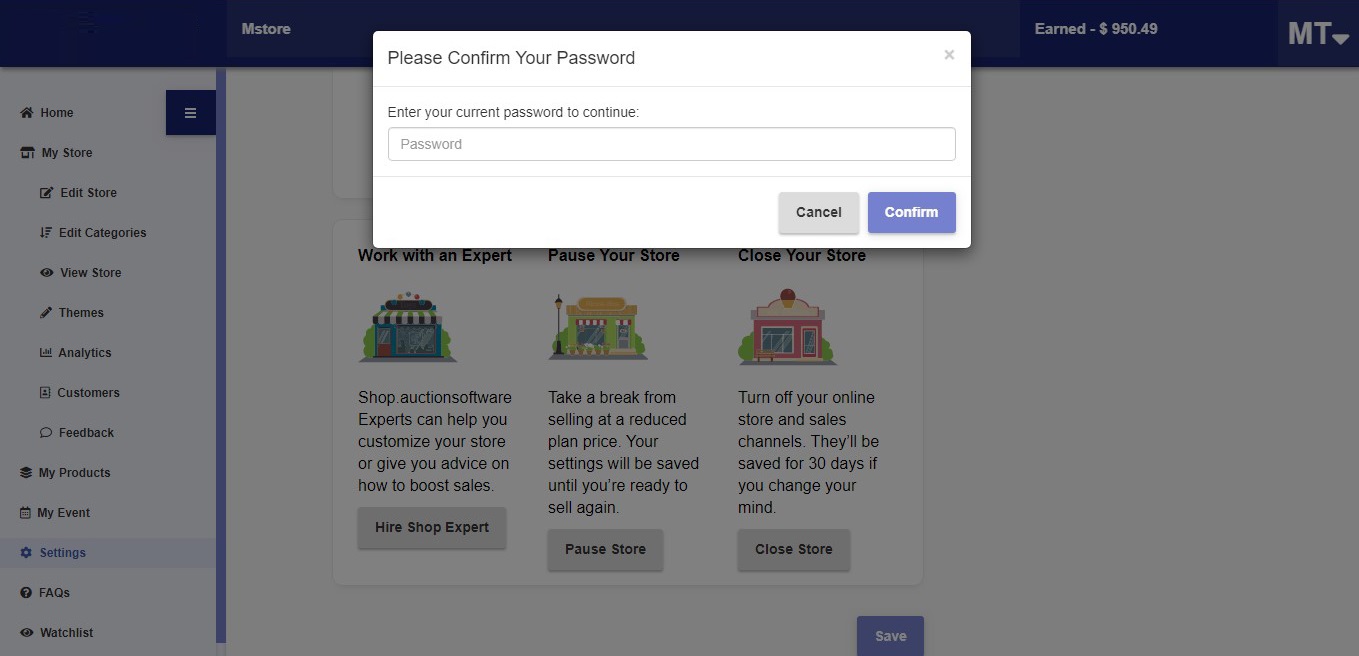
- Close your store
- To close the store, click on “Close Store”, enter password and click confirm.
- Give a reason for closing the store (optional) with an option to get help by email or call.
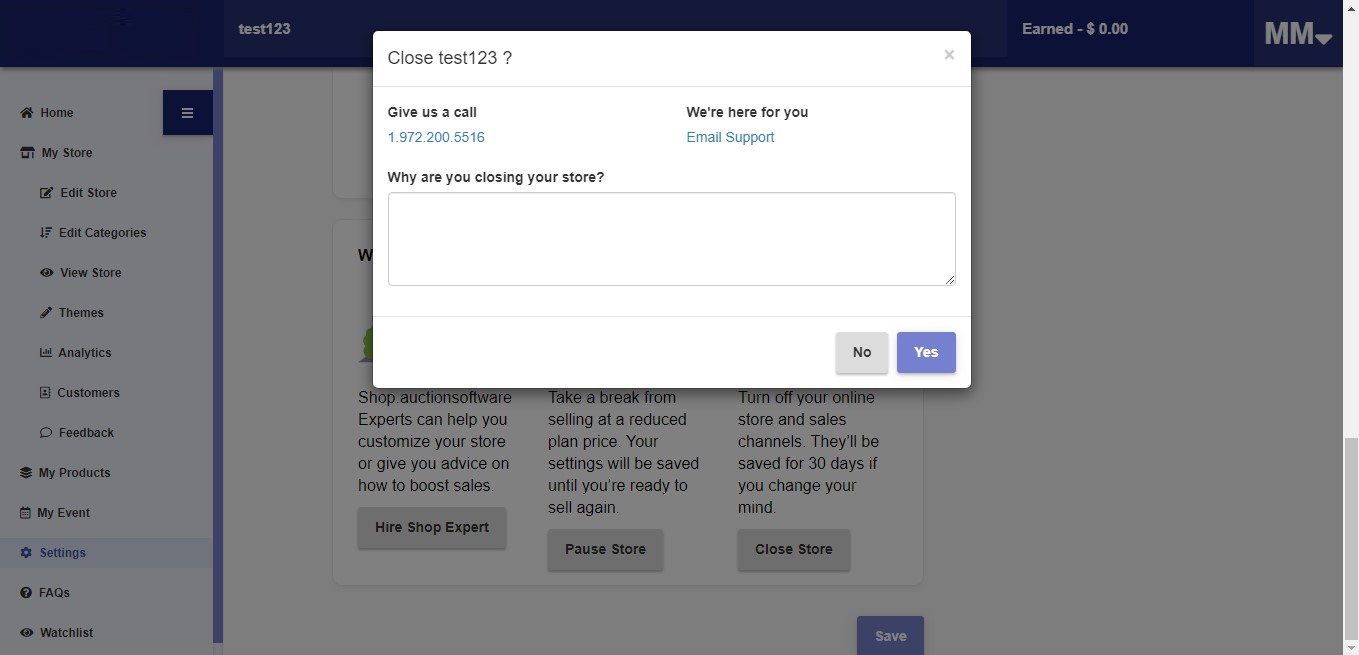
- Clicking on “Yes” will load the store settings page. Sellers can view, edit or reactivate their stores here. Logging out will close the store permanently.

- To close the store, click on “Close Store”, enter password and click confirm.
5.4.7 eBay Settings
- Connecting the store to eBay will be added soon.
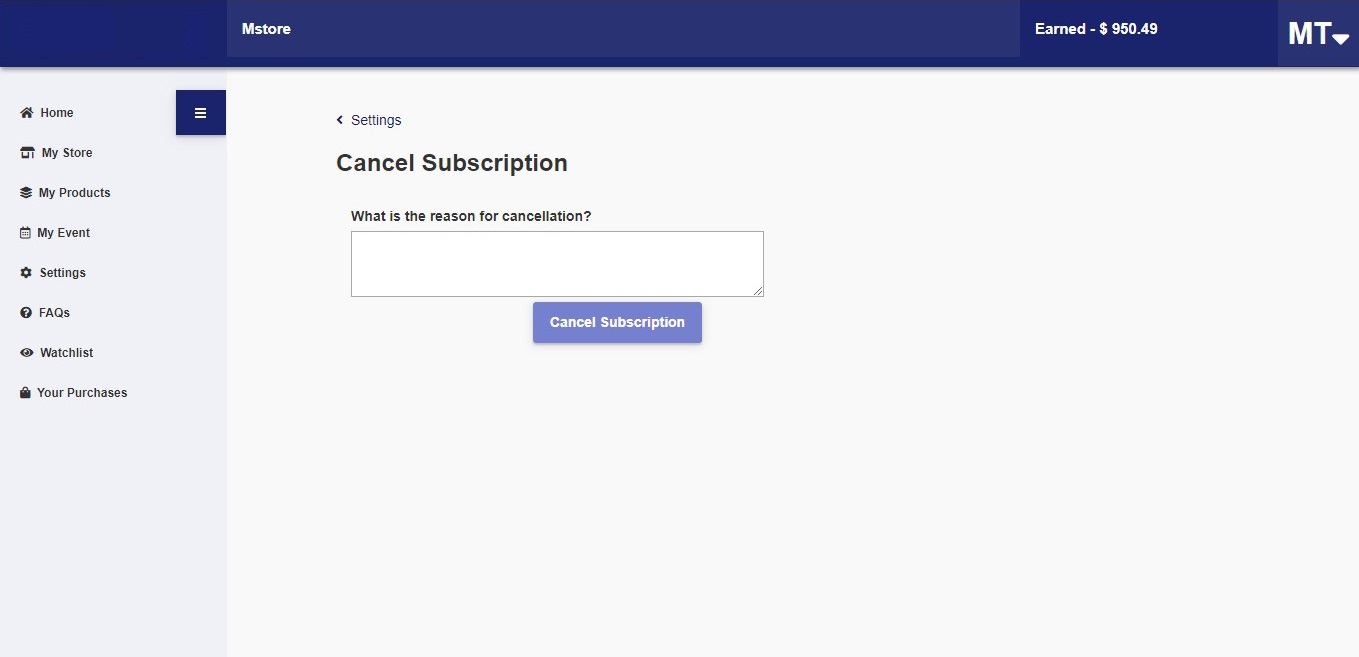
5.4.8 Cancel Subscription
- Clicking on “Cancel Subscription” will ask for the reason for canceling subscription.
5.5 FAQs
- How do I add my Paypal address?
The “PayPpal Settings” option is under “Settings” in the dashboard. Here you can click on “Connect with PayPpal”, enter your email address, country/region and password. Then select “Go back to your facilitator’s store” to go back to the store. Sellers cannot list products without connecting their PayPpal account.
- How to Cancel my Subscription?
You will be asked to subscribe to any one of the membership before registering as a seller. If you want to cancel the subscription, In Your dashboard you can find settings, Go to settings there you will find “Cancel Subscription”. Clicking on it will take you to cancel subscription page there you have to give the reason for canceling the subscription and click on Cancel Subscription Button. A confirmation popup will be displayed by clicking on “ok” will successfully cancel your subscription.
- How to create store?
Sellers can create their own stores in just 3 simple steps:
1.Fill all the mandatory fields to complete the registration.
2.Fill in the address fields
3.Enter credit card information
- How to Create Event?
Creating an event is same as store. In your dashboard on the left menu you will find “My event” then Click on create Event and fill the following details to create the event. After filling all the fields and click on save. Event will be created. You can also share the event URL to the buyers.
- Why should I add Categories?
Categories help in classifying different types of products and displaying products in an easy-to-find and user-friendly manner in the store.
- How can I Donate to Charity?
For donating to charity, clock on “Donate Here” option on Event View page or during checkout.
- How to create Discount in my Store?
Discounts can be offered on individual products or entire categories to particular or all buyers via special codes. The process of creating and sharing discount codes is explained in 5.2.5 Create Discount.
- Can I Pause my Store and How?
Sellers can take a break from selling without closing their stores completely by clicking on “Pause Store”. Customers will still be able to view the products but not buy them. Your settings will be saved until you’re ready to sell again. After pausing the store, the button will change to “Restart Store”. Clicking on it will restart your store with the same settings as before.
- How to Improve my sales?
Experts can help you customize your store or advise on how to boost sales. Go to settings in the dashboard, click on “Manage Account, and find “Hire Shop Expert” at the bottom of the page. Fill in the requisite details and someone will get back to you soon with ideas.
- Why should I have a staff to my event/store?
Adding 1-2 staff members to stores or events helps when the owner is unavailable or busy. The staff can act as sub-owners and look after areas that the owner has given the permission for.
- How to add a staff to my store/ Event?
To add upto 3 staff members to your store or event, check 5.4.6 Manage Account.
- How do I change themes?
“My Store” has a long menu of themes. To change the current theme, select the one you like and click on “Set as Default”.
- How do I manage inventory in my products?
- How do I get reports for event and shop?
To get reports for an event or store, see 5.1.5 Analytics.
- How do i create Purchase sheet ?
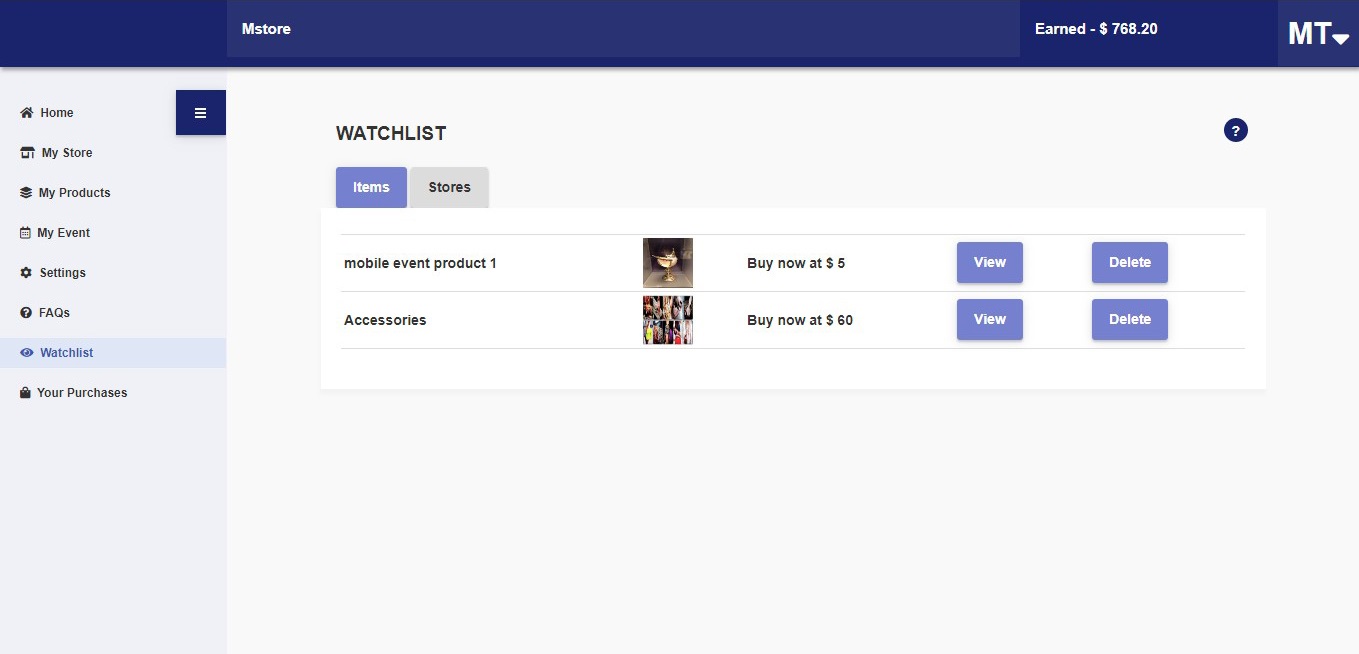
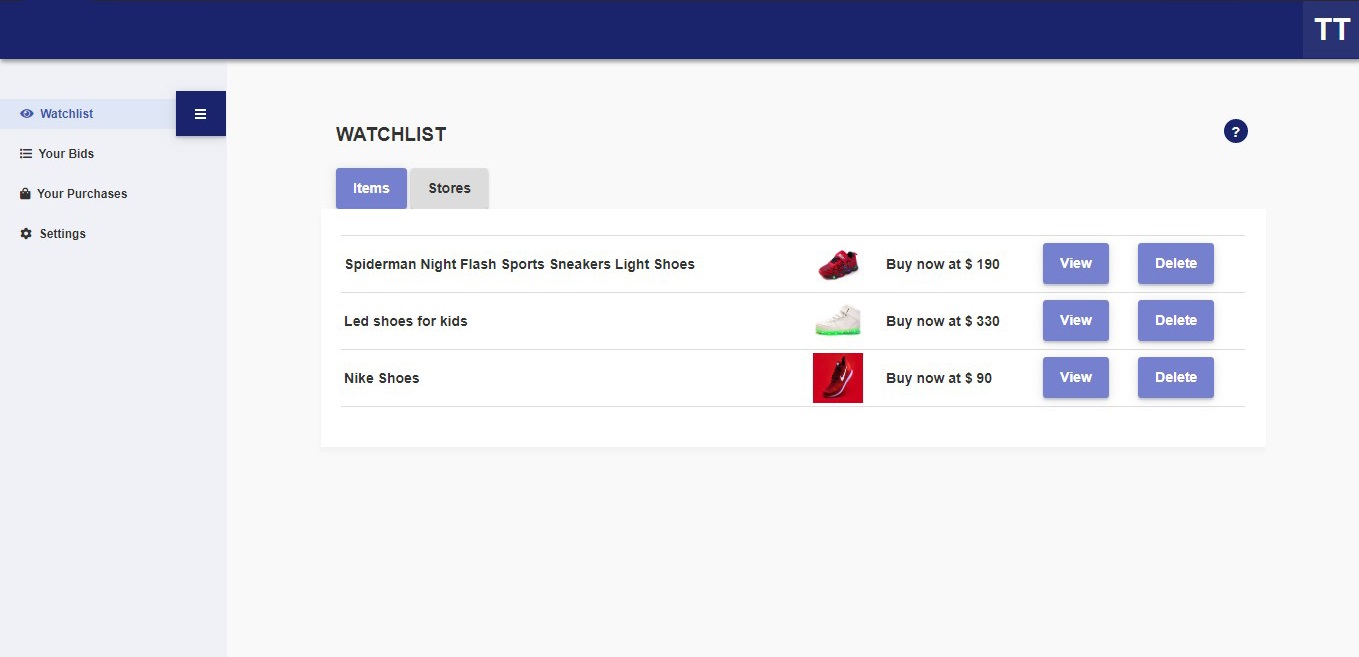
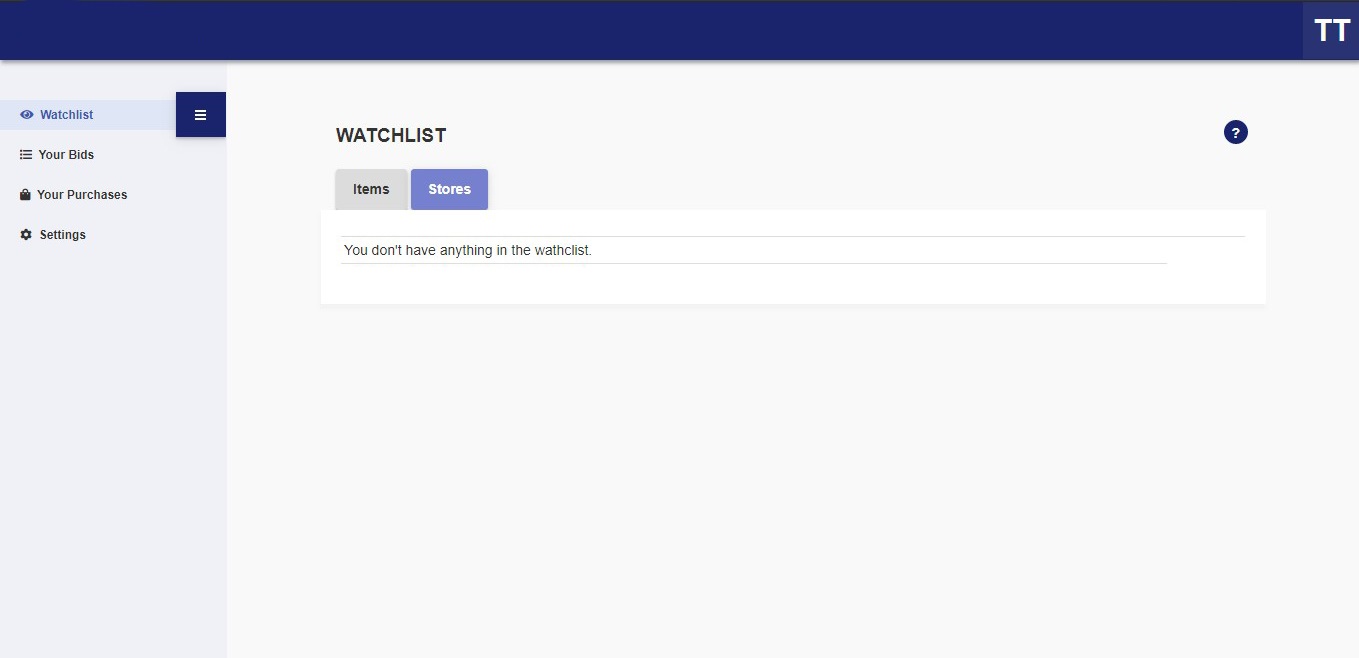
5.6 Watchlist
Items- Liked items are displayed in the Watchlist. Clicking on “View” will redirect to the product view page. Delete will remove the item from the watchlist.

Stores- Liked stores are displayed here. Clicking on “View” will redirect to the marketplace. Delete will remove the store from the watchlist.
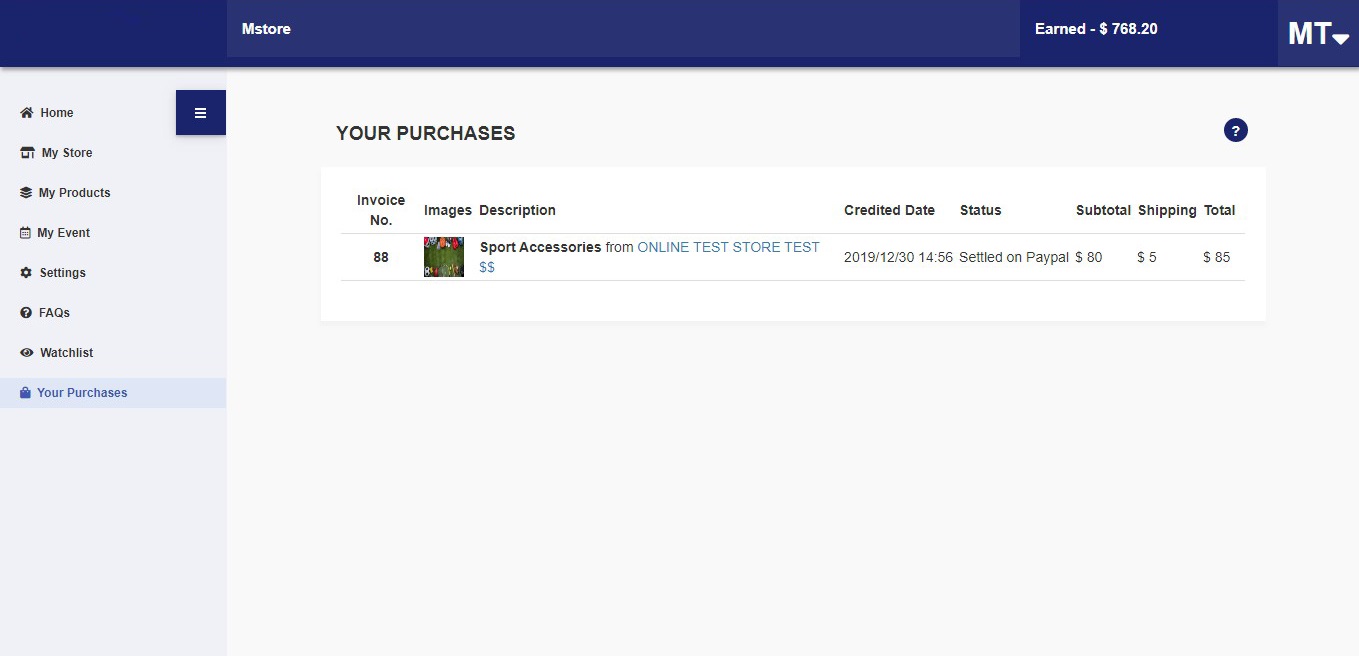
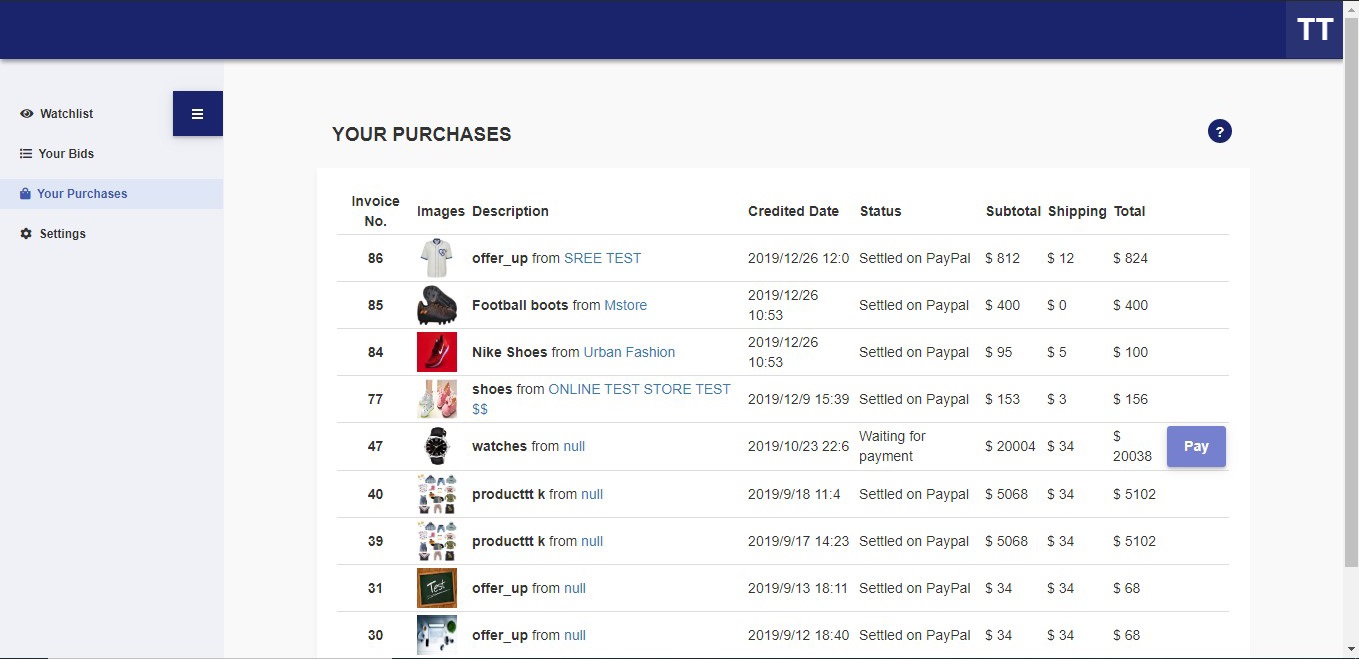
5.7 Your Purchases
Details of purchased products are displayed here along with payment details. Clicking on the item description will redirect to its store. If payment is not done, a “Pay” button will be displayed for completing the payment.
6. Buyer Dashboard
6.1 MarketPlace
- Select products, shop or events from the dropdown menu and search for products in the search box.
- Sorting options like “All”, “Shops”, “Events” and “Category” are also available.
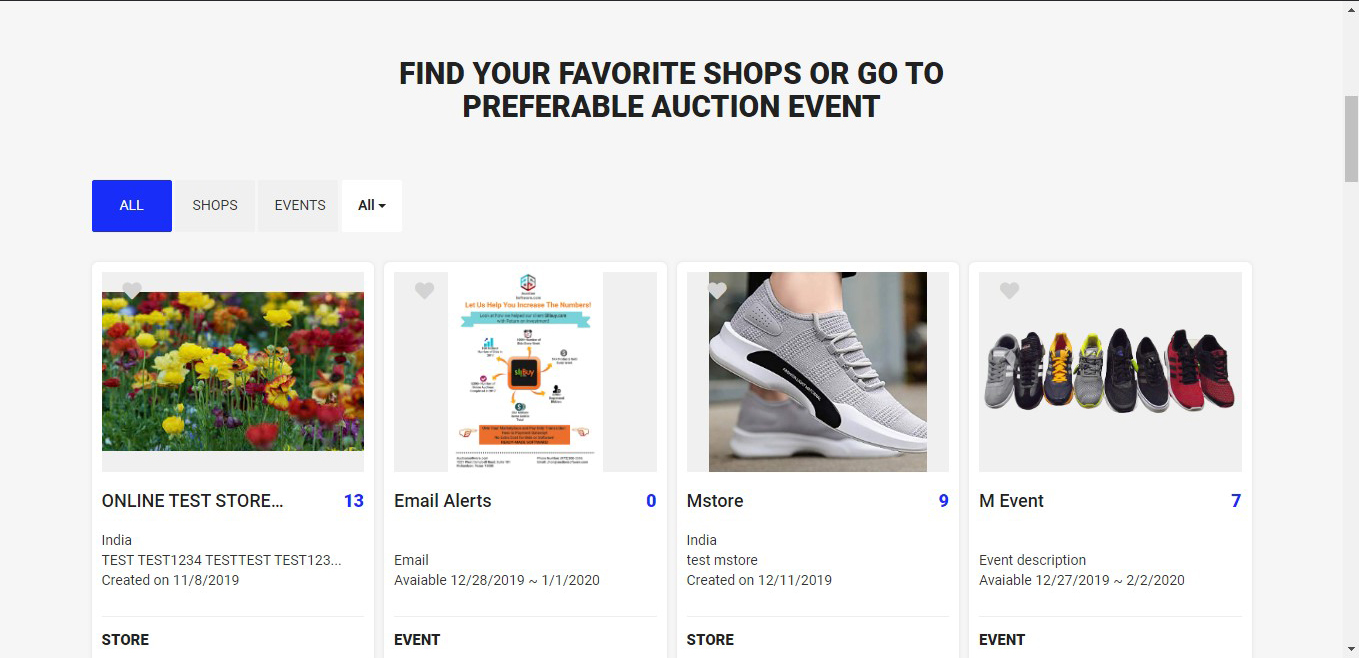
- The footer displays the store’s/company’s address along with a Google Map.
6.2 Watchlist
Items- Items that you liked will display in watchlist. Clicking on view will redirect to product view page. Delete will remove item from watchlist
Stores- Items that you liked will display in the watchlist. Clicking on view will redirect to the product view page. Delete will remove item from watchlist
6.3 your purchases
Purchased products are displayed here along with the product and payment details. Clicking on the item description will redirect to its store. If payment is not completed, a “Pay” button will be displayed to complete the payment
6.4 Settings
6.4.1 Personal profile
- This contains User Information and shipping Details. We can edit the details.
6.4.2 Reset password
We can reset password by giving old password, new password, confirm password and click on “Save” button,

7. Buy now
7.1 Buy now
- If the product is offered with Buy Now options, buyers can click on “Buy Now“ to make the payment and immediately buy the product.
- Alternately, if the highest purchase equals or exceeds Buy Now price, then the “Buy Now” option disappears.
- Payment Dashboard Once payment is completed, it will redirect to the Payment dashboard.
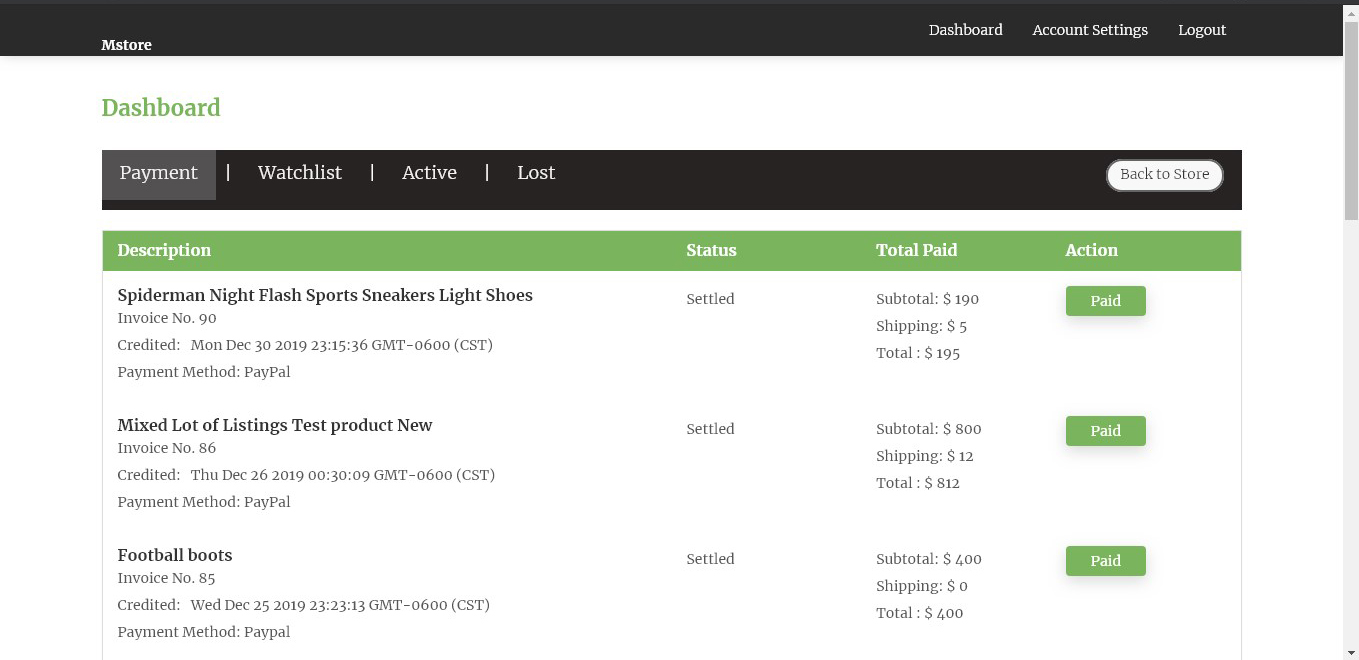
- Payment - Displays transaction details like Product Description, Status, Total Amount Paid and Action.
-
Watchlist- Displays the items that you have added to your watchlist.
Active- Displays all the active products that are live.
Lost- Displays products that you have lost.
7.2 Only Buy Now
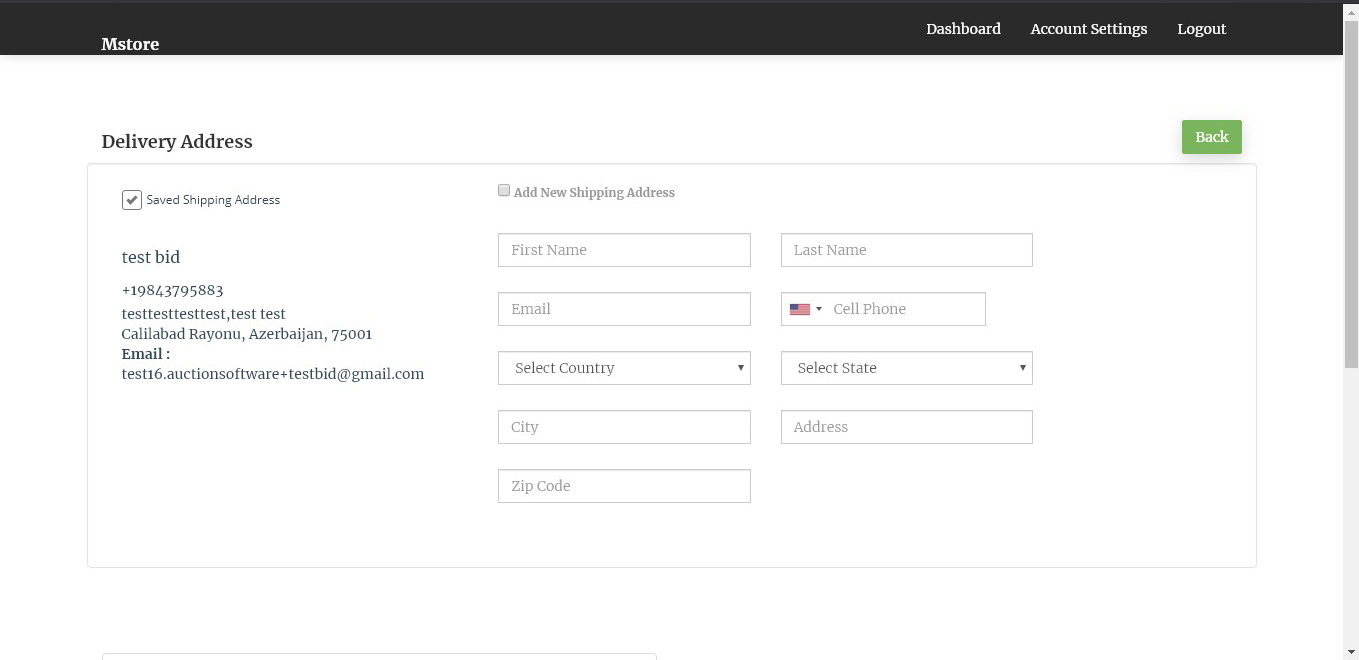
- If the product is only Buy Now, then you can see “ Add to Cart” option to buy the product after entering the required quantity. The button will change to “View Cart” .
- Add New Address - Enables changing the shipping address.
- Continue Shopping - Redirects to the event/store where you can browse and add some more products.
- Continue shopping will redirect to event where you can add some more products.
- Then you can make payment.
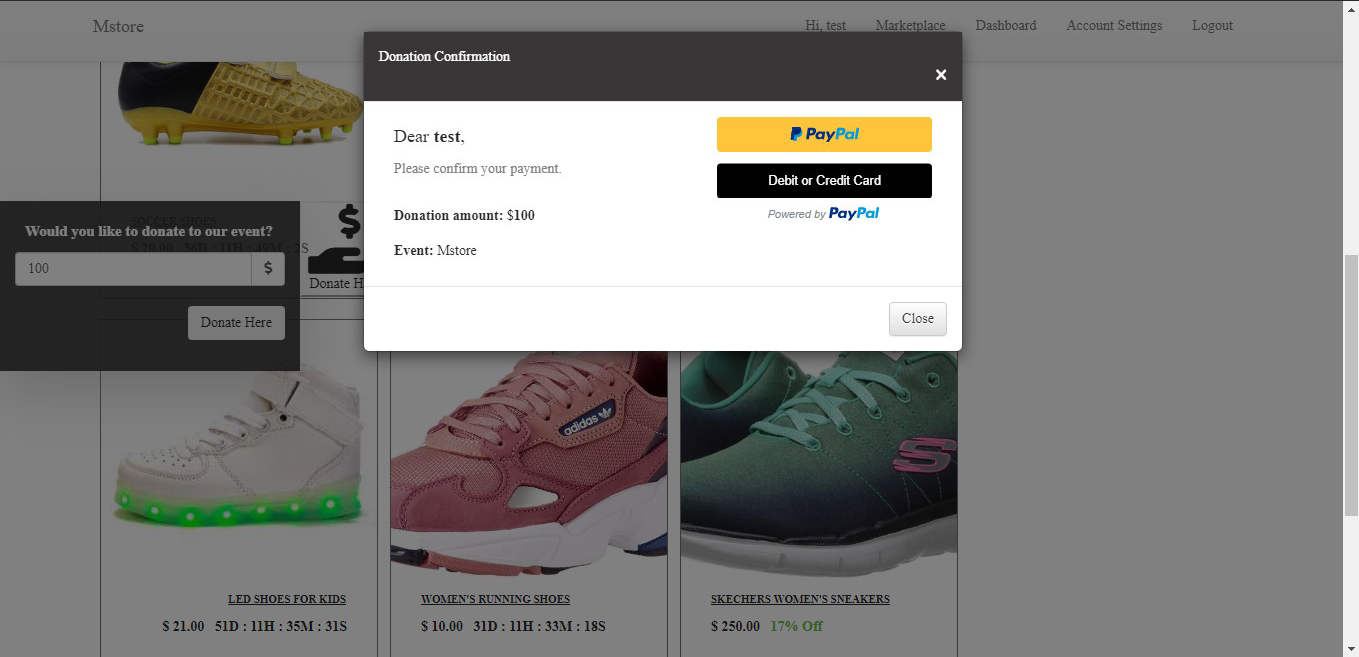
8. Donation
- Donations can be made through events using the “Donate Here” option or in the Shopping Cart during checkout.
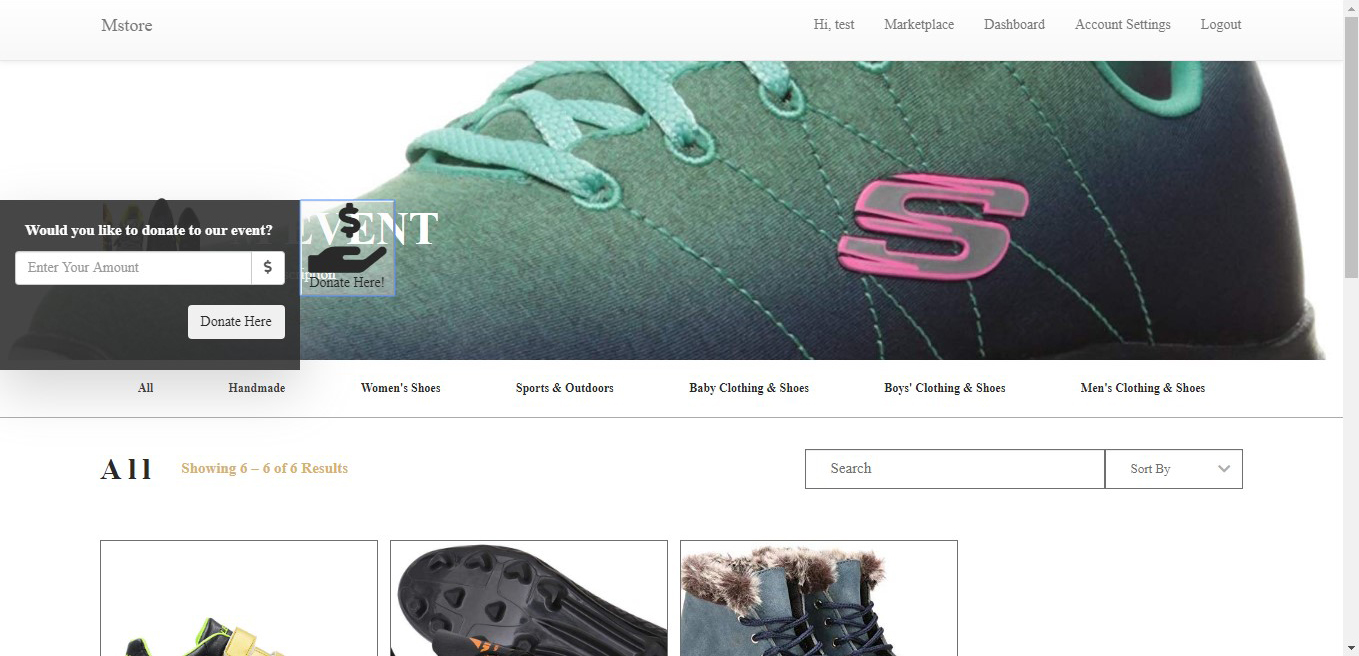
8.1 Donate directly
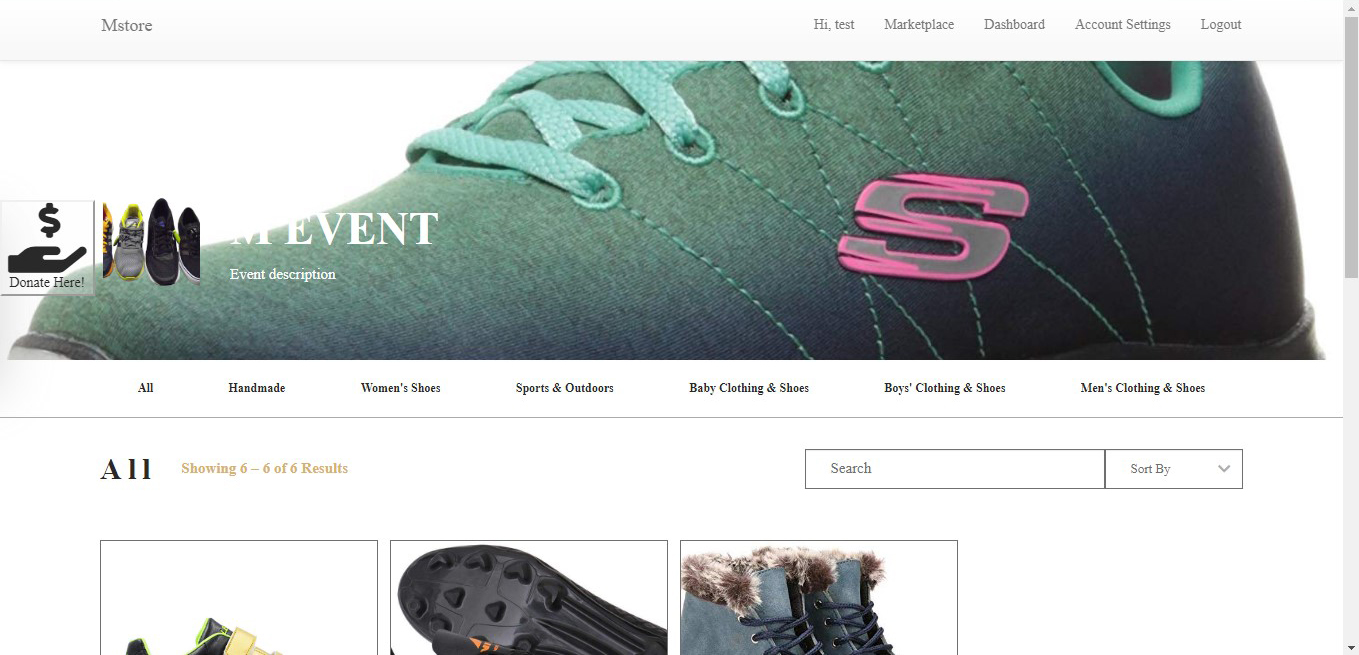
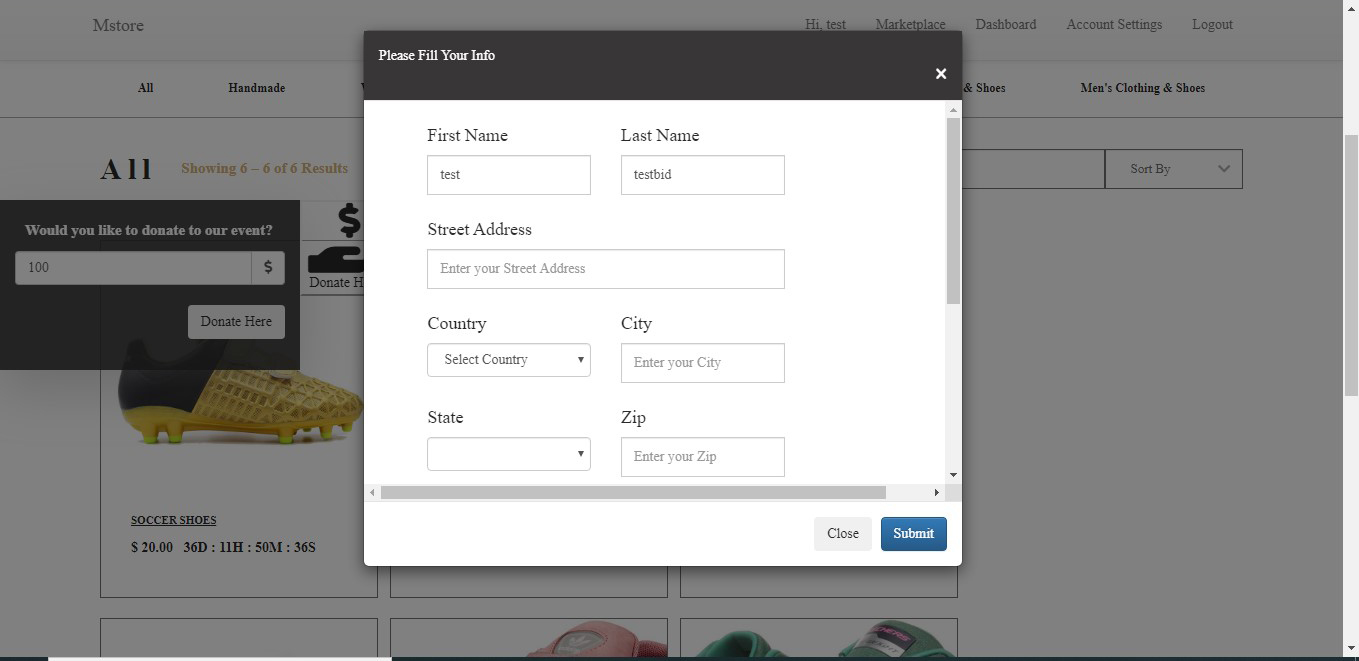
- Click on the “Donate Here” and enter the amount you wish to donate.
Fill in the required personal details details and submit the form.
”.
-
- A confirmation pop-up will display the amount and give an option to complete the payment via PayPal or Debit/Credit card.
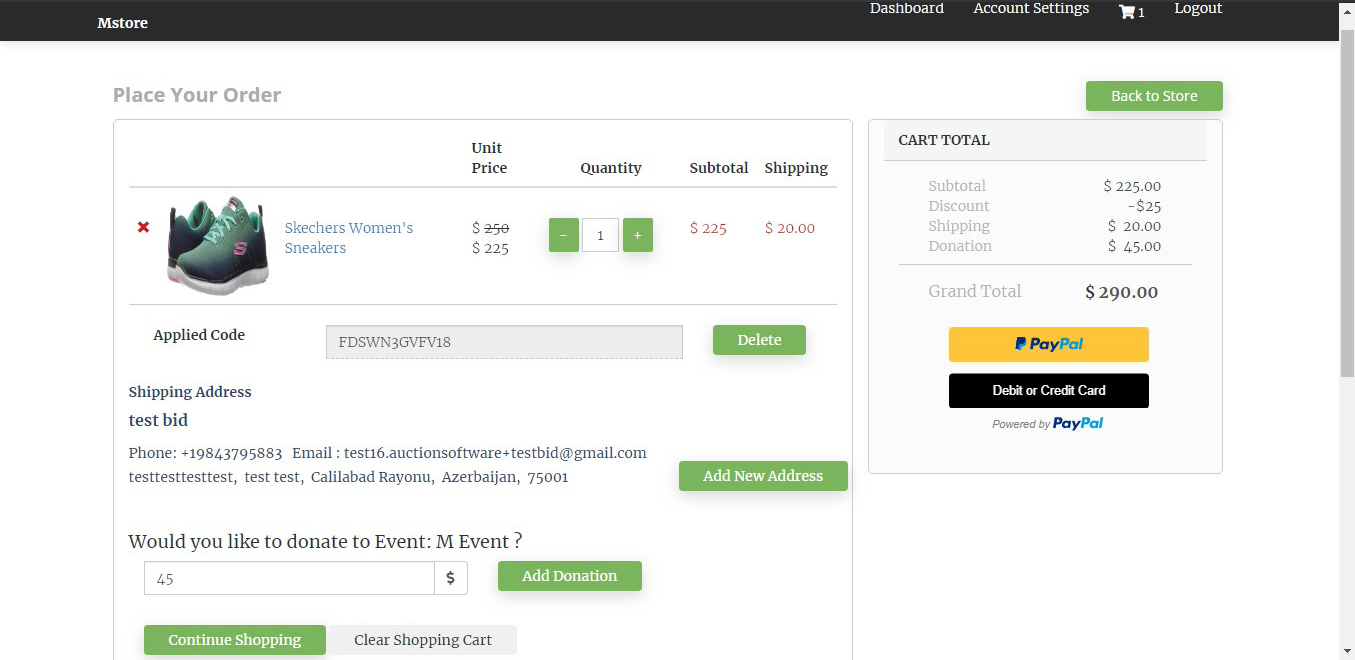
8.2 Donate during Checkout
- During checkout, the shopping cart shows the option “Would you like to donate to Event: Eventname?” Enter the desired amount and click “Add Donation”.

- Here you can find “ Would you like to donate to event?” enter amount that your going to donate and click “Add donation”
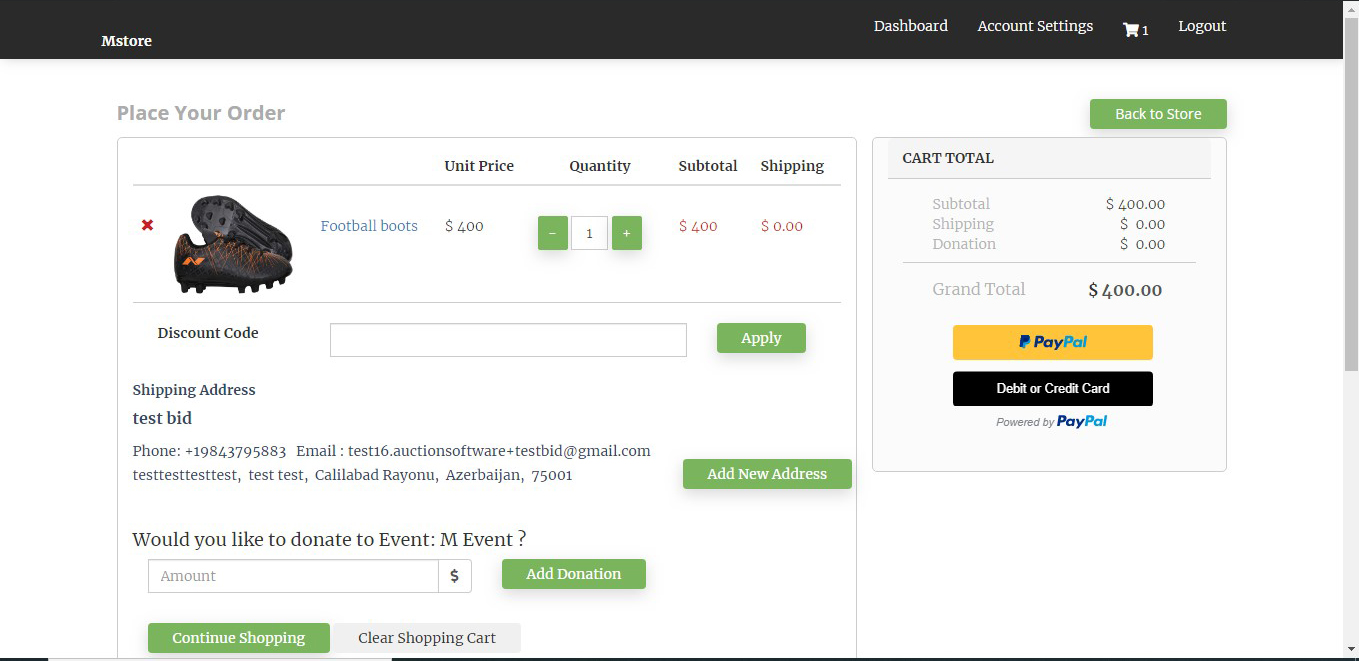
- Enter the amount that you are going to donate to the charity and click “Add Donation”. It will added in the grand total.
- By clicking on “Add new address” we can change the shipping address.
- Continue shopping will redirect to event where you can add some more products.
- Then you can make payment.
